Pages

Monday, 31 December 2012

New Year's Resolutions

It's that time of year again! Time to start thinking about New Year's Resolutions.  And since this is a dual purpose blog, about my cooking and my crafting, I'd better make resolutions for both aspects of it.

If you have been with me since the early days of this blog, early in the summer, you will know about my personal Too Much Stuff challenge.  I kept that up all year, apart from a few treats to myself in the last couple of weeks (and one of those was a CD of designs to help me replace one of my Mum's favourite pictures, which she has lost, so I was buying that for HER really wasn't I?).

I've also take part in lots of bcraft challenges on various blogs, but many of them I've only joined in once or twice. I go back every week to look at the new challeges and admire the entries, but somehow I never quite finish my own entry in time.

So my 2013 craft resloutions are two:
  • keep up with the Too Much Stuff challenge
  • without buying lots of extra Stuff, join in more challenges and take part regularly

Now on to the food side of things. I have to confess that I tend to only blog about food when my husband is around because he is so much better at the photography side of things than I will ever be, so one of my resolutions is.... no, not to improve my own photography skills, but to remember to ask him to take photos for me, instead of doing my usual trick of looking down at my empty plate and saying "I was  going to ask you to take a photo of that.....".

More seriously, I plan to cut down on the amount of meat we eat yet improve the quality of it. We love meat, and will never give it up. There is an excellent butcher at the end of your road - and yet it is just too easy to buy a few special offer packs while in the supermarket and stick them in the freezer for later. Proper planning should mean I can get what we need at the butchers, and if the lack of special offers means I am paying more per portion, eating a couple of meat free meals a week will balance that out.

At the moment.  we probably eat an average of one meat free meal a week,  but it isn't a conscious decision to make it a weekly event, just a case of occasionally fancying something made with beans, or a mushroom risotto, an omelette or a stuffed marrow. Maybe we'll eat meat five days in a row - maybe we'll go without it for five days.

But, led by the contents of the weekly veg box, I plan to make AT LEAST one meal a week meat free, and ideally two or more. And my mouth is watering at the prospect......


Sunday, 30 December 2012

A savoury jelly

If you are a regular visitor to this blog, you will know that every year we have a roast ham joint on Boxing Day. I wrote about my plans here  and you can see this year's meal on my husband's blog, Mark's Veg Plot.

The day after Boxing Day, we had ham, egg and  chips  and there have been a few sandwich meals, but there was still plenty left. I'd also bought far more parsley than we needed for the parsley sauce, so I decided to make a rough and ready version of a classic jambon persillĂ©e - ham in a parsley jelly.


First I diced enough ham to fill a small bowl, then tipped it into a larger bowl and mixed it with chopped parsley before returning it to the small bowl. Then I estimated the amount of  liquid it would need to fill the bowl - it took around 350ml - and used bottled chicken stock concentrate to make a light stock, which I used to dissolve three sheets of leaf gelatine (the quantity you need varies according to brand - check the pack instructions). When it was cool and on the point of setting, I poured it over the ham and parsley and left it overnight to set.

A true jambon persillĂ©e would be made with a mixture of home made stock and wine, but when I have used ham stock in the past we have found it too salty, and my home made chicken stock tends to have so much flavour of its own it would swamp the taste of the ham. As for the wine...... well,  there was none "spare" (Hic!) but I don't think it really adds a lot to the dish in this case.


We've had this for lunch today with the remains of some salad,  home made pickled pears and some home made rye bread. And there's plenty left for tomorrow!

 
I'm submitting this to the No Waste Food Challenge at Turquoise Lemons -  where the challenge is Christmas leftovers.


Stamped on acetate

It's great to have a change from making Christmas cards at last, and I've been playing around with stamping on printed papers and on acetate. I've used a selection of K & Company papers, made into an easel card, and uses Stazon  inks to stamp both the backing paper and the acetate. I thought making a very raised dome was a good idea  - and it does look good, giving a lot of depth to the design - BUT I've just realised I intended to send this card by post, so now I'm going to need to make a matching box!


Saturday, 29 December 2012

Pear Tarte Tatin

Are you bored with Christmas food yet? Have you got some pears left going soft in the fruit bowl? And a sheet of ready-rolled puff pastry in the freezer? What about a quick and easy pear tart to brighten up this miserable, wet, windy day?

You will need a small (18cm) frying pan that is oven safe - if you aren't 100% certain your pan handle won't scorch, wrap it in foil before you put it in the oven - and as well as the puff pastry and a couple of pears, about 30g of butter and a couple of tablespoonfuls of brown sugar, golden syrup. maple syrup - whatever you have to hand. In my case, I used Sweet Freedom syrup to make the dish less of a diabetic nightmare.

Heat the oven to 200 C (180 fan) - that's 375 F or gas mark 5. Cut the pastry into a circle, using the top of your pan as a template.  Peel and core the pears and cut them into wedges.  Heat the butter and sugar/syrup in the pan on the hob until bubbling and starting to caramelise, then remove from the heat, arrange the pears in the pan and place the pastry over the top making sure the caramel is all covered.

Bake for 20-25 minutes until the pastry is well risen and golden. Leave to cool in the pan for around 5 minutes then invert onto a serving plate. Best eaten warm but not piping hot.


Wednesday, 12 December 2012

What's in the basket?

Several times, when writing about cookbooks, I have mentioned the basket of recipe books I keep under the kitchen sink, and it always elicits comments or tweets asking me "What's in the basket?"

Well, the most-loved, oldest and most well thumbed members of my collection live there - the ones that are needed in the kitchen so frequently they never get chance to leave the room, but are no longer pretty enough to be on display.


First among the contents are the budget recipe books, dating back to when we were first juggling children and a mortgage, or even to student days. They include:

Frugal Food by Delia Smith (1976)
The Pauper's Cookbook by Jocasta Innes (this is a 1984 copy, but it is my third, the previous two having been worn out - I bought my first copy in 1975)
More for your Money by Shirley Goode and Erica Griffiths (1981)
The Shirley Goode Kitchen (1986)
Goode for One (1987)


Next a few Indian and Chinese recipe books. Not, apart from Madhur, for authentic dishes but for the kind of thing that brings back memories of cheap student meals out in the 1970s.
 
Quick and Easy Chinese Cooking by Kenneth Lo (1973)
Indian and Ceylon Cooking Made Easy by Anil de Silve-Vigier (1972) - this book is price marked 20p but being an impoverished student I waited until it was half price in the sales.
An Invitation to Indian Cooking by Madhur Jaffrey (1978)
An Indian Housewife's Recipe Book by Laxmi Khurana (1985)
The Curry Secret by Kris Dhillon (1991)
 
 
A selection of promotional baking booklets from Be-Ro, Allinson and McDougalls - these are not dated but the Be-Ro books are editions 38 and 40.
 

And finally, the instruction manuals/recipe books for my Actifry and slow cooker, along with, rather inexplicably, a packet of Dylon Colour Catcher sheets - I was wondering where those had got to!
 

Less is more #97 - In a Row

It's a one layer challenge over at Less is More this week,  and the theme  is "In a row"

When I first started playing along, one layer cards scared me witless (I said WITless) because when you make a mistake have a happy accident there is nowhere to hide, but I've gradually got into the habit of planning ahead and using a stamp positioner, and now the challenges don't seem as daunting.

My items "in a row" are skycrapers, and I've used them to make a sunset scene. You can tell eveing is coming because there are lights on insome of the windows!

Monday, 10 December 2012

Pickled Pears

This week's fruit box included lots of pears - well over 1kg of still-firm but beautiful specimens. Since we still had a few ripening from last week's box, I decided  to make a treat for my husband  - pickled pears, one of his favourite accompaniments to cold meat.

First I prepared the lightly spiced vinegar syrup. I used a 500ml bottle of white wine vinegar, 600g of granulated sugar, and a cinnamon stick and a few cloves tied in a piece of muslin  J-cloth, bringing it slowly to the boil to dissolve the sugar then removing from the heat and setting aside for the spices to infuse.

Next the peeled, cored and quartered pears were poached gently in water until soft but not falling apart - it took about an hour.

 
Next, I drained the pears and added them to the spiced syrup, and cooked them again, this time for about 40 minutes, until the pears had turned translucent. Just look at the lovely pink colour they acquire! I'm not sure how  white pears,white vinegar and white sugar combine to produce pink, but it's all part of the glorious alchemy of cooking.

 
Meanwhile I warmed some jars - far too many as I'd forgotten how much the pears seem to shrink during cooking. I lifted the cooked pears from the syrup and placed them in the jars, discarded the spices and poured over the syrup to fill the jars.
 

Now the hard part ...... ideally they need to be left for a month before eating, but I know that after Boxing Day's baked ham, Mark will want a pickled pear with his next-day cold  ham!

Thursday, 6 December 2012

A Comfort Dish for a Cold Day

Many years ago,my husband and I went for a short break in the Lake District  - it's so long ago that it was the first time we left the children with their grandparents and went away without them. Those children are nowin their thirties! We stayed at a tiny guest house, so small that they could offer no choice at mealtimes, and many miles from the next place to grab a meal,so wwe were stuck with whatever was served.

And one evening we both groaned in  disgust when we saw steak and kidney pudding on the menu. Apart fromthe fact that neither of us likes kidney, we both had childhood memories of grey, flabby suet pastry enclosing tough, grisly meat.

So we were both surprised and delighted by the light, crispy, golden pudding set in front of us. OK, we still had to pick the bits of kidney out, but the beef was tender and unctuous, the gravy rich and comforting. Wonderful! So wonderful that we asked how they had made it so much better than any other we'd ever tried. "The secret, " we were told, "is to steam it for at least 5 hours, whatever your recipe says."


When we got home I checked several recipes- most gave a cooking time of around two  hours. So I tried one, cooking it for five hours instead and leaving out the kidney. It has become a firm family favourite, and an ideal winter dish. I know it means starting to prepare it a long time in advance - ideal for me as I work from home so I can take a few minutes (and a few minutes is really all it takes, probably less time than it takes to read the recipe!) to put it together early in the afternoon and then just leave it to look after itself for the rest of the day. Totally imparctical if you get home from work at 7pm and want to eat at 7.30 though! But there are always weekends.....

So this is how I make it. This pudding serves 3-4 and can be made in a 1-litre pudding dish, which should be well greased.  You will need a deepish steamer, the kind that sits on top of a pan of boiling water.  Bring the water in the pan to the boil while you prepare the pudding.

For the filling, you will need about 500g of stewing beef, trimmed. Pop it into a plastic bag with a heaped tablespoon of plain flour and plenty salt and pepper, and give it a good shake to coat the meat.

Now take 200g of self raising flour, 100g of shredded suet and a pinch of salt. Mix them all together then stir in enough cold water to give you a pliable dough. Roll it out into a circle - for the size, try to picture your pudding basin "flattened out"  so that the centre of the circle would be in the middle of the bottom of the basin and the edges of the circle just beyond the rim.

Cut out a quarter of the circle and set it aside, then line the basin with the bigger part, sealing the edges  together with a little water. Now tip in the contents of the platic bag, surplus flour and all, and fill the basin almost to the rim with cold water.

Re-roll the suet pastry you cut away to make a circle to cover the top of the pudding, put on top and seal the edges with a little water. I usually just use the splashes  on the edge from when I added water to the filling.

Now take a square of  greased greaseproof paper about 20 cm wider than  the widest part of the bowl and  make horizontal and  vertical pleats in the middle. Place it over your pudding and smooth it down, then tie in place under the rim of the bowl with string and trim off the excess to about 2cm from the string.

Place in the steamer  and steam for at least 5 hours, remembering to check the water level in the pan and top it up from time to time. To serve, remove the paper and string, gently loosen the edges with a palette knife and invert on to a deep  plate or bowl.

I like to serve it with a winter vegetable like cabbage, sprouts or leeks,which canbe steamed in another tier of the steamer towards the end of the cooking time. My husband likes some boiled potatoes with it too.

Wednesday, 5 December 2012

Happy birthday Claire!

Today is the 40th birthday of the lovely Claire, who blogs (with some help from her cat)  over at Life, Ninja Killer Cat and Everything Else. 

I decided to make her a card using the Bookatrix. A  few years ago, you couldn't move for cards made with scoring boards, they were everywhere, especially the Bookatrix as the cards made with it have so much impact. Being the awkward beggar that I am, I hardly used my boards at the time, but now  they've fallen  out of general favour I use them a lot!

Here is the card I made for Claire, using  a selection of vintage style papers and a vintage topper, aged a little more with distress inks. The flowers are stamped, he leaves punched, and it is finished with paper lace, pearls and Candi.


Happy Birthday Claire!

Now, while I have your attention, I'd like to draw it to the amazing candy on offer at Crafty Individuals blog. There's a pic over there >>>>>> on my sidebar. Pop over and take a look at it!

Saturday, 1 December 2012

Less is More #96 - Red and Green

This week's challenge at Less is More is a colour challenge and the colours are red and green.

Naturally given the time of year, I thought of Christmas and here is my card - there's not much stamping on it as I wanted to let the paper speak for itself. I don't suppose Anna Griffin's papers find their way  on to CAS cards very often!

Friday, 30 November 2012

Boxing Day plans....

Being a greedy sort of family, we generally have TWO feast meals over Christmas. On Christmas Day, it is the traditional roast turkey with all the trimmings. On Boxing Day, we have a huge baked ham with new potatoes, roast parsnips, something fresh and green that we didn't have on Christmas Day (probably broccoli, it depends what's available), parsley sauce AND Cumberland Sauce. And we follow it with the mince pies and brandy butter that we didn't have room for  the day before.

Cumberland  Sauce, if you haven't come across it before, can be made quite simply by heating together roughly equal quantities of port, redcurrant jelly and orange juice together until the redcurrant jelly melts and dissolves into the liquid, then cooling to room temperature.

As for the gammon, we always have it with a richly caramelised brown sugar and mustard crust.


To make the coating, boil or roast the ham in your preferred way and then just before it is fully cooked, remove it from the oven and strip off the skin and most of the fat, then score the remaining fat into diamonds. Stick a clove into the centre of each diamond and then spread a thick layer of Dijon mustard over the whole surface and press as much Demerara sugar as will stick on to it all over the surface.
Then put the ham in a foil lined baking tray (if you don't use the foil, you'll end up throwing the baking tray away!) and put into a fiercely hot oven for around 30 minutes until you have a nice glossy caramelised surface. Stand and serve in your usual preferred way.


Here are the parsnips we had last year - home grown ones!

And then mince pies to follow (sorry about the tiny photo, Blogger is stubbornly refusing to allow me to resize it. I'll try again in a day or two when hopefully it isn't being such a sulky Blogger)

 
I'm joining in with Food Friday at Carole's Chatter

Tuesday, 27 November 2012

Great candy at Studio 12

Studio 12 at Polkadoodles has a £50 goody bag to give away this month, including CDs, stamps, promarkers and embellishments - follow the link to see how to join in!

Sunday, 25 November 2012

Food Glorious Food

No, this isn't a recipe post (really must get back in the kitchen, but this cold wet weather turns me into a "meat and two veg" woman and that isn't awfully creative) but yet another craft one. Yes, I'm having a lovely weekend crafting - so very relaxing and it stops me from looking at the saturated ground outside and sighing!

I'm really enjoying making this year's Christmas cards as I've gone in for such a wide variety of styles. I've been making them all yesr too, so what a pity I've only recently found the Winter Wonderland blog.

Anyway, I've found and followed them now and this week's challenge is Food Glorious Food. To my surprise, the only Christmas food themed goodies I had were a Christmas Pudding stamp and backing paper, so here is my take on the theme. I am entering it into the Food Glorious Food! challenge at Winter Wonderland

Singing the Blues

Several of my friends and family have birthdays in December - several MALE ones. And I need to make cards for them. I can hear 90%  of you groaning - cards for men are so hard to make, especially men who don't like the traditional male card themes of booze, sport and fishing. But all the men in my family appreciate landscapes, and I like to create a wintry looking scene that isn't specifically a Christmas card. I reckon that way they can sneakily carry on displaying their birthday cards right through Christmas and make it look as if they had more Christmas cards than usual!

 
So here is a card I have made with that in mind. I die cut the circle and stamped the scene, then masked off the scene and the card below it and  also a circle for the moon. Then I sponged two shades of blue ink over the circle and blended them with horizontal strokes of a watercolour brush to create a wintry looking sky. Finally I highlighted the snow with touches of holographic glitter to reflect the blue.

I am submitting this to
 CAS-ual Fridays CFC79 Winter Blues
Addicted to Stamps and More CAS challenge 4
Addicted to Clean And Simple ATCAS #1 Snow

Saturday, 24 November 2012

Glamour and Glitz

With this card, I am joining in two challenges:

Less is More - 95 - recipe: Glamour and Glitz
Oldie  But a Goodie - Anything Goes

When I think of Glamour and Glitz, the very LAST thing I think about is "Clean and simple". My instinct is to pile on the bling! But of course glamour means fashion too, and I remembered some old peel-offs I bought when I first started cardmaking about 15 years ago.

Isn't it funny, as crafting newbies there is a temptation to rush out and buy armfuls of peel offs. Then you get them home and wonder what the heck to do with them! Once you are an established crafter, you find that the ones you use most often are borders, corners and words, yet you can't bring yourself  to part with those early purchases.

So this dress is definitely an oldie but a goodie. In fact I think it is a great credit to the manufacturer  that after all this time the adhesive on it still works as well as if it had been brand new.

Actually everything on this card is at least a year old. The grey card I used for the band across the middle was also one of my first purchases, I just KNEW it was going to come in handy one day. The paper I used for the dress was from a prize I won from a craft magazine last year, and the pink glitter card from a bundle I won last year. The shoes are from a RAK I received the Christmas before last and the sentiment was a freebie in a craft magazine absolutely years ago. Everything comes in useful if you hang on to it for long enough!


CASology #20 - Gobble

The cue card this week at CASology is GOBBLE. Now here in England, very few of us celebrate Thanksgiving,  so the whole turkey thing doesn't happen. Well, it does, but at Christmas, and we  tend to go for snowflakes, robins and penguins (why penguins? Santa lives at the North Pole, penguins at the South Pole. There is, quite literally, a whole world of difference!) on our Christmas cards.

So if I wasn't going to use a bird that goes "Gobble! Gobble!" or a Thanksgiving feast on my card, what COULD I use? What do most of us love to gobble?

CAKE!!!!

So here is my interpretation of the cue card. With hindsight, I should have made the band across the card a few millimetres lower down. Looking at the photo,  it looks as if I was trying to get it across the exact middle and failed, when in real life it definitely looks  as if it's where I planned it to go  noticeably below the centre!


I'm joining on with this week's  challenge at CAS-ology

Sunday, 18 November 2012

Less is More 94 - Hardware

When I saw that this week's theme at Less is More  was hardware, I knew exactly what I wanted to make. I have some brads that look like screw heads and some decoupage of retro style ladies doing DIY. I would use the brads to attach a strip of woodgrain effect paper down one side of a cream card, then use the decoupage design to overlap the woodgrain and the white space.

But I looked in my brad box and there was no sign of the brads. I spent half of yesterday afternoon turning my craft stash upside down in search of the brads. Not a sign of them. "Never mind", I thought, "I'll use the decoupage and wood grain anyway, with some plain brads". So I opened my folder to remove the decoupage sheet - and found it bereft of designs apart from a couple of useful looking borders.

Yep, I'd already made the card  I had in mind for a male birthday last year, using up the brads and decoupage. No wonder I could picture it so clearly!

But while I was  searching for the missing bits of stash, I came across a box of metallic embellishments left over from a Hot Off The Press Christmas kit from several years ago - parcels, words, Christmas trees and reindeer, along with some bow and star brads for holding them in place. I don't know why I didn't use them at the time - I think they are so cute they need little else to set them off. Here are a couple of cards I've made with them.


Let it snow!

There's a new CAS challenge blog on the loose! It's called Addicted to CAS and the first challenge is snow.
Here's my snow-themed card. The snowflake is an acetate one I got in a goody bag a couple of years ago and I've never quite worked out what to use it for. I covered it with spray adhesive and white glitter, then stamped a snowflake border and greeting.


Sorry the photo is a bit blurred - I must ask Santa for a decent camera!

Friday, 16 November 2012

A Winter Salad

Oh dear, poor Onions and Paper - I've been neglecting you recently! I've been away to visit my Mum again, and the rest of the time I've been so busy my craft goodies are lying untouched on the table. In fact a half-made card intended for a  Less is More challenge two weeks ago is still glaring reproachfully up at me.

However we still have to eat, and one day this week I put together odds and ends left over in the fridge to make this colourful and tasty salad. The soft, sweet lettuces of summer are gone from the garden (and veg box) now, and have been replaced by the more bitter salads of winter - endives and chicories. In thefridge this week there were the remains of a radicchio  and a couple of chicons of chicory. On their own, that combination makes for a rather bitter salad,  but with a couple of sliced oranges for  sweetness and some walnuts for a warming crunch, the salad sprang to life.
 
This week for the first time, I am joining in with Foodie  Foto Friday  at The Crazy Kitchen
 
The Crazy Kitchen

Thursday, 8 November 2012

Spicy lamb bake

Last week I won a baking dish from a competition promoting minced lamb, so although it has a multitude of uses, it would have been rude not to include minced lamb on its first outing, wouldn't it?

Minced lamb always makes me think of Bobotie, the spicy South African dish that looks like a moussaka, tastes like a curry and feels like a meatloaf, so I dug out a   recipe for it. But it used raisins and flaked almonds, and I happened to fancy apricots and pistachios, so I played around with the ingredients and ended up with something that definitely wasn't Bobotie - the taste was  much closer to a Northern African dish, but still with the Bobotie texture.

Here's the recipe:


500g minced lamb
1 medium onion
2 cloves garlic
25 g butter
1 tbs white wine vinegar
1 tbs mild curry powder
1 tsp dried oregano
75g ready-to-eat dried apricots, roughly chopped
50g shelled pistachios, roughly chopped
Juice of ½ lemon
seasoning
2 slices white bread
250 ml milk
2 eggs

Tear the bread into chunks  and soak in the milk for about half an hour.

 Preheat the oven to 160 C, gas mark 3.

 Chop the onion and fry gently in the butter until sort and golden, adding the garlic when it is almost cooked. Cool slightly.

Squeeze the milk out of the bread, reserving it for later.

Mix together the lamb, onion and garlic, vinegar, curry powder, oregano, apricots, pistachios, lemon juice, seasoning, one of the eggs, beaten, and the bread. Pat into a medium sized ovenproof dish, smoothing the top.

Beat together the milk left from soaking the bread and the remaining egg. Pour over the lamb, then bake for around 1 hour until the meat is cooked and the top is golden.


The leftovers were delicious  cold the next day, with salad and chutney


Wednesday, 7 November 2012

Random recipes #22 - Birthday number

This month at Random Recipes, Dom suggested we should pick a book to cook from by counting along our bookshelves until we reach the date of our birthday. Now this is all very well if you separate your books by subject, but I don't, so counting along 13 books on the first shelf (my birthday is August 13th) brought up this little gem, which I've had since school days.


Assuming you don't want to know the atomic weight of Molybdenum or the square root of 397, I moved on to the shelf blow and counted 13 books along. Now I have a huge collection of exotic, interesting and historic recipe books from all over the world, yet the magic birthday system came up with.........

DELIA!!!


Actually this isn't my first copy of this book. When it was re-issued, I bought it to replace my old copy, bought in 1981, which is just about worn out (although I've not been able to bring myself to part with it yet)


Well-used, as you can see, so I thought I must have cooked just about everything in the book. Yet the random page it fell open at was a recipe I had never tried - Delia's version of home made pork sausages.


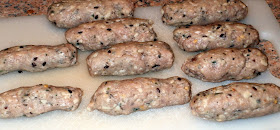
The only change I made to the recipe was to cook them in sunflower oil rather than lard, as  I no longer keep lard in the house. The sausage mixture was very obedient and easy to shape


And after frying looked quite appetising although rather dry.


We served them with mash, Savoy cabbage and onion gravy, and our verdict was that they tasted good but were, as we'd anticipated, quite dry.


I suspect that for health reasons, supermarket minced pork is very much leaner than it was when  Delia first wrote the recipe, and with no skins to keep the juices in, the result is a healthier but less appetising sausage. The ones my husband made based on a recipe in "Sausages" by Paul Gayler were far superior.

I am joining in Random Recipes over at Belleau Kitchen