Tuesday, 11 October 2016

Dinosaur Dreams

I really didn't think I would be joining in with Less Is More this week, because I went through all my sentiment stamps and couldn't find anything to do with dreams. And then I lifted out this Clearly Dinosaur set  to make a card for the "Five stamps or more" challenge at Inkspirational - and lo and behold, there was the perfect sentiment!  And as I was already planning to heat emboss my dinosaurs to make them stand out from the background, that's heat embossing at CAS on Sunday sorted too.


I'd originally planned to layer up the little scene, but now I was making a one layer challenge I masked the edges of the card off instead. And to make the little stegosaurus dream he was a pterodactyl, I found myself a peel off "thinks bubble" (I hope a peel off is OK on a one layer card - I checked the DT posts at LIM and one of them used enamel dots so I think a peel off should be OK!)

The two dinosaurs are heat embossed and coloured in with  water based markers - not Promarkers which would show through on the inside. Then I added the thinks bubble and masked off the dinosaurs and the bubble (using the peel off waste as a template for my mask) and stamped all the other elements of the scene, and coloured them in with pencils so the dinosaurs would stand out.  I used a total of nine stamps, because every element in the set is separate meaning that I can create a different scene every time I use them.

I'm disappointed with a couple of things though - firstly a couple of rough patches on the card that have made the stegosaurus look rather unevenly coloured, and secondly a tiny spot of ink that I got on the right of the card. I tried to cover it with an opaque white pen but it just seems to have made matters worse. Had it not been a one layer card, I'd have stuck something over it!

RECIPE: Left-Over Chicken Pie

We're constantly reminded to reduce our food waste, for the sake of our own purses and for the sake of the environment, and left overs are often a problem. When you've had a roast chicken, there's often meat left on the carcase, so you stick it in the fridge thinking it will get used in a sandwich, and the next thing you know it's gone dry and slightly smelly and is totally unappetising. Such a pity - a waste of meat, a waste of money, and I also feel that when an animal has been raised from birth to death solely in order for you to be fed, the least you can do to thank it is to make the most of it and enjoy every mouthful.

So, sermon over, here's an idea for using that left over chicken. It needs to go in the fridge as soon as possible once you've used what you are eating for your roast dinner - and if you have any gravy left, hang on to that too, you can add it to the stock you make with the picked over carcase.


Pick off all the chicken meat from the carcase and cut it into bite sized chunks - don't forget to turn it over and pick out the succulent "oysters" from beside the backbone. As you go along, chuck all the bones, skin and cartilage into a large saucepan to make stock. (For this, you can add the leftover gravy and whatever else you have around. I generally add an onion and a carrot, wiped and roughly chopped but not peeled, a stick of celery or some leaves from a celery plant in the garden, bayleaf, parsley and thyme, whatever you have around, peppercorns, cloves and a blade of mace. Cover  with water, simmer for 2 hours then strain, chill, skim and store in the fridge or freezer in suitable sized containers.)

Now, back to the pie. As well as your chicken, you will need mushrooms or leeks, puff pastry, milk, butter, flour and beaten egg. For two servings I used

A small cereal bowl full of cooked chicken
125g (approx.) sliced mushrooms
300ml milk
a knob of butter (about 30g)
a rounded tablespoon of plain flour
just over half a sheet of ready-rolled puff pastry
half a beaten egg
seasoning

Pre heat the oven to 220C (200 fan), 425 F, Gas mark 7
Unroll your pastry sheet (or roll out block pastry) and use the top of the pie dish to measure a piece for your lid, cutting it slightly larger than the dish. Pop the pastry in the fridge to cool while you make the filling. Grease the pie dish, including the rim.
Melt the butter in a large frying pan and fry the sliced mushrooms (or leeks) until softened. Remove from the heat and stir in the flour then blend in the milk, then return to the heat and cook, stirring constantly, until boiling and thickened. Mix in the chicken, season and turn into the pie dish.
Cut a slit or cross in the centre of the pastry lid and place over the pie (ceramic bird optional but pretty) then crimp the edges and brush all over with beaten egg.
Place in the oven and cook for about 25 minutes, until the pastry is risen and golden and the filling piping hot all the way through.


Now, as you are using reheated meat, here are some notes about food handling that really apply to anything re-heated
  • You should never reheat meat more than once, so don't make more than you will eat at one sitting.
  • For the same reason, don't prepare the filling in advance - the pie needs to go into the oven very soon once the chicken has been mixed into the sauce, and not stand around with the chicken keeping warm.
  • Use a ceramic or ovenproof glass dish, not a metal one, so the sauce doesn't burn on the outside of the dish, but choose a fairly shallow one so that the heat penetrates right through to the middle of the dish.
I know that a top-only pie is technically not a true pie, but it's easy and delicious and a meal we always look forward to. And you are guaranteed never to end up with the dreaded Soggy Bottom!

And finally, in case you are wondering about this leaving me with half an egg and half a pack of puff pastry, they went into the Bonfire Night Snacks that I posted about yesterday, so not a scrap was wasted.


I am sharing this with Kitchen Clearout at Madhouse Family Reviews

Time Flies at Cardz 4 Guyz

Today we have a new challenge for you at Cardz 4 Guyz, and this time the theme is "Time flies".

I had to think long and hard for this challenge - I have plenty of time-themed stamps and stash, but I wanted to somehow work the "flies" part of it in too. I didn't have any wing stamps that would fit any of my watch ones, so I decided to die cut a butterfly and use that. I hope you think that, by using a newsprint-effect card and not embossing the butterfly, I've kept it masculine enough for the card.


Once I'd decided that, I had a lovely time making this, delving into my snippets and stash, stamping, inking, scrunching and distressing to my heart's content. I used an old watch stamp and the Time background stamp I've used many times before - I think it originally came from Raindrops on Roses. The "Tempus Fugit" stamp was a magazine cover mount and as it translates to "Time flies" I absolutely HAD to use it.

The vintage aeroplane image is a repro cigarette card from Foil Play, the button, brad, wooden tag, washi tape and twine are from the dovecraft Curiosity Corner range, the corrugated card is from the packaging of a bottle of olive oil, the self adhesive cork strip was a pound shop find and all the papers are from my snippets box.

It's ages since I've made a collage like this and I'd forgotten just how much fun it is!

I am sharing this with

Classic Design Team Open Challenge - October
More Mixed Media - Anything Goes
Pixies Snippets Playground - week 250

Monday, 10 October 2016

Bonfire Night Snacks with Primula Cheese

We're already well into October and before we know it, November will be here - and that means Bonfire Night on November 5th. Properly known as Guy Fawkes Night, it commemorates an attempt to burn down the British Houses of Parliament, so it is essentially a British celebration, but  it is beginning to spread all over the world because we all love a good firework party - and while most of us would never condone destroying our governments in real life, I suspect most of us have a little voice at the backs of our heads saying "If only....."!

The lovely people at Primula Cheese sent me some samples to create some Autumn themed snacks, and I've used them to make a selection of simple snacks suitable to serve at a bonfire party. I've not given any exact quantities because I don't know how many people you've invited to your party - and with Primula, you can squeeze out exactly the amount of cheese you need!

Prawn Firecracker Toasts


Cut bread into fingers about 2cm x 7 cm. Toast one side under the grill. Turn the toasts over and use a tube of Primula Cheese With Prawns to pipe a line of cheese along the untoasted side of each and then sprinkle each one with a few sesame seeds. Return to the grill and toast until the edges are toasted and the cheese starts to melt. Drizzle with sweet chilli sauce and serve hot or cold.


Cheese and Chive Catherine Wheels


Pre-heat your oven to 220C, 200 fan, gas mark 7 and line a baking tray with non-stick parchment. Take a piece of ready-rolled puff pasty ( to work out how much you need, half a sheet and half a tube of Primula will make about 12) and spread it all over with Primula Cheese With Chives. Roll it up into a "swiss roll", sealing the final edge with beaten egg. Cut into 1cm slices and brush the outsides with beaten egg - only the flat sides, not he cut edges, or the pastry will get sealed and not puff up. Place on the backing sheet and cook in the pre-heated oven for around 15-20 minutes until risen and golden. Serve warm or cold.


Bonfire Night Potatoes


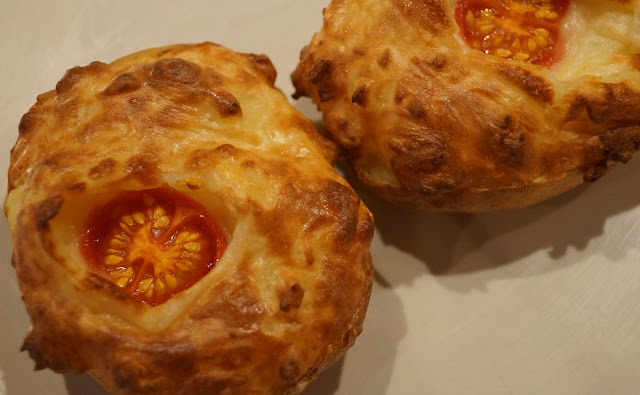
For these I have used very small potatoes to make snack sized portions, but you can make them larger to use as a post-firework meal if you prefer. Pre-cook your potatoes, in the oven, the microwave or even in the ashes of the bonfire, allow to cool slightly and then halve them and scoop out the flesh into a bowl, leaving the potato shells intact. Mix in Primula Cheese With Ham, allowing about half as much cheese as the amount of potato you have. Mash together well and then spoon back into the potato shells. Decorate the top of each with a slice of tomato (or a halved cherry tomato for snack sized ones).
To serve, place the halves on a baking tray and cook in a hot oven for 10-15 minutes until golden on top and heated through. If you have used large potatoes and are cooking them from cold, they will take rather longer - up to 30 minutes depending on the size.


Note- I was dent the Primula to try but all the ideas and other ingredients are my own.

Tea Time Treats

I am sharing this with Tea Time treats, hosted this month by Jo's Kitchen  and run by Jo's Kitchen, Lavender and Lovage and Travels For Taste

Shades of Autumn at Ooh La la Challenge Blog

You may remember that back in the summer I spent some time as a guest designer for the Ooh La la Creations Challenge Blog - well, I guess I did something right because I'm delighted to tell you that they've invited me back to join the Design Team. If you've joined in their last two challenges, you may have sort-of guessed that, as I've already done a bit of commenting, but this fortnight's challenge sees me joining in as a full blown DT member with my first card.

The theme for the next two weeks is Shades of Autumn and I have used images and papers from the CD "Carnival of Colour". The card is a large 20cm square one,  the front of which I have scored and folded forwards diagonally. The leaf die cuts were cut with the cover-gift die on the September issue of Die Cutting Essentials.


I am sharing this with
Dies R us - the leaves on the trees
Allsorts - Colours of Autumn
Cardz 4 Galz - Autumn Colours 

Sunday, 9 October 2016

Falling leaves

Before you read on, can I just remind you all about a brand new challenge that launched yesterday? The name is Always Use Rubber, and there will be a new theme every two weeks. It's a stamping challenge, so you need to use some stamping on your work (and you can use clear stamps, not just rubber!) and no digis. We have a beautiful photo inspiration board for our first challenge - do please pop over and have a look!

I love autumn, the beautiful colours and the crisp leaves, so it's not really surprising that I have a lot of leaf stamps in my collection. The two larger leaf stamps I used here were bought from the US company Just For Fun some years ago. One side of the wood has a silhouette stamp and the other side has the veins to stamp separately. Positioning the veins needs the use of a stamp positioner - nowadays a set like this would probably be clear stamps that you could align by eye or using a Misti.


The small leaf is a Card-io peg stamp - as you can probably see, I always have a hard time getting a clear image from it, I think the wood may be at a slight angle as it always seems lighter on the same side. But then, nothing in nature is even all over, is it? The sentiment is from a Creative Expressions snowdrop set and is probably my current favourite sentiment.

There are lots and lots of Autumn challenges around at the moment, so I'm sharing this card with:

One Layer Simplicity - Red, Orange and Yellow
Sweet Stampin' - Autumn
Stamping Sensations - Autumn
Uniko challenge - Autumn
CRAFT - Inspiration photo
  

Proud as a peacock

There was still a piece of the cyan-that-looks-green-in-photos card on my desk after making yesterday's card, and I thought how lovely it looked against the beautiful peacock feather ribbon in my ribbon bag. A bit of a rummage round produced this beautiful scrap of peacock feather paper, the last bit of a precious sheet of paper from the beautiful Graphic 45 Artisan Style pad, and a very old Art Nouveau style peacock stamp which I bought from Tandastamps many years ago, which I stamped with a Kaleidacolour pad.


I think the colour of the blue/green/cyan card has come out more realistically this time. Must be the sunny morning!

I am sharing this with
Shopping Our Stash - Duck, Duck, Goose!
Mod Squad - For the Birds