Pages

Monday, 29 June 2020

Tropical sunset

Oh to be enjoying a cocktail while watching a tropical sunset right now! A pleasure I don't suppose any of us will enjoy this year (unless we happen to live in the tropics) thanks to this pandemic. But we can still daydream.


I made the main background by repeat stamping the sea shell over a square of blue card, using Versamark ink and leaving it to cure for an hour or so to let the watermark effect develop. The amount it develops varies according to the card you are using - on this one it gives a subtle watery effect that doesn't divert attention from the main image.

For the image panel, made a background using  a fingertip dauber to cover a piece of card with narrow bands of Distress Ink, blending them well where they met. Then I stamped and heat embossed the palm tree scene over it in black. The stamp is an UM that I've had for 20-25 years, I think it was created by Trish Bayley.

I don't have a stamp of the sentiment so I created it in Word and cut it out using scalloped scissors "back to front" to give a wave effect.

I am sharing this with

Sweet Stampin' - Create your own background 

Crafty Cardmakers - Create your own background 

Sisterhood of Snarky Stampers - W for Water 


Just Us Girls - photo challenge


Sunday, 28 June 2020

Little Grey Rabbit

The papers I've used for this card come from one of the very first packs of patterned paper I got, years ago, the Craft Asylum "Candy" range. I got a 12" and 6" pad and apart from one uncut large sheet and two small ones,  there's nothing left of it but snippets. In fact every time I get it out to use, I think it will be its final outing before there's nothing left, but it keeps on surprising me. This card is all made from snippets and there are still at least as many left.


The colours are very much "ice cream" colours so I teamed it with a stamp from the House Mouse "Happy Hoppers"  range which I coloured with Promarkers. I die cut it with a stitched oval die and then took the sky and grass colours just to the "stitching" line. I can see now, looking at the photo, that I didn't get the horizon straight. So they're sitting on a gentle hill, right? 

I found the sketch that I used by searching Pinterest for "free card sketches". It appears to have originally come from https://feltmagnet.com/crafts/Free-Card-Making-Sketches where there are 10 great sketches to choose from. 


I am sharing this with 

Allsorts Challenge - So Cute

Inkspirational - Sketch   

Passion for Promarkers - Use a Die  

Pixie's Snippets Playground - Challenge 381 

Shopping Our Stash - You're So Sweet  

Saturday, 27 June 2020

Snowflake Twist Card

I do love a card with a bit of engineering involved!


and when opened out... 


It's very easy to make too! Well, as long as you have a scoring board and hole punch to make life easier. Any stamps you can use to create an all over design will work - I've used leaves and flowers in the past. 

For the main panel, cut a 27cm x 9cm piece of white card (if you prefer to work in inches, just remember to make the length three times the width, and scale up your matting layers to match). For the matting, cut 10cm and 11cm squares of card to match the inks you plan to use. It tends to look best with the lighter colour on the outside, so make that  the larger square. 

Do your stamping and any colouring you wish all over the main panel. It's best to avoid heat embossing as it can crack when you fold the card. I used a very old Hero Arts stamp  for the large snowflake and a stamp from a Poundland set for the smaller one. 

Now score and crease your card into three equal sections, so this one was scored at 9cm and 18cm. Next, score the two end panels diagonally from corner to corner making sure that the scores at each end run parallel to each other.  Fold the side panels inwards then fold back along the diagonal score to get your card shape.  Now mark a place to punch your holes,  along the centre of and slightly in from each diagonal fold and, with the panels still folded back, punch a hole for your ribbon. 

Stick the folded card to the two layers and then thread ribbon through the holes to tie the card closed. 

I am sharing this with 

Rudolph Day sat Scrappymo's - sorry to be so late to the party  this month but it's been too hot for crafting for a few days! 

Fab'n'Funky - Christmas  

Jingle Belles - Get in shape  

Crafty Hazelnut's Christmas Challenge - ATG/Snowflakes 


Wednesday, 24 June 2020

Dancing daisies

I've been feeling totally lacking in inspiration this week, so I dug out an old book that always gets my creative juices flowing- "Simply Beautiful Rubber Stamping" by Kathie Seaverns, and this card is an almost exact CASE of one of the projects in it.


I started with a whole sheet of A4 card and stamped Daisy from Just For Fun (I've had this stamp for about 20 years so I don't know whether it's still available) in a roughly diagonal line from near the top right to near the bottom left,  Then filled in the space below the line with more stampings of the daisy. 

Next I cut out along the top of the line of flowers, not too close to the petals, and turned the card over to stamp along the line again. Because neither the flower nor the arrangement is symmetrical, it isn't possible to line the flowers up exactly with the cut lines,  so I kept them a bit further from the edge than on the front. I didn't cover the back of the card, to give the sender somewhere to write. 

I coloured all the flowers with watercolour markers - alcohol ones would be no use as the colour can show through -  then used a scoring board to make it into a tri-fold card. Finally I heat embossed a dainty sentiment in white on back card and added it to the front section of the card. 

I am sharing this with 

Alphabet Challenge - Flora or Fauna  

Stamping Sensations - Make it Colourful  

A Place to Start - shaped card  

Watercooler Wednesday - All About Occasions  


Monday, 22 June 2020

Steampunk Rose

Today's card was made using the beautiful CD "Steampunk Beauty"  from Magik Graphics. I've tried using this CD in the past and everything has printed out dark and dull so all the beautiful detail was lost, so I stuck it aside in a box and forgot about it.

But when I saw that the current challenge at Cardz 4 Galz was Female Steampunk, I knew it would be perfect for the challenge, and I remembered that Carol from CD Sunday Plus had recommended  some specialist printer paper from a local supplier which I've been using regularly  on her advice, so I tried my long-neglected CD with it and what a difference it made!


The  watch images are part of the background paper,  but were also part of a sheet of toppers and embellishments, so having two sets of them meant I could add a second copy of each image to add depth. The rose topper is also raised from the card with 3D glue, and  the cog corner stuck flat to the card with the metal key added for more depth. 

I am sharing this with

Cardz 4 Glaz - Steampunk (female)  

Use Your Stuff -  It's a Girl Thing 


Sunday, 21 June 2020

Blue, Blue Christmas.

Are you singing along?


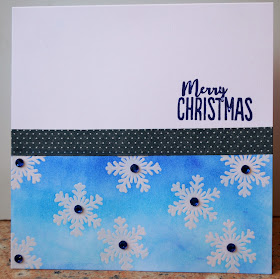
I seem to have recently rekindled my love of the emboss resist technique. For this card I've masked off the upper half of the card then repeatedly used a small, bold snowflake stamp and heat embossed it with white pearl powder. I sponged on inks from a Kaleidacolor pad to give an ombré effect then buffed with a tissue to make sure the snowflakes were free from ink. I covered the join between the inked area and the rest of the card with washi tape and stamped a sentiment above it, then finished the snowflakes with gems.

I am sharing this with

Sweet Stampin - Got the blues 

Crafty Hazelnut's Christmas Challenge - Anything goes/washi tape 

52 Christmas Card Throwdown - snowflakes


Friday, 19 June 2020

The Golden Age of Steam

I've been having another play with my Hunkydory Planes, Trains and Automobiles stash; the trains this time.


I used one of the matching papers which only had a border along one edge, so I cut it off the unused portion of the paper and used it along the opposite edge, then added wide gold peel offs to cover the join and again at the other edge to keep it balanced. Framed with much narrower gold peel off borders and a peel off sentiment (I'm going to use up some of my ancient peel offs by hook or by crook!) and finished with a tiny cluster of buttons.

I'm sharing this with

Crafty Cardmakers - masculine 

Watercooler Wednesday - Anything Goes with a Masculine Twist 


Thursday, 18 June 2020

Jammy Dodger!

Do you all know what Jammy Dodgers are? Are they just UK biscuits or does the whole world have them?

Just in case you don't know what they are, they are two biscuits, the top one with a heart-shaped hole in the middle, sandwiched together with red jam. The biscuits have an embossed pattern on the surface which changes from time to time, but apart from that they've been around  for many years, and although they are a branded biscuit if you google the name you'll find scores of recipes for copycat ones.

They are an essential part of a British childhood. Whenever  the biscuit tin comes out you hope there will be some Jammy Dodgers in it, not just a few soggy HobNobs! So here is my tribute to the Jammy Dodger.


All it needed was a couple of small snippets - one biscuit coloured and one red. I used dies to cut a circle with a heart cut out of the centre, and a scalloped die to take a "bite" out of it, then embossed it with a geometric design embossing folder and sponged a tiny bit of brown ink around the edge. Then I stuck the scrap of  red card behind the heart and filled in the whole red area with the thickest layer of Glossy Accents it would take without overflowing. Finally I stamped the sentiment and attached the whole "biscuit"  to the card. 

I am sharing this with

Addicted to Stamps and More - Clean and Simple 

Pixie's Snippets Playground - Challenge 380   

Sweet Stampin - diecuts and/or punches 


Monday, 15 June 2020

Going round in circles

This month's Twofer challenge is circles or bubbles. I've chosen this circular "starburst" stamp from The Gentleman Crafter's stamp set to do my twofing with this time.


One very summery card, one Christmas card. Fist  the summery one:


I stamped the starburst three times in different shades of pink as the flowers, then used a stylised dandelion clock head stamp from Uniko for the centres. I ruled in stalks and added leaves and a sentiment from the same Uniko set. The background is the starburst again stamped in Versamark ink on pink card to give a watermark effect.


By complete contrast, my second card is a Christmas card. I used a magazine freebie set to stamp the stable scene and sentiment, then masked it off and stamped and heat embossed the starburst in gold above the stable.


I am, of course sharing this twosome at Twofers Card Challenge

also I an sharing the Nativity scene at

Crafty Hazelnut's Christmas Challenge - Anything Goes 

Fezziwig's Festive Frolics - The Christmas Story 


Sunday, 14 June 2020

UFO Spotting #3

Here is the third - and final for now (because I really must get on with some other stuff!) post for the UFOs challenge at Shopping Our Stash.


My previous post  used a peel off as a mask - well, this is the peel off that I used. After removing it from the card I'd used it to ink over, I placed it on this black die cut square and set it aside to use "some time". It's such a strong, bold look that it didn't need much else. I added some blingy gold gems to the corners and stamped a "sentiment" of hieroglyphs using a very, very old unmounted stamp. I've no idea what it says - I hope it isn't something rude!

Saturday, 13 June 2020

UFO spotting #2

It's still UFO (unfinished object) tome over at Shopping Our Stash  and I've used a couple of UFOs on this card.


 The topper has been hanging about in my UFO box for 3 or 4 years - I was experimenting with using peel-offs as masks. I put the peel off of Tutankhamen's death mask onto card then sponged gold Alchemy Wax over it. I peeled off the sticker (and wiped the wax off for reuse - see my next UFO post!) to leave the negative image.

The background is one I made a few weeks ago when I was playing with a new stencil. I  had made it to use in an emboss resist challenge then realised that the challenge was a CAS one and there's nothing CAS about this. I sponged clear embossing ink through the stencil onto white card, then removed the stencil and heat embossed with clear powder. Then I sponged gold ink over the whole  piece and buffed it off the embossed areas.
Some black matting to make the gold stand out and a sentiment that rather sums up the Pharaohs were the only new stash needed.

Now, some of the Sistahs at SOSS are also on the DT of SOS, so by combining the two challenges I'm being utterly noble and saving you from having to make two visits - today at any rate. Isn't that noble of me?

So, I'm dropping in for a second visit (of who knows how many!) at Shopping Our Stash  while also sharing the techniques of peel-off as mask and stencilled embossed resist at the Sisterhood of Snarky Stampers.  How very efficient of me!


Friday, 12 June 2020

Sunflowers and Butterflies

How typical, a wet gloomy day and what do I do? Make a card with sunflowers on it!


The papers, topper and borders I've used are all printed out from Debbie Moore's "Sunflower Dreams" CD. Usually when I choose not to mat papers, I finish the edges in some way - distressing, inking, faux stitching - and today I decided to go really "old school" and finish them with peel-offs.
I've added a panel of plain yellow paper to the outside back of the card since there's nowhere really on the inside to write a greeting. Naturally the panel is also edged with peel offs!

I am sharing this with

Butterfly Challenge - Z for Z fold card (just the card shape this time) 

CD Sunday Plus - anything goes 

Cardz 4 Galz - more then one score 


UFO spotting #1

The current challenge at Shopping Our Stash could have been made with me in mind - we're being asked to use our UFOs aka UnFinished Objects. Those backgrounds we made that didn't quite work with the topper we had in mind, the die cuts that we cut too many of, the stamped images and experiments we set aside for later.....


Well... as you can see, I do have a few UFOs hanging around...  

So here goes with the first of my UFO makes. 


This die cut peacock was one of a pair I cut a few months ago from a piece of card I'd inked specifically for the purpose. I used one and set aside the other to use "in a day or two". As you do. The blue green inky background was just the right colours for it. That has been in my UFO box for so long I can't remember when or how I made it. I chose a piece of bleach-sprayed burgundy card from the UFO box to back the peacock, knowing that I still had plenty of the plain burgundy left for matting the background, due to a slight "user error" some years ago when ordering burgundy card online, when instead of the "10 sheets" box I clicked the "100 sheets" one and was too proud to admit my mistake and ask for a refund. Proud as a peacock, perhaps? 

The sentiment is cut from a very old Cuttlebug die and I've had it lurking for so long that I've lost the dots for the i's. But little blue pearls work very nicely with the blues in the card! 

So that's my first finished UFO card... I'll be back over the weekend with more. Look out, Shopping Our Stash - this may be a busy week for you! 

Thursday, 11 June 2020

Bold Gold

It's ages since I've posted twice in one day, lockdown has seen my crafting mojo get very temperamental, but while it's paying me a visit I'm determined to make the most of it!


It's not often I manage to make a CAS snippets card, but I never throw away even a tiny scrap of black or white card so my snippets basket was the perfect place to find what I needed for this border and butterfly.

A month ago today I shared a card made with a very old NBUS stamp from Graphicus so today seems like a good time to share a card made with the one stamp from the sheet that I'd used before,  this lovely bold border. I heat embossed it in gold on black card then added it to my base card, with a sentiment stamped below. The butterfly is cut with a First Edition layering  die set and finished with tiny gold pearls.

I am sharing this with

Pixies Snippets Playground - challenge 379 

Less is More - Borders 


The cat that walks by himself

Cats can be very independent creatures, can't they?


This gorgeous cat stamp is a very old PSX stamp which my daughter bought about 25 years ago and I am "minding"  for her. I've coloured it with pencils to give a ginger tabby effect and layered it up with papers from an old issue of Making Cards plus some cute kitty ribbon. The Tim Holtz sentiment perfectly sums up a cat's attitude to life!

I am sharing this with:

2 Crafty Critter Crazies - Earth Bound Animal 

Fab'n'Funky - Creature Feature 

2 Crafty Critter Crazies - Challenge 39 

Show us your Pussycats - Furrything Goes 


Tuesday, 9 June 2020

I found a lost stamp!

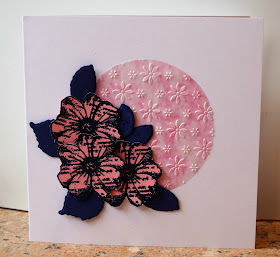
This flower-on-text stamp was a magazine freebie, Craft Stamper I think, that i got several years ago and immediately lost. I've searched high and low for it many times, with no luck, and then at the weekend it turned up -  right in the middle of my box of flower stamps where it should have been all along and where I must have looked at least 20 times for it. I think there's a poltergeist living in among my craft supplies....


I stamped it three times on pink card using embossing ink then heat embossed it with navy blue powder. Then I fussy cut the flowers and die cut leaves from navy blue card.  For the background I die cut a circle of pink cloud-effect vellum and used an embossing folder to add the flowers. 

I am sharing this with

CAS Mix Up - Embossed vellum (vellum, stamping, heat embossing, dry embossing, die cutting, fussy cutting)


The Flower Challenge - Navy and one other colour (pink)


Crafty Calendar - Flowers 

Craft Rocket Challenge - Embossing dry/wet  (used both)

Saturday, 6 June 2020

Butterflies and swirls

I was pleased to see that the current challenge at Shopping Our Stash is Stickers, because I keep seeing this part used sticker set in my stash and thinking I really must use some of them again. But you know, once they are gone, I won't have them any more....


I've had them in my stash for years and years - the garden centre craft shop I bought them from closed down about 15 years ago so they are at least that old.  To go with them, I chose this NBUS Linda Luckin stamp of about the same vintage (I bought a whole sheet of rubber just for one of the stamps on it and had never even cut the rest out, so I have several more NBUS swirls to play with now I've rediscovered it), which I stamped and heat embossed with my very newest item of NBUS, "Serene" embossing blend from WOW.  It's a lovely blend of aqua, white, black and sparkly powders that give the embossing varied textures as well as colours. The dotty trails on the swirl echo those on the butterflies, and to link them together even more, I added gold liquid Pearls to a few of the dots.

I stamped and heat embossed a sentiment, then used a marker and ruler to frame the card. Finally, the large butterfly did't look quite right as its head was made from a large brown gem, so i carefully eased the gem off and replaced it with an aqua one.

I'm sharing this with

Shopping Our Stash - Stickers 

A Bit More Time To Craft Extra - Anything Goes 

NBUS - NBUS (Never before used schtuff)

Oh, and I still have one of the butterfly stickers left, so I haven't not got them now after all!

Friday, 5 June 2020

Poppies and Lace

Although it's grey, cold and windy today we have had some glorious summer days recently and they have  reminded me of the trips we used to make to Cornwall when my father in law was alive. At this time of year, the fields on either side of the A303 were always full of poppies and given how slow the traffic was on fine days,  especially in the area around Stonehenge, there was always plenty of time to enjoy them!


For this card I used an assortment of dies to cut and emboss the lace corners and topper, and a very, very old unmounted stamp that I've had for about 20 years for the poppies. I coloured them with Promarkers - there used to be a time when I found those tiny stems daunting to colour with the tip of a Promarker  but I seem to have learned much better control nowadays. The sentiment is a random loose unmounted stamp that lives in my sentiments tin - it looks as if it came from a set once upon a time but I can't recall which. I have a feeling it's a Woodware owls set which I've had for about 10 years.


 I used the Misti to line up the word around the edges of the topper, and added the topper to the card using foam pads for a little depth.

I am sharing this with

Passion for Promarkers - A celebration 

Watercooler Wednesday - Feminine anything goes


Country View Challenges - Summer Fields 

Retro Rubber - Summer time 
RRCB 136


Addicted to stamps and More - Make your mark 


Wednesday, 3 June 2020

ships

A year or two back I got a set of Hunkydory papers and toppers from their Planes, Trains and Automobiles range, and after playing with them a few times popped them into a folder where they  have languished ever since. Then while sorting out some old craft mags I saw some cards made with them so I thought I'd try recreating some of the ideas.


This card uses some of the Historic Ships toppers and two of the coordinating papers. I cut the legend off the toppers to affix separately and then trimmed off the border from around each image. Then I covered kraft card with some of the wood effect paper and added a central strip of ship collage paper, and arranged the toppers over the card, finishing with some black gems. 

I am sharing this with 

Crafty Hazelnut's Patterned Paper Challenge - anything goes 

Use Your Stuff - Masculine or Fathers Day  

Pearly Sparkles - For the boys/men