Pages

Monday, 31 May 2021

Sparkling Joy!

 That's sparkLing, not sparking - just imagine what Marie Kondo would say if she were to wander into my crafting space! 

I saw a photo recently that used the negative of this JOY die to allow a lovely background paper to show through, and thought it would look really festive with glitter card peeping through the spaces. Instead of replacing the white snowflake into its slot, though, I cut a second image in purple and used that for a bit more colour. 

That. of course, left me with a purple negative and a white snowflake - so I made another card. 


That's two more for the Christmas card box, and wouldn't it be a great card for a quick and easy batch bake? 


Now, of course, I am left with two J's and two Y's. So there are two more cards on the horizon - perhaps I can replace the snowflake with one cut using a different die. Or a circular button in a festive design. Or maybe a small die cut circle with a festive stamped image - the possibilities are endless. 

I am sharing this with 

Jingle Belles - Bring on the Bling 

Fab'N'Funky - Christmas   

Rudolph Day at Scrappymo's 


Saturday, 29 May 2021

Pink and Purple Passion

 How do you make an anniversary card that doesn't have a mushy, sloppy sentiment and yet isn't snarky? Well, I think I've nailed it - roses and passion, that sums up anniversaries for me! 


I still had the Craftascope stamp set on my table from yesterday's snippets card, but this time I used the cultivated rose stamp from it, as well as the bud and sentiment. The stamp set is about 18 months old - usually when I'm making a card for Retro Rubber I pick something much older, after all I've been stamping for around 25 years so I have some very old ones to choose from. But hey-ho, it's still over a year! 

Before stamping, I cut the white panel to size and blended pink and purple inks over a central band. Then I stamped everything over the inky panel. Next I added lots of layers, finishing one with scallop edged scissors (so much more useful than a scalloped rectangle die as you can make any size you want) and another with a border punch. 

I am sharing this with 

Retro Rubber - Anything Goes 


Another visit to Little Red Wagon - Say it with Flowers  

Allsorts - Any Celebration (not birthday) 


Friday, 28 May 2021

Say it with Flowers

 It often seems that my snippets box is full of long, narrow strips of card - too big to throw away yet the wrong shape to cover a card front, even for a slimline card. 

I was browsing through an old craft mag when I spotted a sketch that I thought would be perfect for using some of these snippets. Naturally, I played about with the arrangement so much that it bears no resemblance to the original sketch, but at least it was the starting point! 


Dies are great for working with snippets, and I cut two circles and a label. The green pennant is cut by hand. 

I stamped the wild rose spray from a Craftascope stamp set onto another snippet of white, and the leaves from the set, along with the sentiment, on the label. Then I coloured everything with Promarkers, fussy cut the rose spray and arranged the elements on the card. I felt it needed a little more on the right, so I added some pink diamond shaped gems. I tried to follow the curve of the label, but I'm not sure that was the wisest choice. If the gems came off easily (isn't it funny how they fall off when you want them to stay put, but stick like limpets when you'd like to move them?) I would put them closer to the edge of the pennant, in a straight line. 

I am sharing this with 

Pixie's Snippets Playground - challenge 403  

Make |my Monday - Floral Birthday  

Little Red Wagon - Say it with Flowers 

Addicted to Stamps and More - Make Your Mark 


Watercooler Wednesday - All About Occasions


Sparkly Butterflies

I had a play with a new-to-me technique  yesterday - heat embossing on texture paste. 


I positioned the stencil on the card, masked off the flowers then applied opaque white texture paste through the stencil. Removed the stencil, sprinkled with sparkly blue embossing powder and heat embossed. Then I left it for the texture paste to completely dry before replacing the stencil and using a finger dauber to colour the flowers. I'm currently crushing on sentiments heat embossed in white on black, so I added one to the bottom of the card. 

I'm sharing this at Use Your Stuff, where I chose the diagonal line Flower- Butterfly - Any shade of Purple (and I snuck some sparkle in there too) 


Sunday, 23 May 2021

Golden Holly

 I thought I'd have a change from red holly berries today - there is a variety of holly with yellow berries, and it's not a big stretch of the imagination to move from red to gold, so here is my golden-berried holly. 


I used a large holly background stamp from Funstamps -  new to me as it came in my crafting round robin this month. I stamped it on black card with Versamark ink, then brushed the berries with gold mica pearl powder and the leaves with green, spritzed it with water to fix the powders then cut a circle with a stitched edge die. I decided the berries needed more ooomph, so I used liquid pearls to give them dimension. 

The sentiment is stamped with Delicata ink so that it didn't need to be embossed, because by then I  thought there was already enough going on on this CAS card. 

I am sharing this with 

52 Christmas Card Throwdown - Perfect Pearls 


Crafty Hazelnut's Christmas Challenge - Anything goes

CAS Christmas - Foliage and berries  


Saturday, 22 May 2021

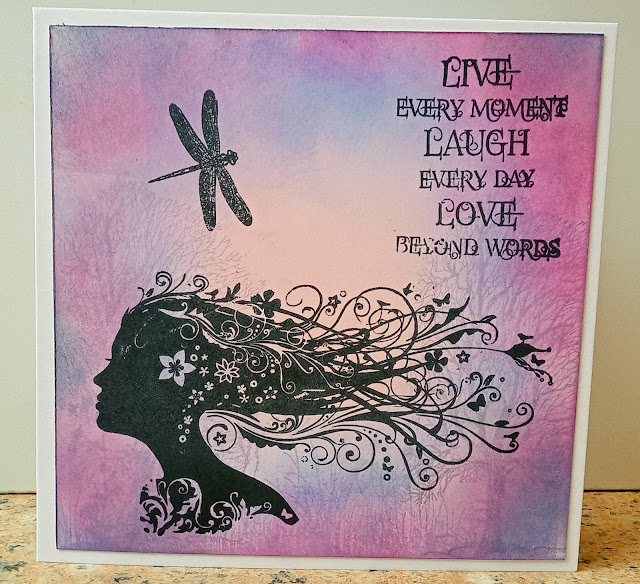
Inspired by a book cover

 You probably all know how much I love reading - and how much I love dragonflies too. I discovered author Helen Pryke when I read two of her thrillers, and enjoyed them so much that I went on to read a trilogy  that she wrote in a completely different genre - I would call it historical fiction with a subtle hint of supernatural. The trilogy follows a family of healers/herbalists/midwives from the plague years to the present day and the setting moves between Britain and Italy. Dragonflies play an important and recurring  part in the books and feature on the covers too. 


I decided to create a card based on the cover of The Healer's Awakening - not an exact copy of the cover, but one that definitely pays tribute to it. 


I made the background by blending Distress Inks in shades of pink, purple and blue then stamped a barely-there layer of trees and foliage in a pale purple. Finally I used black Versafine Clair ink to stamp the silhouette head, the dragonfly and the sentiment - all Indigo Blu stamps. 

I am sharing this with 

Cardz 4 Galz - Things with Wings 


Retro Music

 This week I saw an ad for a craft magazine that had freebies of  die cuts and papers that seem to be designed to work with the Hunkydory retro music stamp sets. I didn't buy the mag, but the bright, cheerful colours in the ad prompted me to get out my stamps and have a play. 


I used my Hougie board to create a stepper card, then made a  stencilled music background to fit the large panel and one randomly stamped with musical notation for the half-height step. Then I went to town with layering, stamping and colouring, all in bright, bold, vibrant colours. The music border across the front is some self adhesive tape I  picked up in a bargain bucket at a craft show.  I die cut the records and fussy cut the other stamped elements before attaching them with foam pads for dimension. 

I know vinyl has been back in fashion among serious music fans for some time, but I hear that cassette tapes are coming back into fashion too. Soon, a whole generation of young people will come to understand why their grandparents still keep a pencil in the glove compartment of the car! 

I am sharing this with 

Addicted to Stamps and More - Die Cuts and Stencils 


Cardz 4 Guyz - Create your own background 

Use Your Stuff - Stencils 

Allsorts - Happy, Bright and Sunny Colours 


Thursday, 20 May 2021

Santa and Sparkles


Another cute (ish) card from me today! The background is a Uniko stamp. I coloured the upwards pointing triangles in red and added a liquid pearl bobble at the end to look like Santa hats,  and the downward pointing ones with stickles to look like icicles. The sentiment stamp is from a very old magazine freebie set and the Santa Teddy is a Clearly Besotted stamp. 


I am sharing this with 

52 Christmas Card Throwdown - Santa  


Crafty Hazelnut's Christmas Challenge - Anything Goes 

Less is More - Sketch  (rotated through 90 degrees) 


Inkspirational - Triangle 


Fezziwig's Festive Frolics - Let's get sentimental  


Tuesday, 18 May 2021

Wine Buffs and a Mum update

 Many thanks to all of you who have emailed, or commented here or on Facebook, about my Mum's recent visit to hospital. She was discharged last week and we went up (having checked that essential caring was allowed under Covid restrictions) to help her settle in at home and make sure the help she needs is properly organised, as well as to celebrate her 95th birthday which just a few days earlier we feared she wouldn't reach. 

She's not doing too well - she has carers in four times a day to feed her, take her to the loo and get her in and out of bed or her chair - apart from that she is totally immobile. She's very confused and doesn't really know where she is or what is happening to her, and although she was sent home for a trial period, I think that social services will soon decide that residential care is the best option for her. It's all very sad, but it seems that all I can really do for her now is to make sure she has a continuous supply of her favourite biscuits. 

Anyway, I've still managed  to fit in a little bit of crafting...


Foolishly I printed the papers the morning before setting off for Mum's, so I can't remember which of the Funky Hands CDs the background papers came from. It must have been Funky Daze or Now That's Funky, because those two are still sitting on my desk next to the printer. Unless, of course, it was V. Funky and I remembered to put that one away.... (blame the stress and anxiety!). I wouldn't usually use so much pink on an obviously masculine card,  but the colours match the tablecloth! The image is from The Wine Buffs CD from Katy Sue Designs. 

I've used the leftover scraps of paper and the mini image from the design sheet to decorate the inside of the card, but I forgot to take a photo. 

I am sharing this with 

CD Sunday Plus -Anything goes   

Sisterhood of Snarky Stampers - A is for Animal (check out those doggies!) 


Dragonfly sympathy card

 I often use butterflies on sympathy cards because of the tradition that says seeing a butterfly means that a departed loved one is thinking of you, but this card is for a friend who has just lost her adult son, and I felt a dragonfly would be a little more masculine - as well as adding a personal touch as she knows my love of dragonflies. 


I used a grey inkpad to stamp the fern, using a platform to stamp the first image twice, the second once and the third with just the residual ink from the previous stamping. I stamped the sentiment over the lightest impression, then added the dragonfly, stamping several times in purple ink. The whole thing is matted with matching grey card. 

The stamps I used are all so old their origins are lost in the depths of time! The fern was from a sheet of botanical stamps that may have come from Graphicus, the dragonfly was from a grab bag of UMs which were mostly All Night Media stamps and the sentiment was a gift from a friend. 

I am sharing this with 

Allsorts Challenge - Anything Goes  

Make My Monday - Sympathy 

Creative Crafting Uncles - Butterflies and/or Dragonflies 


Perfectly CAS - repeat stamping 


Wednesday, 12 May 2021

I don't do cute!

 At least not very often, but I reckon I've nailed it here. 


All the stamps I've used are from a Pink & Main stamp and  die set.  I gave the ladybird border a green mat, to make a layer of "grass" for the little ladybird baby to sit on once I had coloured and die cut it. 

I've got the sister set to this, a bee themed one - I'm tempted to make another card just like this using the bee set. 

I am sharing this with 

Addicted to CAS - Bugs


Tuesday, 11 May 2021

An oldie but goodie

 I can't remember when I bought this stamps-and-paper set but it's many, many years ago. According to the storage card the stamps live in, it was a special offer in Crafts Beautiful. I think the papers I've used here are the very last few sheets from the pack. 


I used the papers to create lots of layers, fussy cutting along the scallops and bubbles of the striped paper. Then I stamped the butterfly and sentiment and coloured the butterfly with colours to match some of the shades in the papers. 

I am sharing this with 

Sweet Stampin - Things with wings 

Just us Girls - layers 


Monday, 10 May 2021

Peaceful on the water


I've used a set of layering stamps to build up the scene for this one layer card, keeping to shades of blue. The water is done by sponging in pale blue ink then going over it with horizontal strokes of several shades of blue pencil.  I finished with a very subtle "frame" of bare branches, stamped in the palest blue I could find. 

I am sharing this  with 

Allsorts Challenge - create a Landscape/Scene  

Cardz 4 Guyz - Monochromatic  

Crafty Calendar - Masculine 

The Male Room - Water/Beach  


Saturday, 8 May 2021

Eating al Fresco

All over the world, countries seem to be at different stages of this terrible pandemic and handling it in different ways. Here in England (rather than Britain - all the British nations are doing different thigs) we are slowly easing out of lockdown, and now restaurants, pubs and cafés can open, but only to serve outdoors. 

On sunny days, pavements and gardens close to them are full of happy people, delighted to be able to share a coffee or a glass of wine with friends again, and this old stamp - I think it was from Crafters Companion? - is a perfect one for current times. Actually today it's pouring with rain, but I'm sure a few hardy souls will still be venturing out to meet up. 


I coloured the image with Promarkers and die cut it into a circle to fit the centre of the large scalloped circle die cut, then finished it with a computer generated sentiment. 

For all of you who have sent supportive messages and get well wishes for my Mum, the latest news is that the rehydration, regular meals, physio and antibiotics have done her a world of good and she is to be allowed home next week, on condition she accepts visits from carers several times a day. In the past, she has sacked any carers that have been put in place for her, but she has been sternly told that this time the alternative to accepting them is residential care - which she really doesn't want, mostly because she would miss her cat so much. So it's looking hopeful. I will be heading up to help her settle back in, so the recent torrent of posts from me (crafting is such great stress relief) is about to dry up for a while. 

I am sharing this with 

Sisterhood of Snarky Stampers - O is for Outdoors  

Watercooler Wednesday - all things feminine  

Little Red Wagon - hers! 

Friday, 7 May 2021

Here comes the sun

 Hasn't the last year or so altered our perception of time? Often the days and weeks have seemed to drag on for ever while they were happening, yet in other ways a whole year feels as if it never happened. I bought this stencil at the Farnborough show in February last year and still think of it as a brand new purchase. 


This sentiment-as-focal-point card is really more about the background - it tells the whole story behind the sentiment. I used the stencil and several shades each of red and orange ink to create the sun, then layered it on the card with the stamped sentiment (sorry, can't remember the brand) positioned so it is in the brightest part of the sunshine. 

I am sharing this with 

Fab'N'Funky - Sunshine Colours 

River of Creativity (a brand NEW challenge from my lovely friend Zoe) - Sunshine  


We Love Chocolate Baroque - Bright Sunny Colours  

Colour Hues - red and orange 


Stained Glass Daffodils

 I hate it when I see the question "What's your favourite flower?" because I love them all, and my favourite tends to be the one I've most recently seen or smelled. So I tried rethinking the question - "Which flower would you miss most if it ceased to exist?". Now that's an easy one for me - having lived in the tropics for 7 years, it's the daffodil. When surrounded by opulent exotic orchids, anthuriums and hibiscus flowers, I soon started to pine for  the freshness and spring promise of a simple bunch of daffs!


The image I have used is a very old unmounted stamp that came in a grab bag. I think it might have been an All Night Media stamp originally. I stamped it in black onto heat embossable acetate and embossed it with clear powder. Normally I would use glass paints on acetate, but as the embossing isn't really deep enough to hold the paints in place, I decided to try colouring it with Promarkers. The colours came out lovely and clear, although as the ink dries fairly slowly and tends to pool slightly, it leaves a slight brush-stroke effect. But then, where would art be without brush strokes? 

I attached it to white card using spray adhesive - being very careful not to get any on the front of the panel as the adhesive is solvent based and would erase the Promarkers, being alcohol based. Then, since it has a very Art Deco look, I chose a suitable style of sentiment and added that before completing with layering and gems. 

I am sharing this with

Passion for Markers - say it with flowers  

The Flower Challenge - Use your favourite flower  


Thursday, 6 May 2021

Rainbow and Butterfly


It's always good to have something new to play with and the stamp, die and stencil I used for this card are all NBUS. The stamp is from the latest Creative Stamping magazine set, the stencil was a free gift with my last delivery from Craft Stash and the butterfly die is a pre-loved one that was in a crafting round robin that I belong to. 

I masked the stencil onto the card so that one complete repeat of the pattern showed, then marked the masking tape into 7 to give me a rough idea where to put the colours, then inked through the stencil with the 7 colours of the rainbow. My indigo ink pad looked too harsh, so I covered what was to be the the indigo section first with violet and then with blue to get a shade I was happy with. I gave the border definition by ruling two fine lines each side with a black fineliner. Then I stamped the sentiment and finished with that gorgeous die cut butterfly. 

I am sharing this with: 

CAS Mix Up - Stencil + Rainbow ink blending (+ stamping + diecutting) 


AAA Birthday - Happy Birthday 


NBUS - challenge 26 


Tall Taggy Christmas


 My latest all-from-the-snippets-box make is here - tags in the traditional festive colours of red (not orange as it looks here!) , green and gold, each one topped with a stamped and punched character from the SU "Cookie Cutter Christmas" set. The tags are cut and embossed with a very old Sizzix die set. 

You may have noticed a change (and deterioration, but that will improve with practise) in my photos recently. Following a recent computer problem, all my computer's USB slots are full so in order to upload photos from my camera, I have to unplug the keyboard. As I've been having problems with the white balance on my ageing camera, I thought it might be the opportunity I've been looking for to swap to using my phone for photos, since I recently got a new phone with a really good camera. My phone puts the photos straight into Google Photos so it saves having to upload them. But I'm not used to the camera yet and still have a lot to learn. 

Also I'm not using my white background at the moment. That's because I have a bit of back trouble just now, nothing serious but it's uncomfortable to bend and twist, and where I usually take photos to get the best light, I have to bend right down and twist to one side (with my elbow in the kitchen sink but you didn't need to know that) so I have temporarily moved to somewhere I can stand upright while I take my photos. And the white background doesn't fit - although I think maybe the wood background is helping with the light balance. 

Lots of experimenting to do before I'm happy with my photos enough to decide on where, when and how to deal with them in order to see my cards at their best, but I'm working on it. I suppose at the end of the day, I'm a crafter not a photographer! 

I'm sharing this with 

Pixie's Snippets Playground  - Challenge 402, Ruby's Memory  

Sparkles Christmas - Use a Tag  

Christmas Kickstart - Santa and Friends 


Wednesday, 5 May 2021

A walk on the beach


 Another make using the really useful stencils from the current issue of Creative Stamping, this time the seashell border. I blended sand coloured ink over the bottom of the card then stencilled the shells over in black Versafine Clair which I find gives a lovely intense blackness. Then added a stamped sentiment, which is also from a Creative Stamping magazine a couple of years ago. 

I am sharing this with 

A Bit More Time To Craft Extra - Anything Goes  

Less is More - Sea Creatures 


Sending Joy


Another Christmas card from me today -  I'm a l-o-n-g way behind my 2-a-week target so I'm playing catch up. 

I embossed the background, leaving a space to stamp the sentiment, then added the word "Joy" die cut in gold. Ugh, and now the photo is enlarged on my screen, I can see a nasty glue smear on the Y. I'll have to replace that letter before I  can send the card next Christmas! 

I am sharing this  with 

Christmas Crafts All Year Round  - Something beginning with I or J 

Inkspirational - Sketch