Friday, 6 February 2015

Hugs and Kisses


At the rate I'm turning out the Valentine's cards, I think I'm going to need to get myself a few boyfriends, as I've made FAR too many for my husband.

Hang on, don't boyfriends take up valuable crafting time? Scratch that idea then!

I've made this card for the Hugs and Kisses challenge at Addicted to CAS

 
The idea came to me earlier this week, when I was crafting with one of my granddaughters, using some free magazine stamps I'd set aside for them to use, thinking they were too "young" for me. But these cute hugging bunnies definitely represent hugs and kisses, so the stamp has moved back into my own collection. (Well, I'm just "borrowing" it for a while)
 
The sentiment is from the same stamp set, and the gingham ribbon is part of a batch of self adhesive ribbons I bought by accident thinking they were washi tape.


Butterflies for Valentine's Day

I've been dithering over this card for days - I kept starting to make it and each time it headed off in a different direction and ended up either not including butterflies or not being suitable for Valentine's Day. Isn't it funny how craft can sometimes take on a life of its own and lead you off at a tangent?

Anyway, at last today the elements came together, helped by my remembering that I had a pack of pretty votive candle wraps that I'd bought from the wedding favour department of Hobbycraft. I backed one with red card and trimmed it to fit the card  and everything fell into place from there.


I'm sharing this with Butterflies & V is for Valentine at Mrs A's Butterfly Challenge

Wednesday, 4 February 2015

Two for the price of one

I decided to have a play today - I rummaged in my scraps box and lifted out a handful of snippets of patterned paper in link/purple/lilac shades and another handful in greens.

On the first batch, I stamped a very open flower, which I think was a craft mag freebie, to allow the patterns to show through. The green papers I folded, cut a half-leaf shape with the fold as the spine, ran through my Ribbler (it's a little hand held corrugator - I don't know whether the Ribbler is in production any more, but similar albeit rather more flimsy items are available in the children's craft sections of shops like Hobbycraft and The Range). When opened out, they make lovely leaves!

With all the shapes prepared, I added candi centres to the flowers and curled the edges of the petals over the blade of my scissors.

The design that I had at the back of my mind had a huge cluster of flowers and leaves, but when I tried to assemble all my flowers I realised I had made FAR too many, and that they looked far better arranged in a more CAS fashion to allow each element to show up. So here you have it - two cards for the price of one!


I'm entering one or both of the cards, as appropriate, into the following challenges

Ooh La La Creations - Love  (card 2)
Make My Monday - Hearts and Flowers  (card 2)
Clear it out challenge -  Anything Goes  (both cards)
Pixies Snippets Playground - Week 162 (both cards)
 All Sorts Challenge - Flower Power (both cards)
Fan-tastic Tuesday - Let's see some purple (card 2)
The Crafter's CafĂ© - Birthday Card (card 1)


Tuesday, 3 February 2015

Simply Sympathy

I always find sympathy cards difficult to make. Other events can be planned for - Christmas and birthdays come along on regular dates, and even babies give you several months' notice of their intended arrival. But death can be sudden and unexpected, and I don't like to have suitable cards "in stock" so whenever I need one it has to be one I can make quickly.

I also think that CAS cards are very suitable for the occasion. Going overboard with pattern or embellishments doesn't really seem right, and the recipient won't be in any mood to appreciate them, they just want something simple to tell them that you are thinking of them.

I love this agapanthus flower stamp and it often finds its way onto the sympathy cards I make, although it is equally at home on a landscape or a bright, colourful card.

I masked off part of the card front and then sponged purple inks in three different shades over the left hand area, starting each at the masked edge and flicking it out with a soft sponge so that it faded towards the edge. The purples have blended together to give a subtle, graduated effect with the palest going almost to the edge of the card and the darkest closest to the masked edge. Then I used my trusty stamp positioner to add the agapanthus and the sentiment.


I'm entering this for the following challenges:

One Layer Simplicity - You Blend - my first visit to this challenge
Fan-tastic Tuesday - Let's See Some Purple
Addicted to Stamps and More - CAS
CAS on Sunday - #51 Flowers

Economical Cookery - 1937 style

One of my favourite recipe books is a thick volume called "Economical Cookery" published in 1937. It was given to me by a boyfriend's mother while I was at school - I think she had romantic notions of me and her son staying together forever and the book becoming a family heirloom. Ha! I'm delighted to say that my relationship with the book has lasted many times longer than my relationship with her little boy did!

It is aimed at the sort of middle class families who, between the wars, found that their way of life had changed. No longer did quite ordinary people in ordinary homes have staff to cook and clean for them, and housewives were suddenly finding that they had to learn skills that they hadn't been taught by mothers who had thought, at the time, they would never be needed (and probably didn't have the skills themselves).

So the book covers everything from absolute basics, like how to use an oven, and how to mash potatoes, to dishes that wouldn't look out of place at a modern dinner party. But the emphasis is on good value, everyday filling food for families, and although relative prices of some items have changed (for instance in those days poultry was a luxury compared to other meats) I still find it a valuable source of recipes, especially for soups, stews and bakes.

But my favourite section of all is a set of menus for every single day of the year, each based on items that were in season or available dried or in tins, as frozen and many imported goods were either unavailable or far too expensive for the target audience of the book. Every item of breakfast, lunch and dinner is included, and the menu for each Sunday is costed out. The menus are very practical - Monday's meals usually include dishes made with Sunday's leftovers and the recipes for them are included in the book.

One thing that is immediately striking today is the sheer quantity of food! Three hot meals a day  with pudding at two of them! With our modern, sedentary lives and constant snacking, we'd all be the size of double decker buses if we ate like that at mealtimes!

Here's the menu for the final Sunday of January


Just out of interest, I've checked the prices of the items at Ocado, going for the Waitrose Essentials items where possible. Here are the approximate equivalent prices today (for comparison, 1s then was 5p now, and 1d was about 0.42p and 1 oz = 28g, 1lb = 454g )

Breakfast
½ pkt cereal 50p
175g streaky bacon  £1.67
4 eggs 65p

Mid-day meal
2 guinea fowl £14.00
breadcrumbs 10p
500g potatoes 50p
1 large cauliflower £1
4 oranges £1.20
pack of orange jelly (for both meals) 54p

Evening meal
Celery soup (made with 2 heads of celery, 1 onion, 650ml stock, 25g flour, 50g butter and 250ml milk) £2.30
salad  - this could be almost anything, but for cos lettuce, ½ cucumber and half a pack of essentials tomatoes the cost is £2
sponge fingers 80p
cream (I presume you wouldn't make your own) £1.60
gelatine 50p

Kick Back and Relax

This week the challenge at Cardz 4 Guyz is Kick Back and Relax. We'd love to see your take on the theme - don't forget to make your card suitable for a man or boy!

For my card I've turned to the ever-popular La Pashe CD, The Best of La Pashe 2014, printing out this cute bear decoupage with the matching envelope backing paper plus a sheet of pizza design backing paper.


I was inspired to try this Large Square Double Display card after seeing this great tutorial on The Craft Spa  and found that by using my Hougie board for all the measuring and scoring, it took only minutes to produce the fancy folded card. I'm delighted to have found something so easy that looks so complicated!

As I've never tried this unusual fold before, I'm joining in with Crafty Gals Corner Challenge #4 - Try Something New
Also Anything Goes at That Craft Place
Also for the first time I've entered the challenge for Design Team members at Design Team Showcase  

Monday, 2 February 2015

Buffalo Pie

If you read my husband's blog, you'll know that at the weekend we went to a Potato Day in Whitchurch, after which we went on to Laverstoke Park Farm to visit the shop (sadly as it was a bitterly cold, snowy day, the buffalo were nowhere to be seen). We'd not tried buffalo before, and although the steaks looked lovely - dark, strong and mature - the butcher warned us that they needed to be served quite rare to avoid any toughness, and as Mark doesn't like rare meat we decided to go for something which would respond to long, slow cooking - mince. The price was comparable to the best mince from my local butcher, so it wasn't a lot to pay for something a bit out of the ordinary.

I decided to make a cottage pie using the mince, so as not to mask the flavour or texture with too many spices or other ingredients, so here is my recipe. Apologies if the title led you to believe you were going to see a huge Desperate Dan style pastry pie with a pair of horns sticking out of the top!

Buffalo Pie  (serves 3) takes approx. 3 hours

400g buffalo mince
1 large carrot, finely diced
1 medium onion, finely diced
small knob of butter
1 rounded tbs plain flour
300 ml beef stock
1 tsp Worcestershire sauce
75g frozen peas, defrosted

600g potatoes, peeled, boiled and mashed with a little milk and butter and lots of pepper

a little extra butter (optional)

Heat the oven to 150C, 300F, gas mark 2. Heat the butter in a flame proof casserole dish and fry the mince, carrot and onion together until the meat is browned and the onion and carrot softened. Remove from the heat and stir in the flour then blend in the beef stock and Worcestershire sauce.  Return to the heat and bring to the boil, stirring constantly. Mix in the peas, cover and place in the oven for 2-2½ hours, checking from time to time to make sure it doesn't catch at the edges. It needs to be pretty thick, or the potato will sink, but not dry, so top up with a little hot water if needed.


Remove from the oven and increase the temperature to 220 C, 425 F, gas mark 7. You can keep the meat mixture in the casserole dish, or transfer it to a clean ovenproof dish as I did, then top it with the mashed potatoes.


Dot with a little more butter (optional)  then bake in the hot oven for 30-40 minutes until the top is browned and crispy in places.


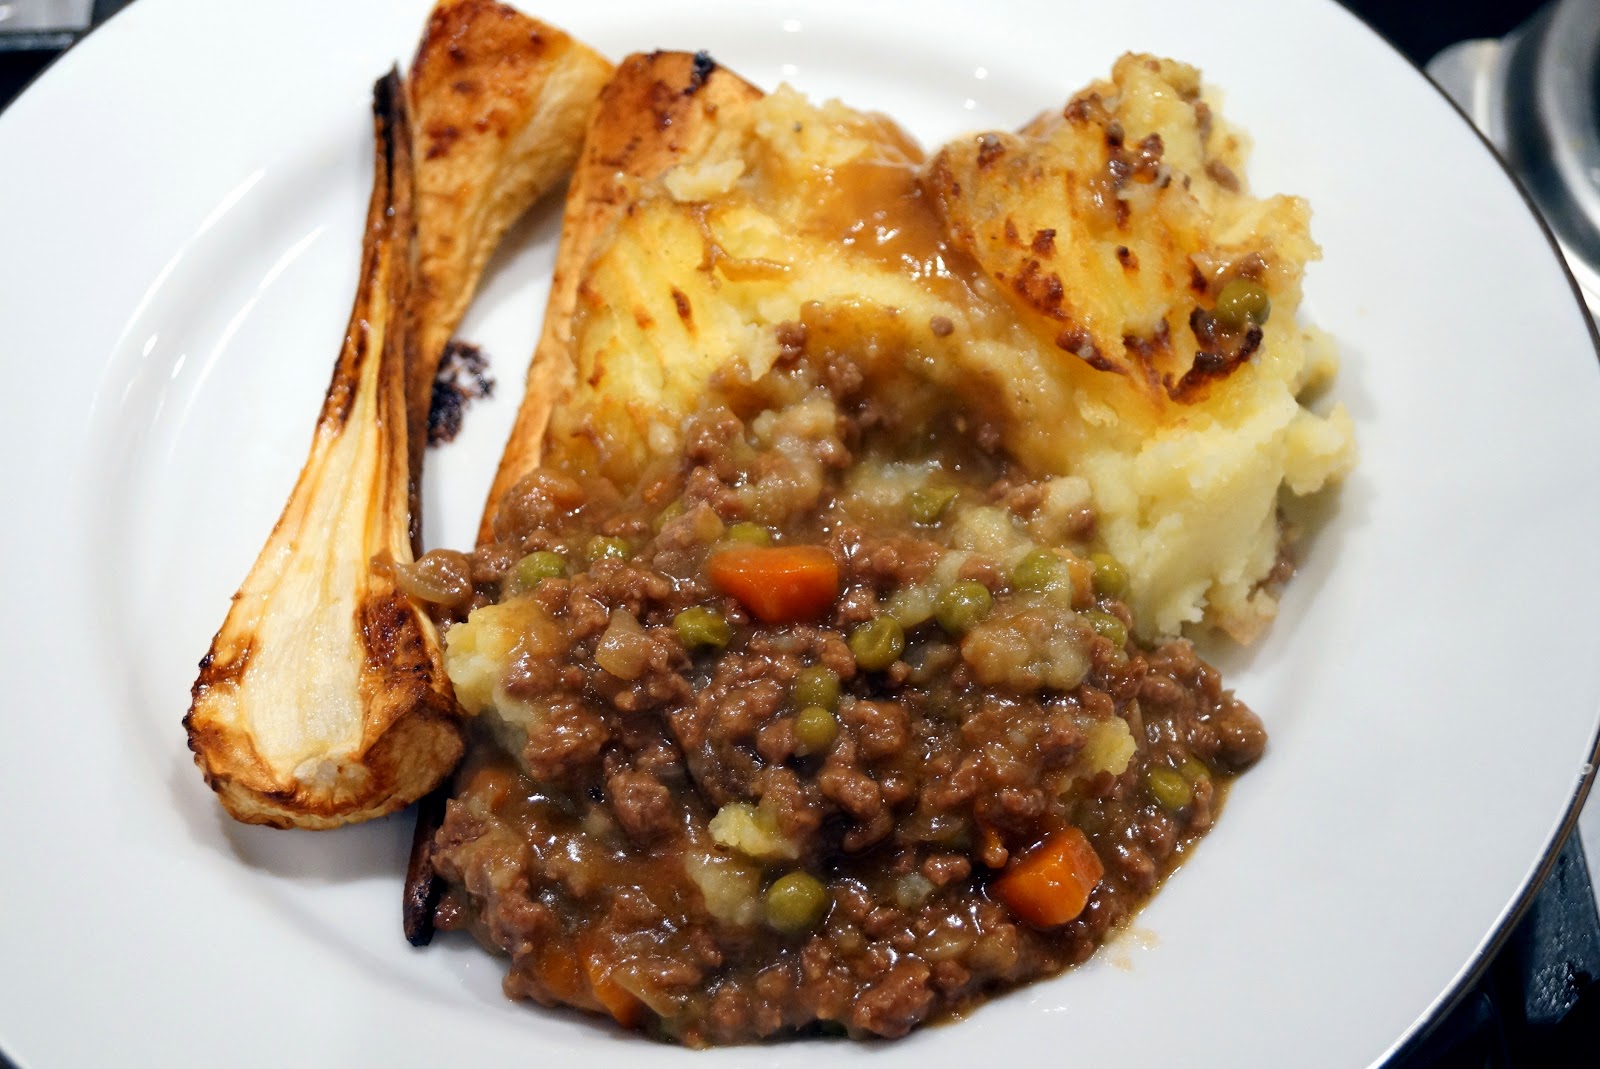
We served it with roasted home grown parsnips.


The verdict? There was no difference in the flavour between the buffalo and good quality beef mince. However the meat was extremely lean (which is why I added a little butter for browning, rather than cooking it in its own fat) and cooked into a beautiful tender mixture with no gritty or gristly bits. I'd definitely use buffalo again - I'd probably not drive 20 miles to the farm for it, but may well add a pack to my next Ocado order; it's rather more expensive there, at £6.49 for 300g when we paid £4.40 for 400g, but unless we were doing a huge shop, the cost of fuel to drive there and back would far outweigh the difference.
I'm sharing this with the Slow Cooked Challenge at Farmersgirl Kitchen


Print Friendly and PDF