Yep, it's that dragonfly stamp again! I just can't get enough of it!
This time I've used it to make a birthday card. I inked the edges of cream card and lightly stencilled patches of lines and trelliswork over it, then used dark brown to stamp the dragonflies and sentiment and various shades of lighter brown to stamp postmarks, wrinkles, text and "cup stains" using stamps that came with a recent issue of Creative Stamping.
I am sharing this with
Little Red Wagon - LOVE it! - I think you all know how much I love dragonflies, and this stamp in particular, and of course stamping is my greatest crafting love.
Watercooler Wednesday - All About Occasions.
Thursday, 28 February 2019
Tuesday, 26 February 2019
Clean and Simple at Cardz 4 Guyz
It's time for our new challenge at Cardz 4 Guyz and this time we'd like to see a Clean and Simple card.
If you are unfamiliar with Clean and Simple (CAS) it means an uncluttered card, with plenty white space (the white space needn't actually be white, it can simply be unused space in whatever background colour you have chosen) with minimal layers and embellishments.
I've used a stamp of a cassette tape - remember those? - and based my idea on a joke a friend shared on Facebook. I hand drew the pencil and printed the sentiment, using a suitably 1970s font, on my computer.
I think this would make a great card for a 50th birthday, because I expect nobody under that age would remember cassette tapes or why it was always necessary to have a pencil nearby when playing them.
The tape is a very useful stamp because, if your handwriting was better than mine, you could personalise it by writing the recipient's name or favourite piece of music on the label.
If you are unfamiliar with Clean and Simple (CAS) it means an uncluttered card, with plenty white space (the white space needn't actually be white, it can simply be unused space in whatever background colour you have chosen) with minimal layers and embellishments.
I think this would make a great card for a 50th birthday, because I expect nobody under that age would remember cassette tapes or why it was always necessary to have a pencil nearby when playing them.
The tape is a very useful stamp because, if your handwriting was better than mine, you could personalise it by writing the recipient's name or favourite piece of music on the label.
Monday, 25 February 2019
Sparking joy
Am I going all Marie Kondo? Well, let's put it this way, if I were to hold each item in my craft stash to see if it sparked joy, it would probably take me years. And at the end of it, not only would I have failed to part with anything, I'd probably be thinking "But I'd be even happier if I had MORE!"
However, Spark Joy is the current title over at the Library Challenge where the cover they shared is this edition of the book:
I decided that as decluttering is the aim of the book, I would make a very CAS, uncluttered card using colours and a layout reminiscent of the book jacket. I masked off the card to leave a circle and blended yellow and orange distress inks into it, then stamped the sentiment and the lovely silhouette stamp overlapping it.
The stamp was part of a set produced by Trish Bayley, many, many years ago. Does anyone remember Trish? Long ago, before most people had internet, she used to run a sort of postal craft club and once we all started to get online she ran a couple of email based crafting groups. Blogs, Facebook and Instagram were still a long way in the future. The last I heard of her was when she had a couple of projects published in Craft Stamper, and even that must have been 15 years ago. I wonder what happened to her?
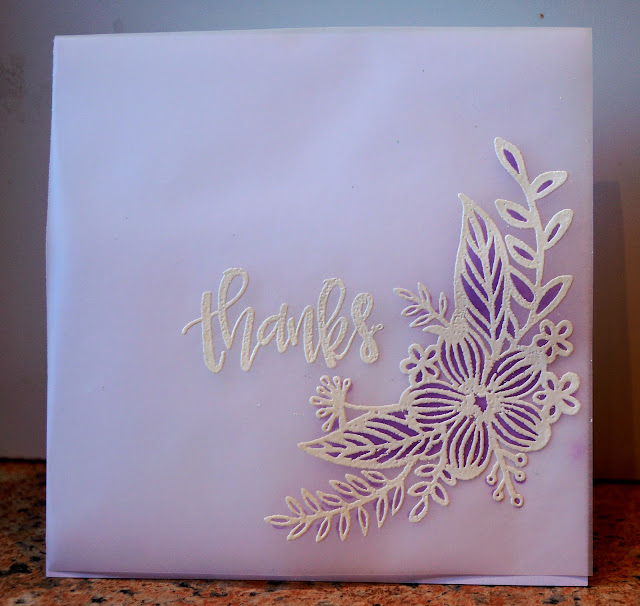
Amethyst flower
Ever since I got this stamp I've been wanting to use it on vellum, however when I stamped it on my very last piece of vellum the other week, I made a mess of it and didn't have chance to buy any more vellum until last weekend. So this card has been a long time coming!
I stamped and heat embossed the flower and sentiment in white and then coloured from behind, then used the vellum as a wrap for a white card, adhering it only to the back of the card.
I am sharing this with
Just Us Girls - Photo inspiration
CAS on Friday - Vellum
I stamped and heat embossed the flower and sentiment in white and then coloured from behind, then used the vellum as a wrap for a white card, adhering it only to the back of the card.
I am sharing this with
Just Us Girls - Photo inspiration
CAS on Friday - Vellum
Happy Reindeer
It's Rudolph Day today, as it is on the 25th of every month, and with February being such a short month we only have 4 days in which to play along at Scrappy Mo's Rudolph Day Challenge, so I hope you're all feeling suitably festive!
I've used the Stampin' Up! Cookie Cutter Christmas stamps and die for my reindeer and sentiment, and dressed them up in festive brads from a very VERY VERY old Hot Off The Press Christmas kit. The background is a piece of corrugated card I rescued from some product packaging - as people know I'm a foodie, they often give me Christmas gifts of items like flavoured oils and chutneys, which tend to come in rustic looking packaging, which of course I always rescue and add to my stash. The snowflakes are the last few from a bargain sheet I picked up at Lidl a year or two back.
Thanks to the recycled corrugated card, I am also sharing this at 52 Christmas Card Throwdown - Recycling
And at Crafty Hazelnut's Christmas Challenge where I've gone for the Anything Goes option (although that hat brad does have a tiny bit of gold on it!)
Sunday, 24 February 2019
Having a play
Sometimes it's fun just to put a set of stamps and a pile of scraps on the table and just play around and see what happens.
I pulled out some vintage/steampunk/masculine stamps and a whole host of vaguely masculine coloured snippets, along with a selection of inks and some embossing powders, and some MDF cogs that had been hanging around in my stash for years.
First of all I coloured the cogs with Alchemy glimmer waxes and set them aside to dry, while I stamped, embossed, tore and cut to my heart's content. What a lovely way to spend a morning!
The only bit of actual planning went into the background card - I inked the edges then used the Misti to accurately stamp the border along all 4 sides of the card so that it lined up at the corners.
Misti came to my rescue when stamping on kraft too - I don't know whether it's a universal thing or whether it's just the ones I've happened to buy over the years, but I always find kraft card is highly absorbent and just slurps up any ink applied to it, so I have to stamp over and over again to get a clear image. Luckily with a stamping tool like Misti, it's perfectly possible to stamp multiple times. When I finally got my images, I embossed the large cogs with verdigris embossing powder and added a few touches to the portrait with gold and white gel pens.
Somewhere in there is a background of faux newsprint (well actually I think it's a vintage recipe for poached halibut, but you can't see enough of it to matter!).
I am sharing this with
Pixie's Snippets Playground because it is mega-snippety
Inkspirational - Use Your Stash because boy, did I use that stash!
Make my Monday - Make it Krafty - I hope there's enough kraft in there to count!
and finally a second visit to The Male Room - Anything goes where that tiny scrap of faux newsprint stops me from also playing the optional card, No designer paper.
Sparkling snowdrops
Today the sun is shining and it's easy to believe that spring is on the way, but there are still very few spring flowers in the garden, just crocuses and the last of the snowdrops, those brave little flowers that start to bloom in what is often the coldest part of the winter.
A closer look at all that sparkle, which can be so hard to capture on camera. I chose a suitably wintery sentiment from the same stamp set (which I think is from Creative Expressions) to go with my frosty snowdrops.
I am sharing this with
Little Red Wagon - Baby, it's cold outside
Allsorts challenge - Spring Flowers
Alphabet Challenge - Xtra Bling
I have given my snowdrops a frosty look by colouring them in with Wink of Stella for the leaves and stickles for the flowers.
A closer look at all that sparkle, which can be so hard to capture on camera. I chose a suitably wintery sentiment from the same stamp set (which I think is from Creative Expressions) to go with my frosty snowdrops.
I am sharing this with
Little Red Wagon - Baby, it's cold outside
Allsorts challenge - Spring Flowers
Alphabet Challenge - Xtra Bling
Saturday, 23 February 2019
Sisterhood of Snarky Stampers challenge 129 - D is for Diet
The season of pancakes, Hot Cross Buns and chocolate eggs is approaching and with this in mind, Edna has chosen D for Diet as our new theme at the Sisterhood of Snarky Stampers.
A balanced diet is, of course, extremely important - that's why we were born with two hands!
I've used stamps from a recent issue of Creative Stamping along with some texture stamps from the Gentleman Crafter's stamp set. I stamped and masked the image then created the background with sponging and stamping. The cake and wine are stamped separately and fussy cut.
Please note - I coloured hair. I need to go for a lie down in a darkened room now. Thank you.
While I'm recovering, why not share your own diet themed work with us at the Sisterhood of Snarky Stampers? You could be our next Queen or Princess of Snark
Les Parapluies
No, I've not turned French, neither am I turning into Renoir (but we can all dream)…
I'm getting quite fond of DL cards again, for some reason. In this case, because it gave that rain further to fall!
First I stamped the umbrellas and sentiment, then masked them and stencilled the raindrops over the card. keeping the blue pretty faint towards the top and darker towards the bottom, the way water, whether it's rain, showers or fountains seems to go (gravity, I suppose). After removing the masks, I coloured the brollies in with Promarkers in bright sunny colours to liven up a rainy day.
I am sharing this with
Cardz 4 Galz - Weather
Shopping Our Stash - Make your Mark
Friday, 22 February 2019
City Gent
I've had this 'tache washi tape for ages and ages and thought it was really about time I used it. I stamped a similar moustache and spectacles (I think this was a mag freebie stamp but it may be an old Studio G one) on skintone card. And before any arguments start, it's the skintone of most London city gents! Plus brown or yellow wouldn't have worked with the washi tape. Added googly eyes and made the sentiment with a hand held Dymo label machine. The button is a classic gent's suit button.
I am sharing this with
The Male Room - Anything Goes/No Designer Paper
Watercooler Wednesday - Masculine Anything Goes
Thursday, 21 February 2019
Christmas hearts
For this card I have used the lovely - and very useful - optional sketch at Christmas Kickstart Challenge where the theme is "Have a heart". Do you think I've used enough hearts?
The die and the snowflake embossing folder were magazine freebies and the heart embossing folder is from Santoro. I've added some Scandi-style heart washi tape and foiled heart backing paper with a stamped sentiment.
I am also sharing this with Fab 'n Funky - Christmas
Meow's it going?
This stamp came from a set of cute Siamese cat stamps came with an issue of Making Cards last year and I've not used them anywhere near often enough. Somehow when I want a cat stamp I automatically go for the Katzelkraft set and my others gather dust.
I stamped the kitty in brown and coloured it with pencils. The sentiments in the set are all tiny, and I wanted something rather bolder with more impact so I used one from a different set.
I am sharing this with
AAA - One corner (I decided not to use the optional music theme as all my music stamps are unsuitable for CAS cards)
Addicted to stamps and more - Clean and Simple
CASology - Furbaby
Sparkles Monthly - Include an animal
Sweet Stampin - Love your pet
Wednesday, 20 February 2019
A pop up box at Back to Basics
At Back to Basics and Beyond this time we would like you to make a pop up box. There are lots of tutorials and ideas available online - we have a couple of links for you to check out over on the blog. I tried making one once before and struggled with it, so I was delighted to find this set of instructions at Tinyrose's Craft Room which makes it really easy as long as you have a scoring board.
I used paper and stamps from Craft Consortium's English Garden range and used pencils to colour the images and acetate strips to hold them in place.
I am sharing this with Sparkles Monthly Challenge - Include an animal
I used paper and stamps from Craft Consortium's English Garden range and used pencils to colour the images and acetate strips to hold them in place.
I am sharing this with Sparkles Monthly Challenge - Include an animal
Sunday, 17 February 2019
Snowy sparkles
The word Christmas is stamped in gold and heat-embossed with a gold sparkle embossing powder, then the word Merry stamped on afterwards.
The trees are stamped in green then drizzled with white PVA glue, with a thicker layer along the bottom for texture, then sprinkled with white glitter. Unfortunately it's such a gloomy afternoon I had to use flash for the photo so the glitter on the trees has reflected it and doesn't look as white as it does in real life.
A couple of strips of spotty washi tape "frame" the Christmassy landscape.
I am sharing this with
Addicted to Stamps and More - Holiday
Crafty Hazelnut's Christmas Challenge - use some green
52 Christmas Card Throwdown - Winter Trees
Jingle Belles - All that Glitters
G&T? Don't mind if I do!
So, while I was stencilling the background for the card in my previous post, I thought that another area of the stencil looked rather like a trace of bubbles rising in a fizzy drink... that made me think of gin and tonic (well, tbh most things make me think of gin and tonic...)
So, I stencilled it with Twisted Citron DI, I do love that colour, somewhere between lemon and lime. Then I stamped the G&T sentiment from Crafters companion, positioning it so that it looked as if the bubble tracks were rising from the middle of it, and interspersed the stencilled lines with traces of stickles to add to the "fizzy drink" effect.
This is my second entry to Less is More - One layer, focus on sentiment
Being awesome
It's one layer time at Less is More this time - it doesn't seem like 5 minutes since the idea of creating a one layer card left me quaking in my shoes, but this time I've created two cards for the challenge and it's still only the second day! Mainly because in recent weeks I've treated myself to several new sentiments that really deserve to be the star of their own show.
Here is the first:
For this card I used the distressed grid effect corner of one of the huge A4 sizex Crafters Companion stencils as a background then stamped the sentiment, from an Altenew set, over it and scattered around a few dragonflies using tiny stamps from a set I won in the Butterfly Challenge.
I am sharing this with
Less is More - Focus on Sentiment
Addicted to CAS - Grid
CD Sunday Challenge #4 - Anything Goes
It's time for our latest challenge at CD Sundays and once again our theme is Anything Goes.
This time I've used the beautiful Water's Edge CD from Design House Studios and my favourite theme of all, a dragonfly.
The background isn't from the CD, it is from a 6x6 pad of matching paper, but everything else is from a single sheet. They call this inverted decoupage a "side stacker" and it comes with a frame to cover the raw edges. I finished the inside with other pieces cut from the sheet.
Saturday, 16 February 2019
Green and blue dragonflies
Yes, it's that Woodware dragonfly stamp again! I'm starting to realise it is much more versatile than I first thought - although it's so beautiful I'd have loved it even if I hadn't found it to be so versatile.
This time I have used a brayer and a Kaleidacolour pad to ink up the image. To complement it, I sponged some of the colours from the pad over the inside of an embossing folder before dry embossing white card.
I am sharing this with The Butterfly Challenge where my choices are Apple Green and Anything (dry embossing). I'm pretty certain Mrs A once told me that dragonflies can count as butterflies for her lovely challenge!
Tuesday, 12 February 2019
Wild Animals at Cardz 4 Guyz
Over at Cardz 4 Guyz, our new challenge has just started and our theme this time is Wild Animals.
The ribbon, from my stash, was the starting point for this - I think it's lovely for on a card for a little boy. I've used a very old Woodware stamp set, I think I bought it to make my granddaughter's first birthday card and she'll be 10 in the spring - for the image, sentiment, bananas and some of the leaves, a woodware punch for the other leaves, and lots and lots of bits from my snippets box for the punching and all the layers.
I am sharing this with
2 Crafty Critter Crazies
Crafty Calendar - add texture and ribbon
Monday, 11 February 2019
Seeing stars
The latest challenge at Twofers, where we are asked to make two different cards using one stamp, die or stencil, is Stars.
I decided to use a star stamp that was part of a recent magazine set.
A cute Christmas card and a distressed romance card - how different can you get? I am sharing this duo at
Twofers - Stars
Now for a closer look at the cards separately:
Here I have stamped and embossed the stars in gold, along with a line of Christmas trees. I might have chosen silver instead of gold but for some reason my silver ink pad and embossing powder have started refusing to speak to each other although they both speak to everything else. Temperamental little things!
I stamped Rudolph and the sentiment on a scrap of white card and cut the top into a hill shape so that the tree line ran atop the hill, Rudolph is coloured with Promarkers and his very VERY shiny nose is courtesy of a liberal dose of Glossy Accents.
I am sharing this card with
Christmas Crafts All Year Round - Carols and Songs (Rudolph the Red Nosed Reindeer of course!)
Crafty Hazelnut's Christmas Challenge - Cute
Recently I've seen several cards on Pinterest that have been stamped in brown on wood-grain paper, and thought how much they remind me of poker-work - the art done by scorching the design onto wood with the tip of a very hot stylus - that was popular in the 1970s. I thought that it would be a super technique for a masculine card.
I wanted to make my masculine card romantic, avoiding the mushy hearts and flowers stuff so popular at this time of year, and what could be more romantic than Paris under a starlit sky? I used a Tim Holtz Cityscapes stamp - I think these lend themselves beautifully to DL shaped cards - and a scrap of woodgrain paper left over from another project. It doesn't quite have the poker-work effect I was hoping for - I think the stamp is too detailed for that - but I like it anyway!
I am sharing this with
Just us Girls - Wood
The Male Room - Love Your Men
Spotlight dragonflies
A few days ago I posted about having fallen into the Big Stamp Trap with this beautiful Woodware dragonfly stamp. It's such a beautiful stamp though, I can't bear to think of it hardly ever being used, so I'm challenging myself to see just how many different cards I can make with it.
This time I have stamped it twice, once onto white card and the other onto purple paper, and die cut two circles from the purple image, using then to "spotlight" the dragonflies.
The base card is stamped with postmark and text elements from the wonderful stamp set in the current issue of Creative Stamping. The dragonfly from the same set is stamped in purple ink and embossed with clear powder. I also used the purple pad around the edge of both card and topper and again, heat embossed them with clear powder.
I am sharing this with
Inkspirational - Text (and no, I didn't intentionally choose the colours to match the graphic!)
Country View Challenges - Black and white plus 1
Subscribe to:
Posts (Atom)