Friday, 30 July 2021

Travel Blues

 Travel may be opening up again for some people, but it's going to be a long time before a guy can just grab his backpack and set off to wander around Europe. 

Except on paper. 


For this card I printed off a paper, a topper sheet and an insert from the Debbi Moore CD "Cards for Men - Silhouettes". 


I covered the front and back of the card with the paper, then used one topper and sentiment on the front, and cut just the silhouettes and skyline from a second topper and added it to the lower edge of the front using 3D adhesive. 

Finally I finished the inside with the insert. 

I am sharing this with 

Cardz 4 Guyz - shades of blue  

CD Sunday Plus - Anything goes 

Watercooler Wednesday - all things masculine 


Thursday, 29 July 2021

What I've been cooking in July

 You haven't seen much craft from me recently (although I have been crafting, just things I can't share yet) so I thought I'd share some of the things I've been cooking recently instead. 

I joined a new Facebook group where a recipe book of the month is chosen and members share the dishes  they have cooked from it. The book for July was "Vietnamese" by Uyen Luu, and after a few days of drooling over other members' creations, I knew I had to have a copy. 


I am totally in love with this book - I've already cooked quite a few dishes from it and as you can see, it is still bristling with sticky notes. Here are some of the things I've cooked (a couple of others were delicious but not so photogenic). I can't share any recipes with you because of copyright. although if you do a web search for the book and author, you will find that several websites have been given permission to share sample recipes. 


Slow Cooked Beef with Lemongrass, Star Anise and Root Vegetables


Instant Carrot and Kohlrabi Pickle 


Baked Ginger and Lemon Chicken 


The veg to accompany the chicken 


Spring Onion Oil (lovely on noodles) 


Sumer Tomatoes, Celery Leaves and Thai Basil 

The Lemon and garlic chicken was the star out of all these delicious dishes. All the dishes are easy to make and use easily obtainable ingredients. I'm hooked! 


Wednesday, 28 July 2021

At the edge of the cornfield

 I love that strip along the edges of fields of ripening corn, where poppies and cornflowers often grow. The gold of the corn, red of the poppies, blue cornflowers, white daisies and cow parsley and green grasses all look so lovely together. So when I realised the flowers on this old Kanban stamp could be cornflowers (they could equally well be pinks, that's artistic license for you!) I decided that would be my colour scheme. 


I stamped the image on lightweight watercolour paper - I prefer a heavier one for painting on but the surface of the heavyweight paper I currently have really HATES being stamped on - then coloured it with watercolour pencils. 

I added a poppy die cut, using the dies from the new Indigo Blu magazine kit, and a sentiment stamped in an Art Deco style font. 

I am sharing this with 

Allsorts challenge - Feminine/for a lady 

Stamping Sensations - For a lady 


Tuesday, 20 July 2021

Sparkling roses

 It's too hot to craft! I certainly had to choose something to make that didn't involve any heat embossing. 


So the inks and stencils came out to play. I made a background by blending distress inks over watercolour card then places a leaf stencil over it and sprayed with water, left it a few seconds to work them blotted up the excess. The leaves don't show up very well in the photo, only the ones on the darkest green show, but if you look closely you'll see it's an all-over pattern. 

Next I took the rose stencil and applied a pink glitter paste through it. By now it was so much more than "just a background" that I really didn't want to detract from it  by covering any of it up with an image, so I went for adding a simple die cut sentiment. 

I am sharing this with 

Alphabet Challenge - Use Happy in your sentiment 

Country View Challenges - Use a stencil (or two) 


Monday, 19 July 2021

Butterfly cloud

 For this fortnight's snippets make, I have delved into my snippets basket and come up with some teeny tiny scraps of too-pretty-to-part-with patterned paper, then set to to punch them into little butterflies. 


I stamped the wildflower border and sentiment - Indigo Blu stamps that came with a magazine some years ago - then scattered the butterflies in a cloud over the flowers, sticking them in place with Pinflair glue. 

I am, of course, sharing this in Pixie's Snippets Playground. 


Sunday, 18 July 2021

Festive Gus

 You may be wondering why I've not posted for a few days, well, here's the reason... 


We've had a lovely little break away - stayed in a hotel for pleasure rather than duty for the first time since pre-covid, and had a fascinating tour of a commercial fruit farm in Suffolk, which culminated in a visit to the cherry field where we were able to pick and eat some of the biggest, juiciest, most luscious cherries I have ever seen.  

Anyway, I'm home and crafting again and was saddened to discover that Bugaboo, one of my favourite sources of digis, has closed down. But I still have plenty images and this one of Gus is one of my favourites. 


I coloured him with Promarkers, used a stitched square die to cut the image out, and added a larger red stitched square, a die cut bottle and a  stamped Dylusions sentiment. I finished off Gus's outfit with Stickles and his specs with Glossy Accents. 

I am sharing this with 

Crafty Hazelnut's Christmas Challenge - anything goes/use a die cut or punch 

The Male Room - Christmas in July  


Passion for Markers - Dies and/or Punches 

Creative Crafting Uncles - Drinks 


Tuesday, 13 July 2021

X is for X-Posed

 The latest challenge at the Sisterhood of Snarky Stampers is X is for X-posed. As soon  as I saw the theme, I knew which stamp I was going to use. Then I scrolled down to enjoy the Sistahs' creations - and say that two of them had already used the same stamp. And I'd used it for an SOSS challenge only a few weeks ago too, so that pretty much ruled it out. 

So I thought of another sense of X-posed - photography. And remembered that somewhere I had most of a page of blank film cell images I'd printed out years ago from an Ooh La la CD. While rummaging among my snippets for it, I found a part sheet of saucy retro images I'd printed from a digi I won many years ago. And as luck would have it, the images fitted the space in the film cells perfectly. 


Better still, this lady is exposing rather more stocking top than is considered decent. And her little puppy is trying to encourage her to show even more. I made an inky background to mimic the background on the image, then edged the card in dark blue to match her dress. The sentiment is from a Tim Holtz Snarky Sentiments pad and it's slightly weirdly positioned because there was some wording on the image that I wanted to cover up. Which meant there was a space at the top where I would have preferred the sentiment to be, so I did what I so often do when there's a problem - stuck a butterfly on it (that could be a pretty good metaphor for life, really). At least with butterflies on the image too, it isn't totally irrelevant. 

Edna's looking pretty X-Posed too! 


CAS Poinsettia

 This is one of the quickest cards I've ever made, I must bear it in mind if I need to do some last minute "batch baking". 


The stamps are from a Creative Stamping set from a couple of years ago. I always seem to use them the same way, colouring them boldly with markers, and wanted to try something different, so I worked out where I wanted the poinsettia flower to lie then blended red ink in the area (using the Misti helped a lot with positioning). Then I stamped the image over it using Versafine Clair ink and added the sentiment. 

I am sharing this with

Addicted to CAS - Christmas  


Crafty Hazelnut's Christmas Challenge - Anything goes/use some red 

Less is More - Christmas in July 


CAS Christmas - Poinsettia 


Taylormade Cards 4U - Holidays in July 


Monday, 12 July 2021

Sunflower!

 Those of you who know me on Facebook or Instagram may have seen that last week I won a huge box of Cadence mixed media supplies, many of which are products I've never tried before. One of these is called Petal Porselen, which I presume translates as Petal Porcelain and is a powerful fabric stiffener. 

I've been looking for a product like this since the early 1980s. Back then I lived in Hong Kong. Emma had started school and once she'd set off on the school bus in the morning, once a week or so I would grab toddler Fiona and head off on the hour long journey into Kowloon or Central Hong Kong for a shopping trip. There was a wonderful craft shop there  that stocked all kinds of American products and magazines. I used to buy a magazine called McCalls, which was full of fabulous projects, and they often had home decor items such as photo frames and tissue box covers decorated with ribbons and fabric flowers that were stiffened with a similar product, but the shop could never get the product for me. 

Now, this shop was on the 17th floor of one of Kowloon's skyscrapers. The lift up to it was TINY - so small that I couldn't get me, Fiona and the pushchair into it all together. The door in the lobby next to the lift was the entrance to the Hot Lips Bar and Massage Parlour and the first time I went to the shop, I rather cautiously peeked inside to ask if I could park the pushchair there. It was mid morning and the bar girls had no "clients" and when they saw Fiona, with her blonde curly hair, they all cooed over her and wanted to cuddle her. Back then, in Hong Kong, there was no "stranger danger" and it was perfectly safe to leave children with strangers, so when they offered to look after her while I went to the shop, I cautiously accepted. Fiona had a lovely time with them and from then onwards, insisted on going to visit her new friends there every time we were in the neighbourhood. It meant I got a lot of craft shopping done, but I always glanced over my shoulder before going in because I was sure that if one of Mark's senior officers had seen me leaving my daughter in a brothel there would have been questions asked! 


Anyway, after that rambling (you seem to be getting a lot of reminiscences from me these days!) on to the Petal Porselen, which I used on this massive fabric sunflower. This is the last one from a pack I bought  many, many years ago. I've tried using them several times but found the petals too floppy to be used on a card - as soon as the card stands upright, the petals flop over and spoil the look. However once stiffened with this product they hold their shape beautifully! 

Such a big bold flower doesn't need much else, so I've used it as the focal point of a gatefold card covered inside and out with papers printed from Debbi Moore's beautiful Sunflower Dreams CD. 


I am sharing this with 

CD Sunday Plus - anything goes 

Craft Rocket - Summer 


An old wine label

 Recently we had a bottle of wine where the label totally covered the bottle. It was designed with a fabulous mixture of prints and colours and I couldn't bear to part with it, so I carefully soaked it off and, once dry, affixed it to some stouter paper with spray adhesive. I've used it for the die cuts on this  card - keeping to the wine theme of course! 


I used some patterned paper for the background, lightly distressed at the edges, and added a "table top" of woodgrain paper. The bottle and glass are cut from some of the wine label and lightly inked around the edges. The sentiment is from the same die set - if I recall correctly this came with Die Cutting Essentials a few years ago - and is part of a much larger cut, surrounded by vines and grapes, which I snipped away to leave just the bold word. By keeping it bold and uncluttered, although not at all CAS, I reckon it has a very masculine look and makes that wonderful label paper the star of the show. 

I am sharing this with 

Allsorts Challenge - Masculine  

River of Creativity - No hearts or mushy stuff  


Just us Girls - Recycle  


Sunday, 11 July 2021

Floral butterfly

 I've used some of my newest stash and some of my oldest for this card. 


The papers are from a pad I've only had for a few days, First Edition's Forever Free 6x6 pad. The Marianne ribbon-threading die and the classic Cuttlebug butterfly die are among my very oldest dies. I embossed the butterfly with one of the matching folders but with all that lovely floral detail I don't think it really needed it. The texture feels nice though, so it adds to the tactile quality of the card. 

I am sharing this with 

Make my Monday - Anything Airborne  

Watercooler Wednesday - All things feminine  


Let it Snow

 There's a positive plethora of Christmas challenges about at the moment so I'm going to need to up my festive cardmaking game. And this card is perfect for a speedy make. 


The entire card front is made with a single embossing folder. I have to admit I wimped out and made it with separate card then stuck it to the front of my card blank just to make sure it was accurately positioned (that's called learning from previous mistakes). Before embossing it, I swiped purple ink all over the flat surface of the folder. After embossing, I dabbed gold wax over the lettering and, once trimmed to size, smeared a little of the gold wax around the edge of the card. I also added clear sparkly Stickles to the snowflakes and stars but the sparkle doesn't show up at all, probably because it's such a gloomy day that there's no sunshine to glint off it. 

I am sharing this with 

52 Christmas Card Throwdown - deep purple, gold and white


Sparkles Christmas - More than one snowflake

Litte Red Wagon - mid-way to Christmas

Let's Squash It - Shimmer and Shine 


Shopping Our Stash - Christmas in July 


Friday, 9 July 2021

Red Eyed Tree Frog

My grandson's birthday is coming up shortly and his passion has changed from dinosaurs and pirates to Mario and tree frogs. A fairly radical switch, and it means the stash I've used for his last few birthdays is out of fashion with him. 

So it's a tree frog instead... 


This gorgeous tree frog and his log (yes, I was singing "Five little speckled frogs... " while making this card)  were stamped with stamps that came in a recent Creative Stamping mag and coloured with Promarkers. I used Google to make sure I positioned the colours correctly because you can't get away with inaccuracies where an enthusiastic six year old is concerned, and found that despite the name, the eyes really are more of a reddish orange than a true red. 

The background is embossed Core-dinations card lightly sanded and I've added a stamped sentiment and punched and die cut foliage. As the frog has such an expression of intelligent curiosity on his face, i positioned everything to make it look as if he is reading the sentiment. 

I am sharing this with 

Passion for Markers - Animals

Fab'n'Funky - Anything goes 

AAA Birthday - use an embossing folder 


Addicted to stamps and more - Any occasion  


Thursday, 8 July 2021

Golden roses

 I was flicking through a magazine the other day and saw a card made with this  vase of roses stamp and realised it is FAR too long since I used it. So I had to put that right. 


I actually used two sets here, both of which I won in the Playground a while ago. I created an inky background by blending the three shades of green ink from an Altenew quad pack (the fourth "colour" in the pack was black) then used the darkest of the greens to randomly stamp the Mackintosh style rose from the sentiment set all over the background. 

Then I stamped the vase of roses and sentiment and heat embossed them in gold on dark green card. I fussy cut the vase of roses, cutting not-too-close to the edge so as not to crack the embossing and using a craft knife  for the internal bit, then attached it to the card with Pinflair glue to raise it slightly from the background. 

I am sharing this with 

Alphabet Challenge - Green and/or gold 

Cardz 4 Galz - get inky 

We Love Chocolate Baroque - Beautiful Blooms 

Crafty Calendar - Anything Goes 


Sunday, 4 July 2021

Bon Voyage!

 Following on from yesterday's card made using First Edition Bon Voyage papers, here is another card made with several papers from the same pad. 


I cut a square of the luggage paper and a large circle, to look like a globe, from the world map paper, and lightly distressed the edges of both. I topped them with a strip from the aeroplane paper (those tiny planes are glossy, as if they have been heat-embossed) and four of the luggage tags. Finally I finished off with a stamped sentiment and plane. 

I'm sharing this with 

Cardz 4 Guyz - Travel 

Crafty Hazelnut's Patterned Paper Challenge - Anything goes 


Saturday, 3 July 2021

Ship's Wheel

 When I was a little girl, we sometimes visited my father's cousin who was married to a retired sailor. Their house was called "Hove To" and was crammed with nautical memorabilia - even the window on the stairwell had been made to look like a porthole. I loved wandering through the rooms and inspecting all the bits and pieces - it was like a private museum. And my favourite piece was the ship's wheel - I felt as if I could sail the house away with me at the helm! 


I've used layering stamps for the ship's wheel and anchor, and a sentiment from the same set. The patterned paper is from the First Edition "Bon Voyage" pad - the striped pattern is the reverse of the ship pattern. I've added lots of layers and some candi. 

I am sharing this with 

Inkspirational - Maritime 


A Bit More Time to Craft - Anything Goes 

Colour Hues - Red and Blue 


Friday, 2 July 2021

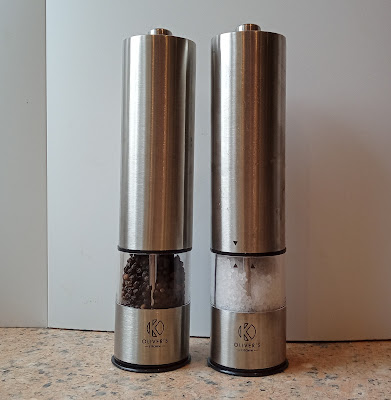
Review - Electric Salt and Pepper Mills and Recipe - Summer Chicken Traybake

 AD: I was sent the salt and pepper mills for review: all thoughts and opinions are my own. 

I was recently approached by Oliver, of Oliver's Kitchen, to see if I would like to review one of his range of kitchen appliances. Oliver's Kitchen is a small, family run business and you can read about them (and see some gorgeous baby photos!) here

They sell a small but very useful range of kitchen items,  the kind of practical workhorse items every kitchen needs rather than the snazzy stick-it-in-a-drawer-and-forget-it stuff. I chose to review the electric salt and pepper mills, as they looked so smart and stylish. The pair is currently on offer  at £16.99. 


The brushed steel finish is very smart - and having already splashed turmeric on them I can reassure you that it's very easy to clean too. 

The box says 4 x AA batteries are required, but that's for each mill, so you need a good supply of batteries to get started. Because of the moving parts, I'm guessing the battery life will be pretty short,  but as the batteries I used claim to have a lifetime of up to 10 years it may be a long time before I can confirm or deny that. 

So, I had my mills, I had my batteries, my salt and pepper were ready -  but then came the time to put the batteries and seasonings into the mills. It took me and Mark several minutes to work out how to open the mills and where to insert the batteries; an instruction leaflet in the box might have made things easier. However once you have the knack, filling them is very easy. 

There is a base plate on each mill to save mess on the worktop. At the moment, we are still not used to taking it off before using the mills, so nearly every time we use them, one or the other of us is puzzled to see nothing coming out, but that aside they are very easy to use and have the huge advantage of being easy to operate with one hand, perfect when you are seasoning a sauce that needs to be stirred. 


As you can see, you get a nice even scattering although you can't adjust the size of the grind. 

These mills would be perfect for anyone with dexterity problems - my mother has arthritic hands and had to stop using her pepper mill several years ago because she could no longer grip and twist it. They might need help with filling them and changing the batteries, but for daily use the simplicity of use would be a real boon. 

Now on to the recipe - you can see it before cooking in the photo above. 

Summer Chicken Traybake 

On the few hot days we had last month (please don't say that's all the summer we're getting this year!) the last thing either of us wanted to do was spend ages in the kitchen, so an all-in-one dish that pretty much looks after itself would have been perfect. Unfortunately I didn't come up with this until the weather had turned wet and distinctly chilly - but there are still several months of summer to come! 


Ingredients (to serve two) 

2 chicken breast portions, skin on (If you can only get skinless ones, wrap the chicken in the bacon rashers instead of making the bacon into rolls, to stop the meat drying out) 

6 rashers streaky bacon

new potatoes - however many you expect to eat (we all seem to have different capacities for new potatoes!) halved if large

2 carrots, peeled and cut into chunks

2 torpedo shallots, peeled and halved keeping the root ends of each half intact

1 lemon, cut into quarters

2 large cloves of garlic, peeled and left whole

3 bayleaves

3 large sprigs of thyme

2 tablespoons sunflower, rapeseed or light olive oil

seasoning

½ cup frozen peas, defrosted. 

Preheat oven to 190 C (170 C fan), 375 F, gas mark 5. 

In a large roasting tin, mix together the veg (except the peas), herbs, lemon, garlic and oil. Toss until everything is coated then spread evenly over the tin. Place the chicken breasts on top of the veg. Roll the bacon into little rolls and tuck in here and there around the tray. Season and place in the oven. 

After 45 minutes remove from the oven and use tongs (they sell those at Oliver's Kitchen too!) to remove the lemon, garlic and herbs. Scatter the peas over the veg and return to the oven for 5-10 minutes. 

I made an onion gravy to serve with this but it didn't really need it, it's a complete one-dish meal. 

Thursday, 1 July 2021

Cute as a Bug

 The stamp set I've used for this card is pretty old, and I think it came from Clearly Besotted, it's very much their style. 


I started off with the big flower, hand drew a stalk and used a deckle edged ruler to draw in the ground, then stamped the ladybird and leaves. I coloured it all with alcohol markers then heat embossed the sentiment on a scrap of black card and added it. 

I am sharing this with

CAS on Friday - Ladybirds  

2 Crafty Critter Crazies - anything goes 

Passion for Markers - CAS