Wednesday, 29 September 2021

Festive Robin

 I am waaaay behind with Christmas card making this year, so I need to make a few quickie ones to boost my stockpile. That's where Hunkydory's kits come in handy - these two cards are made using a kit from a few years ago. 


The first card uses  half of one of the background card sheets plus an image, sentiment and frame from one of the die cut sheets. 

The second uses  the other half of the background, turned sideways, topped with a border from the die cut sheet. I then used a gold frame, the waste from another of the images on the sheet, and stuck a piece of paper of the same design taken from a Hunkydory "Little Book" behind it, trimming away the excess. I decoupaged the robin and foliage from a second sheet of the same design and attached it with 3D adhesive, overlapping the frame where necessary. Then I finished the card with a sentiment and embellishment, the last items left on the die cut sheet, and some teardrop shaped gold gems. 

I am sharing these with 

Rudolph Days (Hooray, it's back!) at Scrappymo's 

Christmas Cards All Year Round - something beginning with R or S (Robins) 

Crafty Hazelnut's Christmas Challenge - Anything goes 


Sunrise silhouette

 I was inspired to make this card by a video I saw on Instagram of a card made using a stencilled sunburst behind a foliage silhouette. Different stamps, different stencil, but the impact is the same! 


I masked the lower part of the card, making sure the sentiment would fit, then stencilled the sunrise above it and stamped the silhouette (a very, very old Trish Bayley stamp) over it. Removed the mask,  ruled a line across the card to ground the image, then stamped the sentiment - a stamp from a useful set I recently won in the Allsorts challenge - beneath the line. By happy coincidence, the sentiment is the right width to make it look as if the plants are springing out of the top of it! 

I am sharing this with 

AAA Cards - no layers (not using the optional twist) 


Addicted to Stamps - die cuts and/or stencils 


Allsorts Challenge - Anything goes/nature


Friday, 24 September 2021

Better with age


The latest challenge at the Sisterhood of Snarky Stampers is U is for Ugly. 


I chose this delightfully ugly dog stamp from The Card Hut and teamed it with a Clearly Besotted sentiment that, although not directly saying it, certainly implies ugliness. I gave the dog a background of paper from an old V&A pad that I keep specifically for those times I need some ugly wallpaper on a card (you'd be surprised how often it happens!) and a scrap of woodgrain  paper for a floor.  


Thursday, 23 September 2021

A Slide and Lock card

 I love making gatefold cards but they have an annoying tendency to spring open which can sometimes spoil the look of the outside. A belly band is sometimes the answer, but over at the butterfly Challenge, Mrs A has come up with a different solution, a sliding lock that slips over the two "gates" and becomes a feature of the card. 


Full instructions for making the card are over on the Butterfly Challenge blog. I used all the suggested colours, and cut the squares and circles with stitched edge dies so I've used all elements in the challenge this time. Not only that, but apart from the white card and the pink, of which I used an entire 12x12 sheet with no viable leftovers, every other element was made using complete pieces of card and paper from my snippets  box - even that lovely Crafty Individuals paper on the inside which picks up the plain colours so perfectly. NOT A SINGLE SCRAP WENT BACK INTO MY SNIPPETS BOX!!!! I reckon that for me, that is some kind of a record! 

I am sharing this with 

Butterfly Challenge - Spin the wheel with the latter S (all elements used) 

Pixie's Snippets Playground - Challenge 412 


Wednesday, 22 September 2021

Sparkling Congratulations


This sparkly card is made using a Uniko stencil and pink and purple glitter pastes, using the pink on top, the purple at the bottom and blending the two together in the middle. I die cut the sentiment in pink, purple and white and stacked the three together so the sentiment has depth, and if viewed at an angle you can see the coloured layers. 

I am sharing this with 

Cardz 4 Gals - use a stencil. 

Color Hues - Purple and Pink 


Monday, 20 September 2021

If age is just a number....

 I love sanding my embossed work, as you've probably noticed, so I was very pleased when the latest challenge at Let's Squash It was Let's Sand It. 


The embossing folder I chose is a Tim Holtz one,  and I think this old Rubber Dance sentiment is perfect with it. 

The black card is from a Core-dinations Black Magic pad, with sheets that are black on one side and a lighter colour on the other, so the black can be sanded away to reveal the colour - and the added perk is there's no need to search around for matching plain card to stamp the sentiment on, just turn over one of the offcuts and you have a perfect match! 

I am sharing this with Let's Squash It! - Let's sand it using a folder with letters or numbers. 


Koala-ty!

My current CD crush is still  Polyanna Pickering's Walk in the Wild, and this is my latest creation from it. 


I printed the image, sentiment and two papers, matting the image on to the dark green paper. Seen up close, the striped paper has a lovely textured look even though it is printed on smooth paper, and I decided to pick up on that textured theme with a piece of card that has a mesh of fibres embedded into it. 

I used a scraper tool to edge all the pieces and inked them in brown before assembling the card. 

I am sharing this with CD Sunday Plus - Anything Goes 


Sunday, 19 September 2021

Cheese-cake

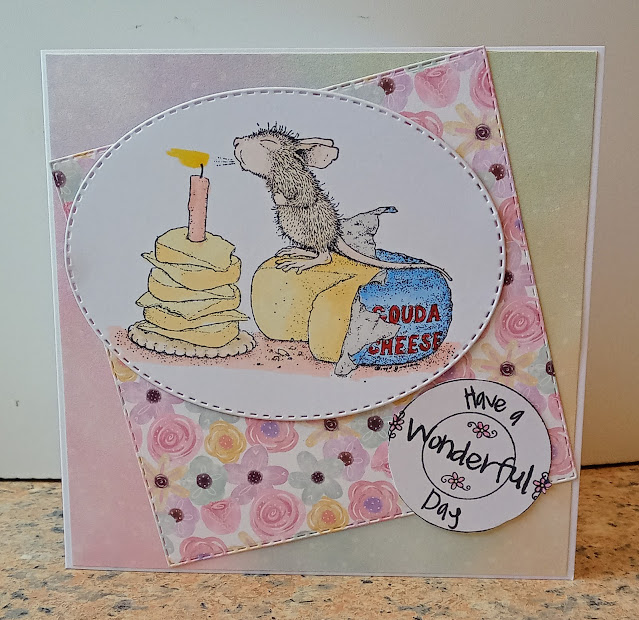
 No, not cheesecake- a celebration cake made out of cheese! 


I made this card for a friend who is celebrating her birthday with a cheese-tasting party. The  image stamp is a House Mouse one, coloured with Promarkers, and the sentiment a very old Polkadoodles stamp. I chose background papers to complement the colours, from a First Edition pad called Forevr Free. The larger paper has a subtle all-over sparkle which looks quite amazing in real life. I tried to capture it in this close up but it really doesn't do it justice. 

We Love Chocolate Baroque - Anything goes/celebrations 

Pearly Sparkles - Pink, Pearls and/or Sparkle 

A Place to Start - patterned paper 

Crafty Hazelnut's Patterned Paper Challenge - anything goes 


Saturday, 18 September 2021

Our wedding anniversary

 Yesterday, Mark and I celebrated our 44th wedding anniversary. We spent a couple of days away earlier in the week, enjoying a lovely afternoon tea in a beautiful hotel in Bedfordshire and spending a fascinating day at The Shuttleworth Collection, a huge collection of historic aircraft that appealed to the military historian in Mark and the engineer in me. The gardens there are beautiful too, and the weather was perfect. 

Just to make you jealous, here is a photo of our tea. 


And this is the card I made for him


The stamps are from two Clearly Besotted sets that were released earlier this year. I coloured the cats with Promarkers - and the colours are significant, when Mark and I met, he owned a ginger cat and I owned a grey one. Neither of us really goes in for mushy sentiments, so this was far more appropriate. I heat embossed it in black on white, my current favourite way to stamp a sentiment. 

The heart is made by sponging ink through a large heart shaped stencil, and the cats fussy cut and attached with 3D adhesive. 

I am sharing this with 

Allsorts Challenge - any real animal or creature 

Addicted to Stamps and More - any occasion  


Watercooler Wednesday - all about occasions 


Show us your pussy cats - Furrything Goes 


Wednesday, 15 September 2021

Autumn again!

 While using the leaf stamp I got out for Monday's card, I stamped a second image from it, this time using just one colour to give it a "skeleton leaf" look.. 


This time I simply matted it onto a smaller card, to get the full impact of the image, adding a stamped sentiment over criss-crossed ribbons. 

I am sharing this with 

Alphabet Challenge - L is for Leaves 

Make my Monday - Autumn/fall 

Craft Rocket - use ribbon, bows or buttons 

Tuesday, 14 September 2021

Another Autumn Card

 This time a very CAS one. 


I used a tree bark stencil with a circular mask to give the bark effect, then added a die cut leaf - the die set was a magazine freebie a few years ago - with the background layer cut using the leftovers from a masterboard I created about a year ago using lots of different inks and pearlescent sprays. It has a lovely shimmering effect that never shows up on photos! 

I am sharing this with

Addicted to CAS - Leaf 


CASology - One 


The Male Room - Nature's Bounty 


Monday, 13 September 2021

Autumn leaves

 While out and about at the weekend, it was very noticeable that the leaves are already beginning to change colour and autumn really isn't very far away. This time of year is reflected in the sheer number of autumn/leaf/harvest themed challenges around at the moment,  and my current crafting is reflecting those themes. 


This card is made using a leaf stamp that I've had for many years and eventually set aside as I just couldn't get good result from it. It was unmounted and very large, and I just couldn't get even enough pressure on it before I had a stamping platform - a single impression is never enough. So I stuck it in a box and forgot about it until now. And now, of course, I have a Misti - but not a good enough memory to immediately remember every long-forgotten stamp! However this turned up while looking for something else and the Misti could well have given it a new lease of life. 

Today I have inked it with a Kaleidacolour pad, using a brayer as the slide mechanism stops the pad from inking properly on the Misti platform. My pad is very, VERY old and not very juicy, so it did take multiple stampings but in the end I managed to get a complete image, even if it does have a slightly distressed look!  

I matted it, along with a sentiment stamped from a Creative Stamping freebie set from a few years ago, and matted the image and sentiment and used the Kaleidacolour pad and  a speckled stamp from the same set as the sentiment repeatedly along the sides to create a border. 

Then I discovered that I'd made the entire card back to front, with the opening  on the left, and had to dismantle it and rebuild it.... 

Anyway, does anyone know anywhere that Kaleidacolour pads are still available? This one really is down to its last gasp, and everywhere I look that seem to be permanently out of stock which makes me think they have been discontinued. A pity if they have, I love my little collection of them! 

I am sharing this with 

Inkspirational - Autumn Leaves  


Sweet Stampin - Colours of Autumn  

Country View Challenges - the leaves begin to fall 


Making hand made paper

 Last week a local crafting friend Petra invited me and another friend, Pat, around for a paper making session - she's made it before but the other two of us were absolute novices. It's really all about recycling old paper into new, and is far easier than I expected! 

Petra already had the equipment we needed  and had prepared ahead by saving all the junk mail that had come into her home, sorting it by colour then tearing it into tiny pieces and soaking it in lots of water, ready to whizz up in the blender when the paper making was about to begin. 

Then we had to dip a fine mesh screen into the wet pulp and pick up a layer of it, drain it and dry it. The drying process takes several days, so I only got to play with the paper I made this weekend. 

We experimented with different inclusions - glitter, coffee grounds, tiny unsoaked scraps of paper and flower petals. 


My favourite of the papers is the coffee grounds paper, which has a faint scent of coffee. It is sturdy enough to dry emboss or die cut, and you'll be seeing a lot of it on her in coming weeks. But for the first make, I chose the little square-ish piece of pink paper. 


As soon as I took this off the mesh I knew exactly what I was going to do with it! You can't see from the photo, but there is actually very fine silver glitter embedded into the paper and it just cried out to be used as a background for a sparkly silver snowflake. I didn't trim the paper at all, because I didn't want to waste a scrap, and because I thought the uneven edges make a perfect contrast for the bold, plain look of my snowflake. A simple stamped sentiment kept it CAS despite the handmade paper. 

I am sharing this with 

Crafty Hazelnut's Christmas Challenge - Anything goes/use some patterned paper  

Less is More - Sparkle 


Jingle Belles - Tic Tac Toe  (I've used the diagonal line Glitter/Die Cuts/Stamping) 


Thursday, 9 September 2021

One in a Melon

I adore this little chappie tucking into his watermelon! 


I printed the image and matching papers from the beautiful Polyanna Pickering CD "A Walk in the Wild". I chose one of the circular images and die cut it to fit the centre of this large scalloped circle die cut then made everything into an easel card. 

I was sure I had a stamp somewhere of the sentiment "You're one in a melon!" which seemed so perfect for this image, but couldn't find it, so created it myself with my new Dymo label maker. 

I am sharing this with 

CD Sunday Plus - Anything goes  

Make My Monday - Fun Folds  

2 Crafty Critter Crazies - Anything goes 


Wednesday, 8 September 2021

Artists Baubles #4

 This is the fourth of the six bauble stamps in the Artists Baubles sets, but my last card in the series for now as I was ready to move on to other things. 


This time I've used an Aubrey Beardsley style stamp. However rather than using his traditional black and white with tiny occasional splashes of red,  I stamped it on green card with purple ink and embossed it with a purple pearlescent powder. Then I used a white gel pen to fill in the flower petals and leaves. Bleach doesn't seem to work much on this particular piece of card, or I would have used that for preference. 

The corner designs are stamps from the same bauble set, stamped using the same purple ink - doesn't it look a lot different on the white background? 

I am sharing this with 

Crafty Calendar - anything goes 

Stamping Sensations - Stamp of the moment (well to be honest it's stamp SET of the moment, I'm really loving this  set!) 

Allsorts Challenge - anything goes (without the option) 


Monday, 6 September 2021

Artists Baubles #3

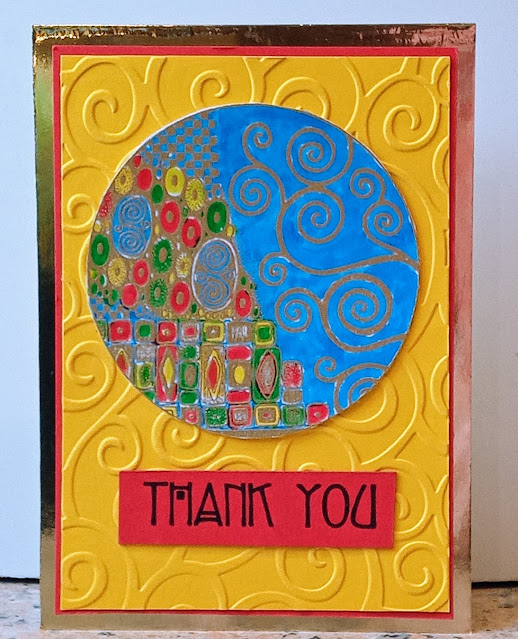
 Here's another card made with a stamp from the beautiful Artists Baubles set from Chocolate Baroque. This time the artist who inspired the image is Gustav Klimt. 


I stamped and heat embossed in gold to get that Klimt look, then coloured it with watercolour markers. I made an A6 card blank from gold mirri then delved in the snippets box for card that matched the image. I embossed the yellow card using a very old Cuttlebug folder, then stamped and cut out the sentiment from the middle of the red before using the rest of it to mat the yellow card. 

I am sharing this with 

A Bit More time To Craft Extra - Anything Goes 

Use Your Stuff - Anything goes

 Pixie's Snippets Playground - challenge 411 - Ruby's memory


Friday, 3 September 2021

Artist's Baubles #2

 This is my second make using the beautiful Artist's Baubles stamp set from Chocolate Baroque. 


This time I chose a William Morris style design and stamped it using a Kaleidacolor pad. Ever since I got a stamping platform, I've thought  the little catch for pulling apart the colours on Kaleidacolor pads meant it wasn't possible to use them with the platform. It's taken me all this time to think "why not use a brayer to ink the stamp?". *sigh* But my pads are getting old and not so juicy now, some of them really need replacing - but are they still being made? I've been searching for months now and can't find any UK supplier with any stock of them. 

I cut out my stamped image and layered it with die cut squares that pick out the colours of the image. 
No sentiment - it would have spoiled the symmetry of the card. 

I am sharing this with 

Sweet Stampin' - Lots of Layers 


Thursday, 2 September 2021

Festive embossing

 This is one of those cards that set out to be something completely different and went through multiple metamorphoses between brain and craft table. The large square motif was going to be black, with the outer square framing an aperture on a yellow card and the remaining square on the card inside. 

That may still happen one day, but I just happened to have some gold mirri on the table and thought, "Wouldn't that look good used with this die" and then while rummaging for the yellow card I spotted this red card blank, and
the two of them together shouted "CHRISTMAS" to me - and who an I to refuse? 


The die set is an old Sizzix one that I've had for many years. I cut and embossed it,  then attached the large square diagonally on the card and the smaller square aligned with the card. I used the Misti to position the sentiment evenly around the square. 

I tried adding a corner design but it reduced the impact of that shiny gold motif so I decided not to use them. 

I am sharing this with 

Time Out - Coloured Card base 


Crafty Hazelnut's Christmas Challenge - Anything goes/embossing 

Wednesday, 1 September 2021

Artist's Baubles

 For my birthday last month, Mark bought me the Chocolate Baroque "Artist's Baubles" stamp set, featuring images inspired by some of my favourite artists including Klimt, Beardsley and Rennie Mackintosh. 

Naturally the C R-M stamp had to be the first to see ink, you know how much I love his style. 


The dark lines actually appear on the stamp as two fine lines of black with a white space in between,  making this stamp suitable to use for light, airy images but as I wanted a bold stained glass effect I filled  in between them with a fineliner, then coloured the rest with Promarkers. A black die cut circle to mat the image and a sentiment stamped with a Woodware set, and this CAS card, the first outing for my new stamp set, is complete. 

I am sharing this with 

Allsorts - CAS  

Addicted to Stamps and More - Birthdays 

Passion for Markers - Add a Sentiment