
This technique is completely now to me, so I'm going to be learning as I go along and sharing my learning experiences with you. This means that nothing that I do is going to need any advanced skills - if you are a crafting beginner you will be in just the same position as I am! And you'll get to see any mistakes I make as well as the results I'm proud of.
First of all I tried combining the foil with stamping. I stamped the winged heat from a Kanban stamp set, then filled in the heart area with the Tonertex adhesive.

I allowed the adhesive to dry and then gently rubbed red foil over it. (Actually for my very fist attempt, which didn't reach the photograph stage, I thought the foil would need more pressure, and rubbed hard with a lolly stick, but I just tore the backing and scratched the surface of the foil, gentle finger pressure is all that's needed). Not being used to the Tonertex, I didn't spot one or two air bubbles and missed patches, so my initial covering wasn't completely even and I had to retouch the glue and foil the missed areas, hence the slightly uneven finish, but getting it right will come with a little practice.
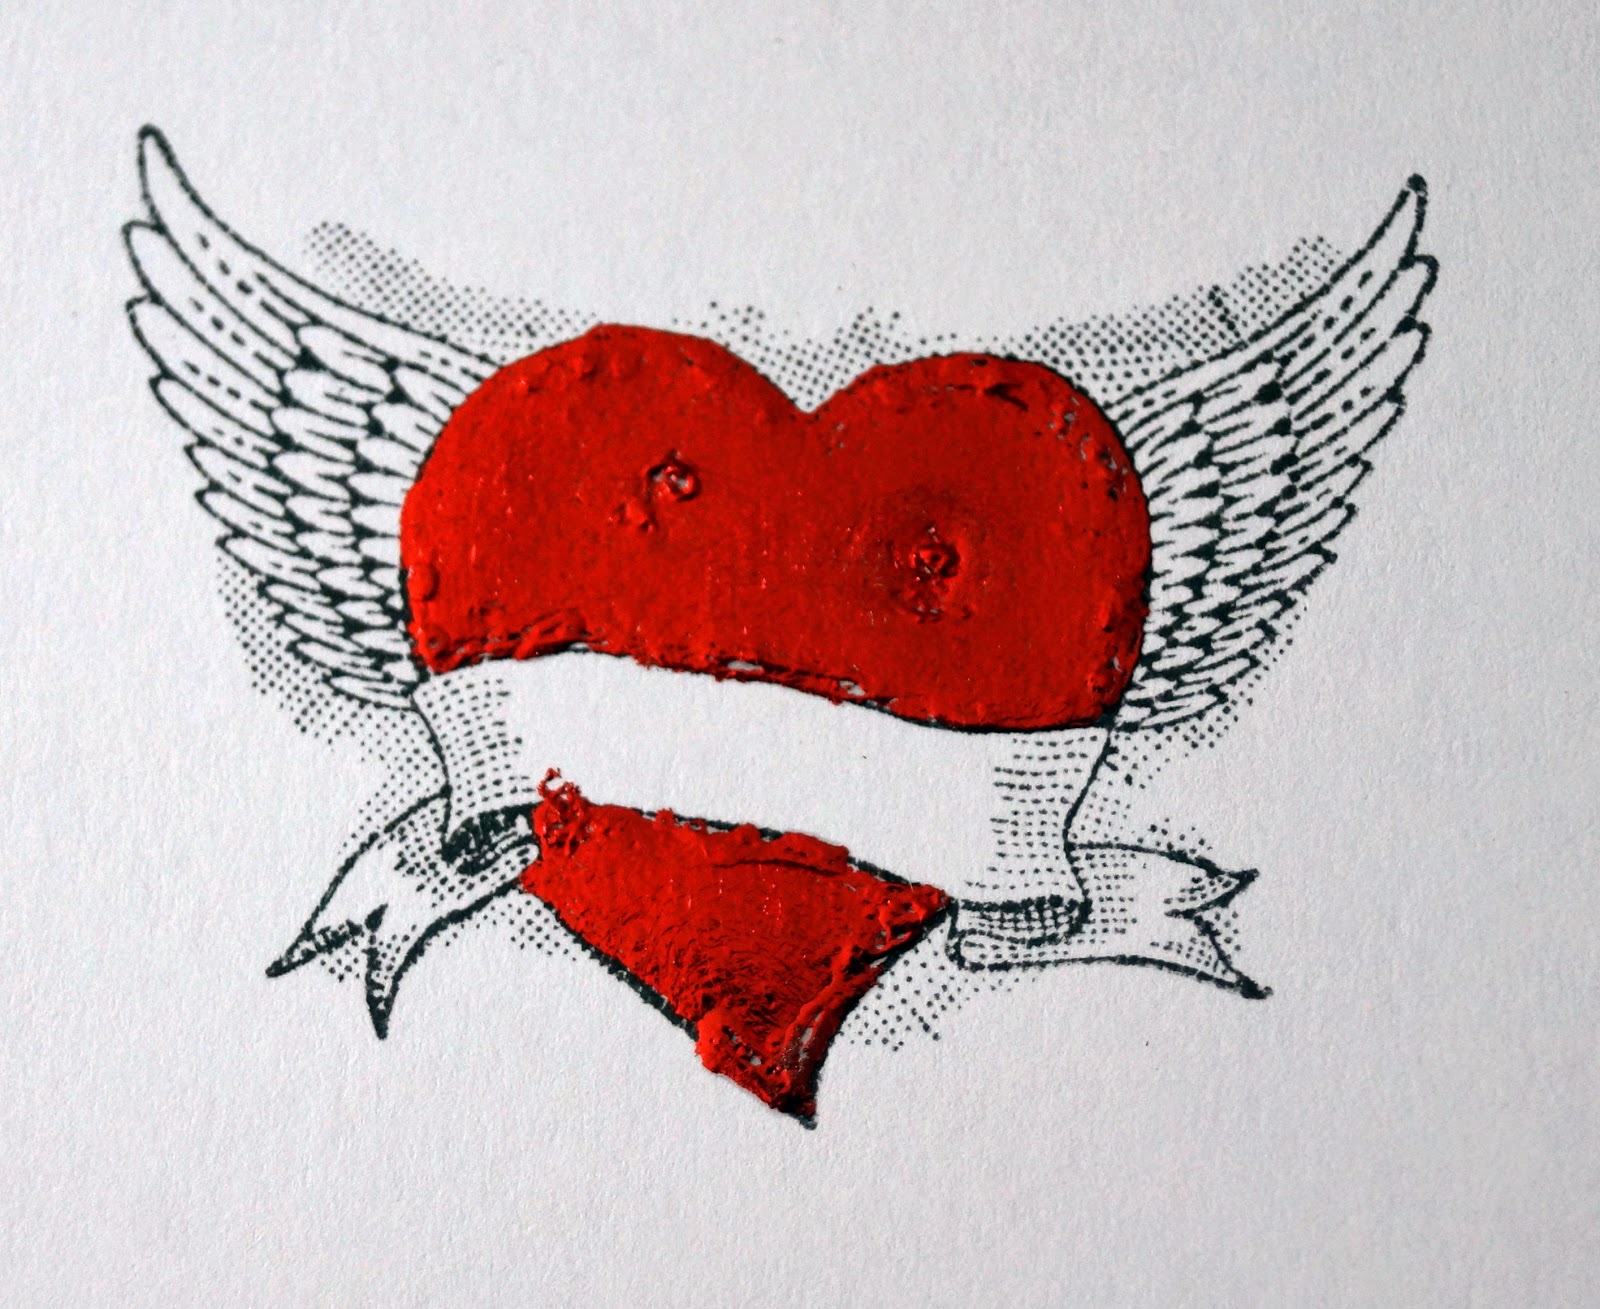
The colour here looks flat and doesn't do justice to the wonderful sheen of the foil. I'm going to have to learn some more advanced photography skills in order to be able to show these wonderful foils off properly!
I finished the design by hand-writing the word "peace" in the banner and hand drawing some drops of blood falling from the heart. The whole image was then matted with black and mounted onto a red card, on which I had stamped a border of a tattoo-style rose from the same Kanban stamp sheet using Versamark ink and rubbed with black chalk.
I think the slight imperfections in the finished design actually work well with the tattoo theme - after all, human flesh is seldom perfect! So I'm putting this card into the current challenge at The Craft Room Challenge which is "Inspired by a tattoo with a little pen work of your own"

Next, I tried double sided adhesive sheet. I punched a leaf shape from the adhesive and stuck it on to white linen textured card, then peeled off the upper protective layer and rubbed bronze foil over the surface. This time there were no air bubbles, so the foil applied beautifully evenly. I added some definition to the leaf by drawing in veins with a Quickie Glue Pen, allowing it to dry and applying a matte gold foil. The finished leaf was so striking that all it needed to set it off was a simple background creates with a woodgrain effect embossing folder and some scraps of wood-coloured papers. I found this one much easier to photograph too - I think it is because of the lovely even finish the double sided adhesive gives it.
This week at CAS-ology it's Week 101 - wood so I'm joining in with this card.


10 comments:
Both beautiful cards, thank you Jane! I love the little drops of blood on the tattoo card, and the woodgrain theme with the leaf too.
so glad you stepped a bit out of your comfort zone, love the foiled effect on the heart- perfect tattoo inspired card! a stunner ! thanks for sharing with us at Craft Room Challenge, Debi x
Have fun with those foils Jane you have got started brilliantly and the finished pictures do show of the sheen. Your bleeding heart is a really traditional tattoo style and I love your sentiment. Thank you for sharing with us at Craft-Room Challenge XOXO Zoe
Fabulous foiled makes Jane. Thank you for sharing your heart card at Craft Room Challenge this fortnight
Hugs Annie x
Fabulous cards, I love the heart tattoo, thank you for sharing with us at Craft-Room Challenge.
xxx Hazel.
Oh wooow Jane..love all the texture on your card this is really brilliant idea with the cue card Wood...I think I see a winner here....
If you wanna see my "Wood" card on my blog... my card is #59 on the CASology Gallery...I would be so happy if you could leave me some love too..big hugs, Monika
Very autumnal and masculine! I love the rich colour on the leaf! So glad you joined us at CASology this week!
ADORE the embossing, and every time I see your blog I Chuckle, cool!!!
I sure hope that you are inspired for tomorrow's cue word too!!! Thanks for joining us, love it!!!
Beautiful brown and loving the woodgrain embossing on your leaf card! Love how you used the pair of banners too! :)
Thanks so much for joining us over at CASology!
fabulous cards, loved the first one with the heart.
Thank you for sharing this with us at Craft Room Challenge, welcome again;-))m
Post a Comment