Wednesday 30 September 2015

A Victorian Christmas

The images and papers I have used on this card were printed out from the Victorian Christmas Cards CD that was a special release for Making Cards magazine a year or two back, but they should also be available on Joanna Sheen's Victorian Christmas CDs.


Some red and gold ribbon to match the red and gold layering is all I needed to add to make a very quick and easy Christmas card, just what I need to try to catch up in time for Christmas!

I'm sharing this with Traditional Christmas at Winter Wonderland.

Tuesday 29 September 2015

Something Beginning with M at Cardz 4 Guyz

This week it's my turn to choose the theme at Cardz 4 Guyz, and I've chosen "Something beginning with the letter M". And don't forget to keep it Masculine! (No, that doesn't count as your M!!!)

I've chosen Maps and Motoring as my Ms, and made them into a stepper card. The topper is made from a scrap of a real Ordnance Survey map, with vintage style posters stamped using stamps from a very old Tanda Stamps set. The backing paper and all the other elements are cut from a sheet out of a K & Company 12 x 12 pad, with the elements I've used as toppers mounted onto card to reinforce them.


I'm sharing this with
Creative Card Crew - Masculine
Craft Your Passion - Anything Goes

Monday 28 September 2015

Autumn Woodland

The new challenge photo at Inkspirational Challenges is this Autumn woodland scene


It made me think of a Crafty Individuals stamp I have - sorry, I can't remember the name of the design sheet - so I stamped it and embossed it with Verdigris ep then added a little colour with watercolour pencils and a waterbrush.

The autumn leaf paper is from a DCWV 12 x 12 pad called "Stack 9" and the different textured leaves are old odds and ends from my stash. The copper sentiment, which says "Happiness", is from an ancient NBUS pack I got from QVC donkeys years ago.


As well as Inkspirational, there are lots of Autumn/Fall challenges around this week so I'm shargin this with
Clear it Out Challenge - Autumn/Leaves
Fan-tastic Tuesday - Colour me Autumn
Make My Monday - Autumn Colours  

Shrink Plastic

I was first introduced to Shrink Plastic over 30 years ago, when my husband went to the States on business and brought home a "Shrinky Dinks" kit for the children. They loved it, and now my grandchildren love similar kits - there's a huge range of them now, I think the brand name is Shrinkles or Shrinkies.

Some time ago, I bought some plain shrink plastic for crafting from either Hobbycraft or The Range, I can't remember which, but I've never really got on with it. All the colour seems to come off my finished pieces. Or at least it DID, before I realised that my grandchildren were colouring theirs with pencils, not markers! I'd completely forgotten that important point from when my girls were children themselves. The pencil colouring looks quite faint on the full sized plastic, but after shrinking it contracts into a really bright finish.

It's absolutely amazing how much the image shrinks - here is my shrunken image next to the butterfly stamp it was created with:


A few tips for using shrink plastic:

  • If you are using a heat tool, protect your work surface with lots of heat insulation. I have an insulated tablecloth, a craft mat and an inch thick wodge of scrap paper between the work and the table top.
  • Always use Staz-on ink for stamping. Even that will smudge in the first few seconds if you aren't careful!
  • Whether you shrink it in the oven or using a heat tool, have a couple of wooden sticks (not metal, it conducts heat too much. I use satay sticks) to hold the plastic in place if it threatens to curl up too much.
  • If it DOES curl until it sticks to itself, you can usually persuade it to unstick by heating the stuck area. An extra person to hold the heat tool while you prise it apart with wooden sticks is ideal, if you can rope somebody in to help!
  • Have a clear acrylic block ready to press down on the image immediately you remove the heat source. It will flatten out any bumps and wrinkles.
My little butterfly turned out to be a very good match to the butterfly printed self adhesive fabric paper that I won a few months ago at Mrs. A's Butterfly Challenge, and along with a punched border and some knotted ribbon, gave enough interest to the card while still leaving lots of the beautiful paper on display.


The current Butterfly Challenge is K is for Knots  and I'm playing along with this card.

Snow Bunnies

Until recently, I've tended to use my Facebook account mostly for entering competitions, but recently I've made lots of crafty friends through joining in groups and commenting on craft pages, and recently I took part in a stamped image swap with Sharyn of Cherrytree Cards. She sent me a selection of Christmassy images and die cuts, and I've made this card completely out of items she sent me - so I'm afraid I don't know the name of the stamps she used.

I coloured the bunnies and robin with Promarkers. For the trees, I coloured them in with a Versamark pen and then heat embossed with green glitter embossing powder. The powder is probably about 20 years old and is starting to lose its sticking power, so it took several attempts and is still a bit patchy.

I'm playing along with Fab'n'Funky where the current challenge is Cute Critters and/or Christmas
and with Anything Goes at  Christmas  Card Challenges

Simply shiny

I've fallen in love with my latest die, the cover mounted gift from the October issue of Quick Cards Made Easy (and in case you didn't spot my post about it the other day, I'm featured as the Designer for a Day in this issue!).

It looks so lovely with hardly any other embellishment to detract from it, although I think a kraft/cream combo with a row of three of them would look great too, I might try that next.

For this card, I've cut it from a snippet of very shiny red mirri card, ruled in a "string" with a hand doodled bow, added a knot of red grosgrain ribbon and stamped a sentiment (also a mag freebie, I'm cheap like that!). It needs nothing more!


I'm sharing this with:

Less is More - Something Shiny
Christmas Card Challenges - Anything Goes
Pixie's Snippets Playground - Week 196  

Sunday 27 September 2015

A way with words

You may have noticed recently that I've got a bit obsessed with the Dylusions sets of word stamps. I was sent a set by the wonderful Christi from Art Without Anxiety and my collection is growing rapidly!

This is a very quick and easy one layer card that uses one of the sentiments in the original set she sent me. I stamped it directly  onto the card, then again on to sticky notes to mask the stamping off. Then I used Aged Mahogany DI to stamp the tape measure image and a couple of splodges, stamping the splodges a second time without reinking, and bringing the whole lot together with a light sponging of the ink. When the sticky noted are rem oved, the words stand out boldly from the inky background.


I think we've all had days when we felt like that!

I'm sharing this with

Allsorts Challenge Blog - Numbers 
AAA Cards - Word Play


Remember ATCs?

About 10 years ago, everybody seemed to be making ATCs (Artists Trading Cards) - we joined in postal swaps, and wouldn't dream of turning up at a craft show or event without a bundle of them to swap. But, in the circles I move in at least, interest in them fizzled out and I haven't made one for YEARS - in fact I had to double check the measurements, although there was once a time when I could have cut one the right size in my sleep.

But the current challenge at Crafting by Designs is ATCs, so I thought I'd try to revive my interest in them.

I nearly always used to make them in pairs, and that's what I've done this time. The two main images are old unmounted stamps a friend gave to me years ago. For the first ATC, I stamped it directly onto the card, then masked it and used a tape-measure stamp to create a background, finishing it off with words cut from magazines.


For the second, I made a background by inking up some bubble wrap and pressing it onto the ATC. The image is made into a tiny topper, with a two lip-effect brads to embellish it.


So here they are together - "before" and "after" pictures!


Getting Steampunky

Steampunk is a style I can't seem to get to grips with. I think it's because it isn't just a crafting genre, to some people it is a whole lifestyle choice, and there are traditions and conventions that I don't  know and probably wouldn't understand. So when a challenge asks us for a steampunk creation, I always flounder! However a challenge isn't a challenge if it isn't a challenge IYKWIM so I've dived in (probably with a Victorian style underwater helmet on) and had a play.

I'm not really sure whether it is really steampunk, and it's a long way out of my comfort zone, but OMG I had a lot of inky, messy fun making it!

The base card is plain dark brown. I accidentally got a bit of adhesive down the folded side, so rather then try to remove it I sprinkled copper glitter over it and incorporated it into the design. I gave the card a very rough edging by running a Tonertex pen in random places around the edge and foiling it with a gold/black distress effect foil from Foilplay.

The next layer is made with something I'm testing for Foilplay - thin aluminium foil, like kitchen foil, only with a paper backing. This gives it the strength not to break and tear when embossed or distressed. I embossed it with a manuscript folder, then splodged random drops of alcohol ink in Ginger, and finally distressed the edges with an edging tool. Here is a piece of the remaining foil so you can see what a crisp impression the embossing gives.


For the next few layers, I used snippets of  patterned and textured paper and distressed the edges with an edging tool and Walnut Stain DI. On the two newsprint layers I stamped - the astrolabe is from the docrafts Chronology set and the cog border from the Viva Décor Old Fashioned Design set.

The dragonfly tucked between the layers is a snippet of brown card stamped with a Personal Expressions stamp (I don't know the exact name, my daughter bought it for me when she was studying in the States)  and embossed with  Verdigris embossing powder.

The main image is also from the Viva Décor Old Fashioned design set, with the rivets and border foiled with the gold/black distress foil I used on the edges of the base card. The Penny Farthing bicycle is a Marianne die used with a snippet of brown pearlescent card, and the metal dragonfly and key are from my stash, I think they came from The Bead Shop.

The embellishment up the side of the card - not sure what to call it - swirly thing? is a white self adhesive one made from very thick card. I covered it in embossing ink and embossed with Verdigris EP, then while the embossing was still hot, sprinkled on pinched of black, copper and Wild Tiger EP and heated it again. All the heat dried up the adhesive, and I had to glue it down.

Finally, because I didn't have enough junk on there already, I added a couple of words from a very old sheet of peel offs.

So there you have it. It's steampunk, Jim, but not as we know it. Or something. But it was a helluva lot of fun to make!

I'm sharing this with

Sisterhood of Snarky Stampers - P is for Punk.... Steampunk


Fantasy Stampers - Steampunk
Sweet Stampin' Challenge - Use a non white base
A Bit More Time To Craft - Anything Goes   
Pixie's Snippets Playground - Week 196
That Craft Place - Mixed Media/Anything Goes

Saturday 26 September 2015

Spot the deliberate mistake!

This card has a deliberate mistake in it - can you see what it is?

The British (I don't know whether it is international) road sign for a dedicated cycle way has the bicycle facing towards the left. However my bicycle die faces the right. I had originally planned to use the reverse of the die cut, to make the sign more accurate, but it really didn't look right, there were too many raw edges! So I decided to use a bit of artistic license and have a backwards way about bike.

The circles and bicycle were cut with my Grand Calibur - I think the bike die is a Marianne one. I ran a blue inkpad around the outer edge of the white circle, to make it show up against the background, and cut the "aluminium" pole from a scrap of matte silver card.

I think this would make a good card for a child who had passed their cycling proficiency test!


I'm sharing this with CAS-ology - week 165: Circles


And Cuttlebug Mania - Wheels

Friday 25 September 2015

P is for Peacock

The Alphabet Challenge is currently up to the letter P, and the challenge is P is for Peacock, Pelican or other bird (presumably starting with P). I've got lots of peacock themed stash, so it's right up my street!

I decided to make a covered notebook, using papers from a Graphic 45 Artisan Style pad, some matching stickers, and the excellent tutorial over at Dots, Dashes, Doodles and Dreams. The peacock panel from the pad is perfectly sized for the notebook cover, and I added extra depth to it by fussy cutting the peacock from a second panel and sticking it over the first, using lots and lots of 3D adhesive so it won't get damaged with handling. A notebook is sure to get more handling than a card.

I just love Graphic 45 papers - they look and feel too beautiful to cut into, yet they give such gorgeous results you are always glad that you did!


Using up the scraps

When I saw the picture inspiration at Christmas Card Challenges this week, it reminded me a lot of a topper that's been lurking in my Christmas stash box for several years.


The topper is one of a few elements left on a Hunkydory sheet, and when I found it, it happened to be nestling next to a couple of snippets of snowflake printed paper left over from a previous project, that went perfectly with it. However I found to my dismay that the topper wasn't a topper, it was a gift tag and had two holes punched at the top for a cord.

The hologram snippet snowflakes I cut the other day came to the rescue, though, strategically placed, one of them completely hid the holes. I finished the card off with the rest of the elements left on the sheet and a couple more snowflakes.

Now, why is it I feel the need to give snowflakes "centres"? They aren't flowers, after all, and real snowflakes don't have them. But I couldn't rest until I'd added a white gem to the middle of each!


As well as Christmas Card Challenges, I'm popping into the Snippets Playground for my final visit of the week, as not inly did this card use a good handful of snippets, it actually used them UP which is always a satisfying feeling!

It's Rudolph Day again

It's the 25th of September, and that means it's Rudolph Day again! Incidentally it also means we are three quarters of the way through the year, so I should be three quarters of the way through my Christmas card making. Unfortunately I'm only about half way through.....

Anyway, you may remember that when I used this Jess image in my "Sassy at Twofers" post (and there's still time for you to join in the current challenge!) I thought she looked a little bit like a lady of ill repute. Well, I have just got a new set of Dylusions Christmas Sentiment stamps that have JUST the right words to go with her! Incidentally, the Dylusions sentiment stamps are a great way to use up your white snippets, as each one only uses a tiny scrap of card!

I added a diagonal panel of striped paper to my base card then inked the edges - I'm afraid the inking is a bit clumsy as I'd cut my finger and was trying not to bleed on the card (perhaps I should have inked it in red).

I reckon there are only certain people I will be able to send this card to! (You know who you are!)
 
I'm joining in with
 
Rudolph Day at Scrappymo's
Addicted to Stamps and More - Holidays
Pixies Snippets Workshop week 195 (it's all snippets except the base card)
Sunday Stamps - sketch challenge 
 

Blocked!

No, not crafters' block - I've just woken up to find that my security software has updated overnight and has decided that ALL blogs including my own are some kind of malware and I'm banned from visiting them!

I've switched the blighter off while I post this, and I have a post scheduled for later this morning, but as soon as my IT man starts work this morning I'll be on the phone to him, and until then I'd better get my protection back on, so I'm afraid I'll not be visiting or commenting on any blogs until it's sorted out.

See you all soon.... I hope!

Thursday 24 September 2015

Very Victorian

My goodness, I've certainly piled it on on this card! Not one of my more CAS efforts......


The backing paper is from the old Artylicious "Filigree Fusions" CD and the image from a CD called "Victorian Ladies" that doesn't appear to have a brand name. I used a Marianne Creatables border die and a Spellbinders oval. Everything was edged with a very light touch of Tea Dye DI. I wanted to thread ribbon through the slots in the border, but had nothing in a suitable colour, so I dyed some white organza ribbon by dragging it over the surface of a Broken China DI pad.

The pearl embellishments are from The Handcrafted Card company and the tiny butterflies were a gift from a friend.

Before I move on to sharing this card, I'd like to share something else - the news that I've been chosen for the "Designer for a day" slot in the October 2015 issue of Quick Cards Made Easy: the card I made for it has already been shared on my blog.


Right, back to the blogs I'm playing along with today:

CD Sundays - Pearls and Lace
Oooh La La creations - Ribbons and Bows
Suzy Bee's Blooming Challenge - Vintage/Shabby Chic
Glitter and Sparkle - Use a Punch or a Die Cut
A Bit More Time To Craft - Anything Goes    

Wednesday 23 September 2015

The Christmas Post

Post early for Christmas! Well, perhaps not THIS early, although I've had a lot of lost and delayed items recently so maybe I should maker a start.....

If you've been with my blog since the outset, you'll know the story of the pillar box die cut sheets - I thought I'd ordered ONE sheet from eBay and when it arrived, there were actually about 24 of them. At 99p they turned out to be a great bargain, except for the fact they are rather boring to use, as the main image takes up most of the front of an A5 card blank. Anyway, the pile is gradually dwindling and I'm delighted to report that this card uses the penultimate one.

Looking for a way of livening it up a bit, I turned to my bag of silver snippets (I've started sorting them by colour, but so far have only done the basics, silver, white, gold, cream, black and kraft) and lifted out lots of tiny pieces of hologram card, the "too small to use but too good to throw away" ones, and cut them into snowflakes using a die that was a magazine freebie. I've used three of them here but have several left to use on other cards. Black gems in the middle linked them neatly to the image.

Oh, I made a matching gift tag but forgot to take a photo of it!

 
I am sharing this with
Crafty Hazelnut's Christmas Challenge - Something beginning with P (Pillar box)
Pixie's Snippets Playground - Week 195 
Glitter and Sparkle - Die Cut or Punch   

Recipe - Tomato and Crispbread salad

I created this salad when I was visiting my daughter last week, and we decided to clear out the kitchen cupboards. There was half a packet of small, thick, oval "crispbreads" that had gone too hard to eat without breaking a tooth or two, and I combined them with some of her home grown tomatoes and her delicious home made red wine vinegar to make a salad inspired partly by Yotam Ottolenghi's Dakos salad from Plenty More and partly by the Italian bread-and-tomato salad panzanella. And we enjoyed it so much I recreated it when I got back home, using half a pack of Dakos crispbreads that were languishing in our own cupboard.

You will need to make this at least an hour in advance to allow the crispbreads to soak up the dressing and blend with some of the juice from the tomatoes. Depending on the hardness (or otherwise) of your crispbreads, it will happily stand for several hours before becoming too soggy.

Ingredients (all approximate)

400g ripe tomatoes
100g small, hard crispbreads
1 shallot, finely chopped
1 tbs red wine vinegar
3 tbs olive oil
a good pinch of salt

Put the vinegar into a large bowl and whisk in the salt, followed by the oil. Stir in the shallot.

Break the crispbreads into bite sized pieces (I stuck them in a plastic bag and bashed them with a rolling pin a bit) and mix into the dressing.

Roughly chop the tomatoes into pieces 1-2 cm across and mix them into the crispbreads. Leave to stand, stirring occasionally - some of the crispbread pieces will soak up lots of juice and go soft, others will stay quite crunchy.


Print Friendly and PDF

I am sharing this with #KitchenClearout at Madhouse Family Reviews

Tuesday 22 September 2015

Kraft and Blue at Cardz 4 Guyz

This week over at Cardz 4 Guyz we have a colour challenge - we would like you to use KRAFT and BLUE.

I've used kraft card to make a stepper card. I wanted to make an origami heart-shaped shirt and tie for the topper, having seen one on Pinterest. But the link from the pin took me to a page that had been deleted, so I ended up searching You Tube for a video and making the shirt while keeping one eye on the screen. If you'd like to do the same, here's the video I found:


Then I added punched borders and a die cut sentiment  and some real shirt buttons


I'm sharing this with Craft Your Passion - Anything Goes

Monday 21 September 2015

A Patchwork Autumn

I haven't done any sewing for years and years, but I still have a few pretty scraps of patchwork fabric hanging around, so this week I decided to bring some into action on a card. I cut out the leaf-printed shapes, then stuck them to a card on which I had used autumnal colours from a Kaleidacolour pad to stamp three lines of "stitched" borders. A greeting stamped with the same pad was all the card needed to finish it. (Hmmm...... looks as if it's time to replace that ink pad - and I've  only had it for 15 years!)


I'm sharing this with

Addicted to CAS - Leaves
Clear it Out Challenge - Autumn/Leaves/Foliage
AAA Cards - Autumn Colours/Fabric  

For a Facebook Fanatic

This week the theme at Less is More is Technology. It seemed only right and proper to use technology to create my card, so I downloaded a Facebook "Like" button image and imported it into Microsoft Publisher to create a top-fold card, simply adding the letters I and U in a suitable font and size.

However when the card was finished, it just didn't feel like proper crafting! I do very little digital crafting, mainly because unless I've used a craft knife and glue, it just doesn't feel like the real thing. So I cut my card up and used the image as a topper on a card made from some "Facebook blue" card.


Festive Fairy

This cute little lady is a digi called "Winter Fairy" from Bugaboo that I won in a recent challenge. I've combined her with an assortment of goodies from my stash - the lower paper and border are from a "My Mind's Eye" Christmas pad that was free with Cardmaking and Papercraft - the date on the cover is 2011, and the snowflake vellum above it was a free paper in Making Cards magazine at about the same time.

The doyley and pearls are from Dovecraft's "Curiousity Corner" range and I've had them for a couple of years - this is a real clear-out card!

I coloured the image in with pencils - not a medium I use often but I happened to have exactly the shades I wanted in pencils but not markers, giving the fairy a "Santa jacket and hat" set, then added sparkle to the fur  trims on her clothes, the snow and her wings using crystal Stickles.


I'm sharing this with

Winter Wonderland - A Christmas Fairy
Allsorts Challenge - Sparkle
Christmas in September - a joint challenge at Shopping Our Stash and Jingle Belles
Sparkles Monthly Challenge - a Sketch

Making and using Halloumi cheese

Recently I was sent a halloumi making kit, made by The Big Cheese Making Kit Company, to test for a project on the craft and food website Cut Out + Keep. You can see the recipes I made with it on the following pages:

Halloumi with Cherry Tomato Sauce
Panko Crumbed Halloumi with Yellow Tomato Sauce
Halloumi and Cherry Tomato Tarts
Making Halloumi Cheese

I've often fancied making cheese but was put off by the vast quantities involved. Take this recipe from an old book in my collection which begins "Take 50 gallons of milk (24 gallons of evening milk which must be cooled down to 60 degrees F, and 26 gallons of morning milk)...."

However this kit uses 4 litres of milk to make around 900g of cheese, a much more manageable quantity. The milk MUST be unhomogenised, and for this cheese it needs to be gold top milk, that rich creamy milk that has dropped out of favour these days. But most supermarkets still stock small amounts of it. You will need to check the bottle carefully though - the most popular brand comes in two varieties, in similar looking bottles, the "cream on top" variant which is the correct one to use, and the "cream blended in" variant which apparently won't work for this recipe. Some of the major supermarket chains only stock the second type - I've found the unhomogenised one in Waitrose, Asda and Ocado.

 
The milk is the only ingredient you need to supply, everything else is in the kit. The equipment you will need is simple - a large deep pan, a colander and a large bowl.
 
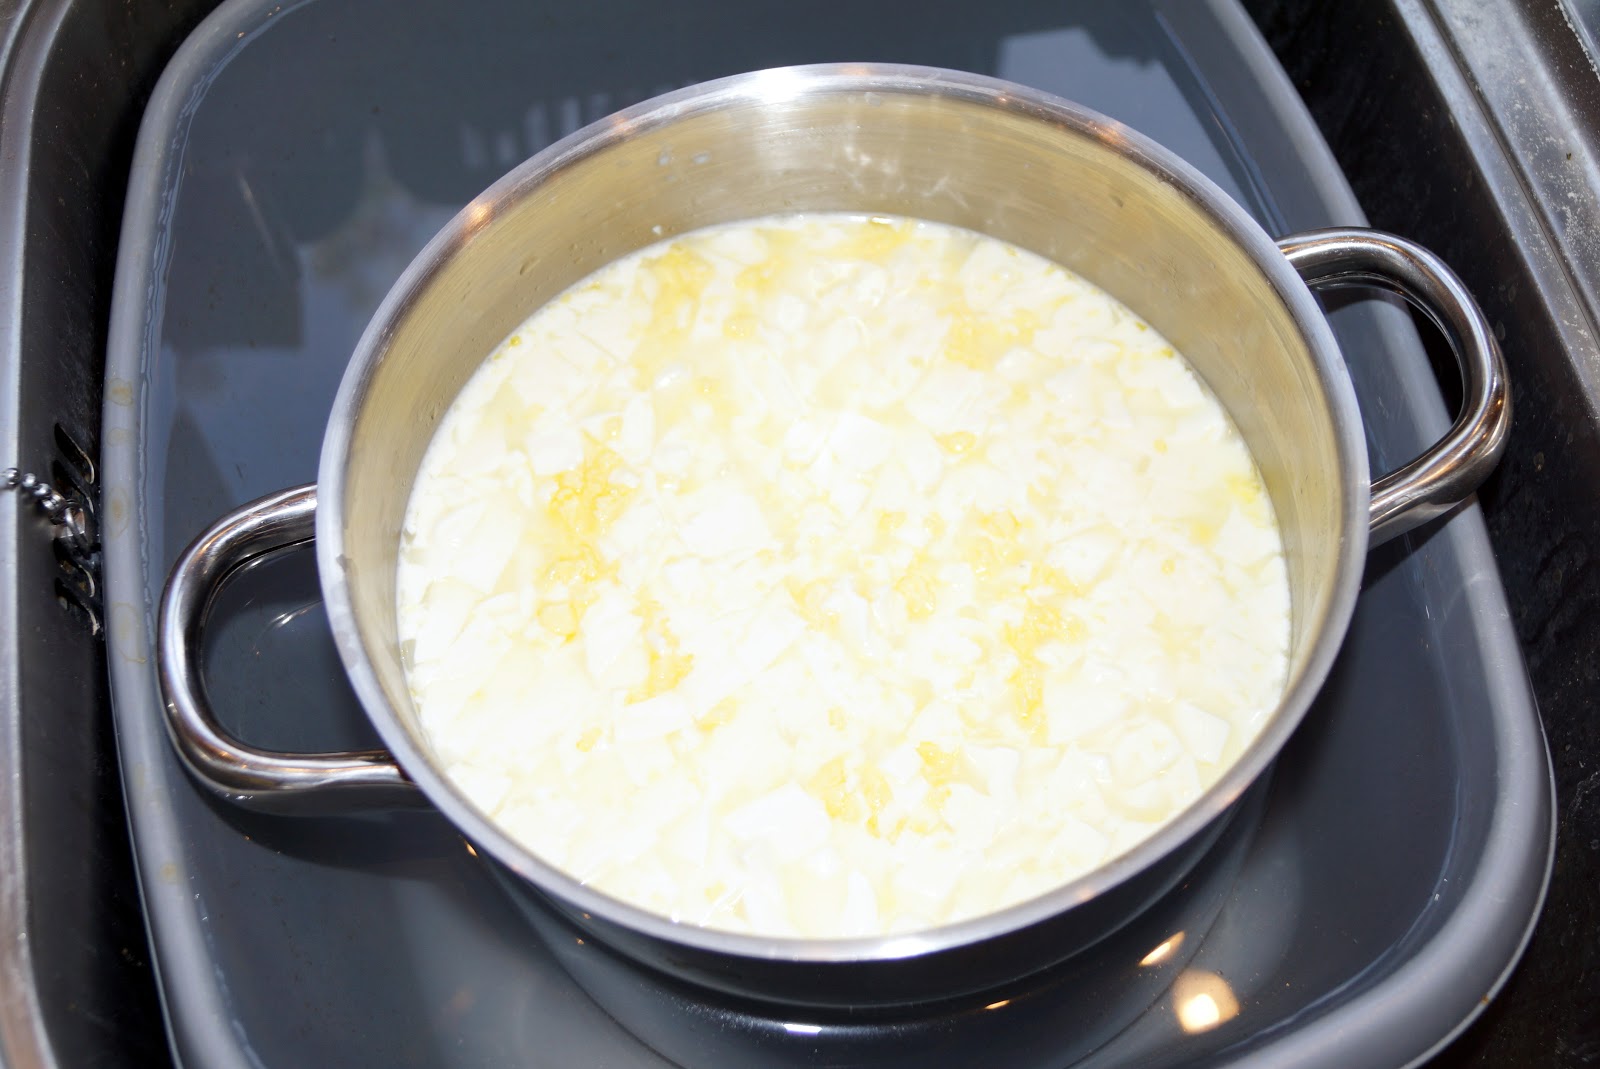
The step by step instructions are very easy to follow - first you heat the milk  and then place the pan of milk in a water bath (ie a sink full of warm water!)  and add the rennet, then leave it to separate.


Then you cut the curd into small pieces and reheat the mixture to a slightly higher temperature. After a short standing time, the curds and whey are separated using the butter muslin provided and a colander. The whey is returned to the pan.


After cutting  the cheese into large slices, it is returned to the pan of whey and gently poached at just below simmering point, then  it is drained on a rack and salted ready for use.


Ignore the mesh marks on my cheese - when I make the next batch I'll line the rack with muslin so it won't happen again!

The results were very successful, a really rich, creamy tasting cheese with that traditional halloumi "squeak". In terms of cost, it does work out cheaper than buying ready made halloumi, even taking the price of the kit into account, but it is also quite time consuming so I wouldn't use one of these kits to save money. However I found the whole process thoroughly enjoyable - relaxing, interesting and fascinating. The alchemy of starting out with a load of milk and ending up with something with a totally different texture and taste is something you can only understand if you experience it. I think it would be a great way of teaching children about how  their food is made, although the hot pans and careful temperature control needed mean they couldn't be left to work alone.

My only regret about the kit? After finishing making the cheese, I thoughtlessly poured the whey down the drain. If I'd not done that, I would have been munching on a buttermilk scone as I typed this!

Halloumi is a very versatile cheese as it can be cooked without melting. This makes it very popular sliced and fried. As well as doing this, I used some of it to top tomato tarts, and covered some in panko breadcrumbs, fried it and served with a yellow tomato sauce. For full details of the recipes, follow the links at the top of this post, and for more great ideas using either home made or bought halloumi, you can see the other testers' recipes here.


Wildflower sunset

Have you noticed (well, here in the UK anyway) how farmers and councils are leaving uncultivated strips at the edges of fields and verges of roads, to encourage wild flowers and wildlife to flourish? It seems to have been particularly noticeable this summer, or perhaps I've only just noticed it because I've been able to get out and about more after a couple of years of not going out much due to health issues. But I think it looks lovely - nature doesn't stop and think "Do these shades of green go together? Will this buttercup look OK next to this thistle?" and yet everything DOES go together, perfectly.

I was thinking about that when I was going through some old issues of Craft Stamper a few weeks ago, and set one aside as there were a few projects in it I still wanted to try. It was a very old copy - I think it is dated 2004 - and it's funny to see how the products and ideas available to us have changed over the last decade, yet the core techniques are still going strong.

I was keen to try this one as I'm still very much a novice when it comes to using distress inks. I blend them around the edges of paper to define and distress them, but seldom use them for anything else.

For this scene, I stamped the black silhouette flowers and foliage, all from an old Graphicus stamp sheet, with Staz-on ink onto glossy card and then blended four different colours of distress ink all over the surface, starting with yellow towards the centre and working outwards with orange, red and a touch of green.

Then I overstamped it with the large flower heads, using white ink and heat embossing with white detail powder. Finally I trimmed the scene and matted it onto black and orange card.


I am sharing this with Sweet Stampin' Challenge blog where this week the theme is Emboss it!

Saturday 19 September 2015

Sassy at Twofers

Have you joined in with the new challenge Twofers yet? We've made it easier to enter - now you only need to make ONE item, using some stamping but no digis, and our latest theme is SASSY. We've also introduced a prize for the top entry each fortnight, a $20 gift certificate for Alleystamp.


I made a pair of cards featuring the Crafters Companion stamp Jess, and I decided to use Promarkers to colour her two ways, once in Spring colours and once in Autumn ones, to make two very different cards.

Oh dear, big eyed young ladies are right out of my comfort zone, especially in pinks and lilacs, and I think when my husband saw me making the first card he thought he must have wandered into the wrong house. And I'm rather worried that in both cards, Jess looks rather like the sort of lady that boys' mums warn them about!

For the spring card I've used pink and black leopard print card from my stash - it is double sided card with the words "baby girl" printed in various fonts on the reverse, so I cut out the word "girl" several times to use as embellishments.

After cutting out the image and colouring it with Promarkers, , I cut three co-ordinating pieces of card, sized as if I was going to layer them up, but instead of normal layering I added each piece at a slight angle to the one below.

I finished the card with a silk flower cut in half, with a halved punched circle to form the centre.


My second card is completely different and perhaps not quite as "sassy" (I'm not 100% sure what that word means!) as the first - but it is much more ME. I love autumn colours and falling leaves, so I felt right at home making this one. The leaf paper is from a DCWV stack and I think the plain cards are Bazzill cardstock.  The thingummy up the right hand side is a thick cardboard embellishment which I have coloured with Promarkers. I finished it off with toning gems.


And here are the two side by side for comparison:


I'm sharing this with
Make Your Mark at Addicted to Stamps and More, where I was delighted to have an Honourable Mention last week.
Anything Goes at Crafty Gals Corner 
Bright and Colourful at Fan-Tastic Tuesdays
Creative Card Crew - Fall - second card only
Orange and Green at Inkspirational challenge - second card only, of course!