Wednesday 28 February 2018

Brown butterfly

This card is inspired by the photo at Inkspirational Challenge


I've  used the circular shape of the cup with a central butterfly and of course the colours.


I stamped the butterfly randomly over the background - I used the Misti for this, and here's a tip - if you are using a stamping platform but want to reposition the stamp without having to clean it every time, keep a scrap of acetate handy to pop over your card while you work out where you want your stamp.

Then I die cut a stitched square and stamped the butterfly again in white and heat embossed it with an opaque white powder.

Tuesday 27 February 2018

Tulips in the spring

Well, tulips aren't among the very first flowers of the spring, but I've turned my stash upside down and inside out and I simply can NOT find my crocus stamp.


Isn't it great the way a stamping platform and a single mask make it easy to turn a single small stamp into a whole border? The original image is of just 5 tulips but now I have a whole garden of them.

I am sharing this with

Sweet Stampin - Spring Has Sprung

Just us Girls - photo challenge

A Sketch challenge at Cardz 4 Guyz

Hello there - today we have something different from our usual themes for you over at Cardz 4 Guyz. For this fortnight's challenge, Julie has come up with this sketch


Here's my take on it


I decided to go with a steampunk look, using some Kanban toppers. I made a stamped background  - the border and corner stamps I used are from a set that Mark bought me, sorry, I didn't keep a note of the name, and the individual cog wheels I uses for the background are from a very old magazine freebie set. The acrylic material of the stamps is starting to break up, hence the patchy stamping - I'm tempted  to throw them away but the patchiness does give a certain "ancient machine" look to it!

I stamped first in black Memento ink, then used a gold marker to colour in some of the screws and nuts, and finally stamped and heat embossed some of the separate cogs in gold. I added a border using cold foiling, matted it with black then added the toppers and sentiment.

Monday 26 February 2018

Christmas Kitty

This sweet little kitty is all ready to greet Santa!


He is stamped on a 2" square die cut and coloured with watercolour pencils and a damp brush. The kitty stamp came from a magazine freebie set and the sentiment from a Studio G mini set.

For the background, I used brushos on damp watercolour paper  to create a stormy sky, then die cut my favourite part. I added some of the lovely schparkly Lidl snowflake stickers,  tiny peel-off stars and larger sequin stars.

I am sharing this with

Jingle Belles - inchies/twinchies

52 Christmas Card Throwdown - Watercolour

Butterfly circle

This card was inspired by the photo challenge at Addicted to Stamps and More  - in particular the   third photo down on the left of the plate of butterfly cakes on a wooden table.


To make the background, I masked off a border then blended DI in Antique Linen and Tea Dye over the card, then stencilled the woodgrain over the top with Walnut Stain.

The three butterflies use kraft for the bottom layer and white for the top, cut using a Dovecraft layering butterflies die. I tried putting them on a plain white circle but it looked a bit dull, so I livened it up by embossing with a Crafters Companion folder.

I am also sharing this with Allsorts challenge where  B is for...... butterflies and bark!

Sunday 25 February 2018

February Rudolph Day

Today's the 25th of the month, and that makes it Rudolph Day. And as it's a very short month, that means we only have four days to get our entries in to Rudolph Day at Scrappymo's  so grab that glitter and polish those baubles - QUICK!


My card was inspired by this pin that I saw on Pinterest.  - I used the SU Cookie Cutter Christmas stamps and punch for the gingerbread men and Uniko stamps Festive Sentiments for the bold sentiment. Those gorgeous sparkly snowflake stickers are a Lidl bargain and the foliage and fir cones (which, despite appearances to the contrary, are dark green and gold) are cut with various dies from my collection.

I an sharing this with
Scrappymo's - February Rudolph Day
Crafty Hazelnut's Christmas Challenge - Use some gold (or atg)
Christmas at Sweet Stampin - anything Christmas goes 
Holly & Ivy - Anything Christmas Goes
Fab 'n' Funky - Christmas

Saturday 24 February 2018

Sisterhood of Snarky Stampers #104 - Tissue

Our latest challenge at the Sisterhood of Snarky Stampers is T is for Tissue.


I don't use tissue much in crafting but I do have some vintage advertising printed tissue so I've been playing with that.


I find tissue tears very easily so I attached it by wetting the base card with gesso, and slid the tissue over it, wrinkling it in places but keeping it pretty smooth in the area of the horse as I wanted that to be the focal point.

When it was dry I painted around the edges with Starlight paint, also painting a paper rosette and a couple of resin roses, and then when that was dry, stencilled on a couple of borders using Alchemy Wax and daubed a bit of that onto the rosette and roses too.

Finally, a stamped sentiment using one of my beloved Dylusions sets. Now you know why I wanted to keep the horse as the focal point.

Now why not trot over and see what the other Sistahs  and of course our Queen have created  - you'll find all kinds of different ideas for incorporating tissue into your crafting. And if you share your own creation, you could become the next Queen or Princess of Snark.

Friday 23 February 2018

Dragon's Den

No, not the TV show - a real den with a real live dragon in it!


The dragon-serpent is a very old Linda Luckin stamp, heat-embossed in black to give it a shiny finish, and coloured in red to match the angry expression on its face.

The "den" is created using the Gentleman Crafter stamp set and inks in the "magical" colours of purple and turquoise.

I have made this for the latest C.R.A.F.T. challenge where the theme is Alien/Fantasy.

Clarice Cliff Style Cottage

I love the artwork and pottery of Clarice Cliff, so it's no wonder I adore this set of Woodware stamps designed by Francoise Read and very much in the style of Clarice Cliff's work.


Sometimes I colour in the image in the rather offbeat colours that Cliff occasionally used - a whole landscape in shades of purple and orange, for instance, but for this new home card I've kept to more conventional ones. The corners and the sentiment are from the same stamp set and I've ruled a fine line between the corners to represent a frame.

I am sharing this with

Shopping Our Stash - Home Sweet Home
CAS on Friday - One Layer Wonder
Just add Ink - Just add H (house/home/hollyhocks)

Thursday 22 February 2018

Tall tree

The world needs more DL sized cards! I don't know why it is but I very rarely think of making them, and yet that long, lean space is great for so many cards.


For this card, I cut a panel slightly smaller than the card front then die cut the Christmas tree from it. The die has stitching effect on both the inside and outside of the cutting line, making both the positive and negative die cuts useful.

Next I embossed the top part of the panel with a Darice snowflake folder, then stuck a panel of Christmas sentiment paper behind the aperture. The Altenew Christmas sentiment stamps that I recently won in the Playground use a very similar font, making this one perfect to stamp on the clear space at the bottom of the card.

Finally I attached the bow- a ready made one I rescued from some packaging at Christmas - and stuck the whole panel to the front of the card.

I am sharing this with

Little Red Wagon - Go Green!  - my recycling is the ribbon
Fab'n'Funky - Christmas

A breath of spring

It's lovely to see the first signs of spring appearing in the gardens and hedgerows. On the road to Farnborough this week I spotted a lovely little clump of primroses growing on the verge, the first I have seen this year, so I had to come home and dig out this lovely old stamp which I think originally came from Dimension 4th.


I used Brushos to create the background then stamped the medallion onto card in yellow and two shades of green, coloured the centres and fussy cut the layers.

I am sharing this with

Cardz 4 Galz  - stamping (no digis)
Make My Mondays - messy backgrounds  
Uniko - 6th Birthday Linky Party
Crafty Sentiments - Spring 

Glittery Kimono

Here it is folks, absolutely the last of my Iris folding cards. The card blanks and folding strips are all used up, the instruction leaflets and paper scraps discarded  - I'm not committing myself to NEVER doing any again but when I do I'll be cutting my own apertures and strips as and when I need them, not hoarding pre-cut ones for years or decades.


To be fair though, I got the original kits long before a die cutting machine was part of a crafter's essential kit - and I got the peel-offs I've used here at about the same time.

Since this style of kimono is a very masculine one, I chose strong masculine colours for the glitter papers and peel-offs but softened the effect with ornate corners rather than squared-off Oriental ones.

I am sharing this with

Use Your Stuff - Twinkle twinkle

Watercooler Wednesday - Masculine anything goes

http://watercoolerchallenges.blogspot.com/  

Wednesday 21 February 2018

The Beet Route

One of my all time favourite stamp sets is Hero Arts "Stamp Your Own Salad" and today I've used it in a very CAS way.


The beetroot, leaves and sentiment are all stamped using the set, and I've added a "ground" line using a deckle edged ruler. I made sure a tiny bit of the beetroot showed above the ground because that's how Mark's beetroot look when they are in the garden. The rectangles are cut using Gummiapan Stitched Rectangle dies.

I die cut a little watering can to embellish it with but it looked all wrong, so that's gone into my bits box for on a future card.

I have made this for CAS-ology where the cue word is PUN.

Monday 19 February 2018

A bit OTT for me!

Well, I've really gone a bit OTT by my standards today! I make a LOT of CAS cards, and often stray into messy or more complex territory, but seldom go full-on ribbon, lace, pearls, flowers, multiple die cuts and the whole shebang. However, Mother's Day is approaching and needs must......


(The usual disclaimer - in real life that ribbon is NOT bright orange, it's a lovely soft peach like the upper die cut doily)

The design of this card is inspired by the Butterfly Challenge where the wheel segments this time are paper piecing, pearls, patterned paper, peach, pink and purple. I've managed to combine all the segments except paper piecing and frankly last week's venture into it was enough to last me for quite some time!

I've used two pink patterned papers, pink heart gems and pink pearl braid, a purple flower, purple die cut butterfly, sentiment and doily and peach  ribbon and doily.

Incidentally that doily die is one of my oldest dies and yet I hardly ever use it because although the die cut comes out lovely and cleanly, the waste from all those little holes doesn't. It doesn't matter what I do to help them on their way (and that die has single-handedly killed a Tool'n'One) I end up having to pick them all out from the die with a pokey tool. One. By. One. So you can see how much love has gone into this card. I cut TWO of the blighters!

I am sharing it with The Butterfly Challenge and with 

Little Red Wagon - Luuurve

C.R.A.F.T - Mother's Day/Feminine 

And, thanks to Liz's suggestion, I am also sharing with The Crafty Calendar Challenge - 2 or more layers.

Stencilled stag

I'm sure you all know by now how much I love this stencil, I've used it so often. It makes such a tranquil Christmas scene which I think is perfect for a masculine card, especially when done using a dark background.


This time I used texture paste for the stencilling, sprinkling it with white glitter while still wet. The paste doesn't pick up a lot of glitter, just enough to give a gentle sparkle as the light changes. Some matting and layering and a stamped Altenew sentiment and the card was finished.

I am sharing this with

Crafty Hazelnut's Christmas Challenge - anything goes (or green)
Crafty Creations Challenge - anything goes
Winter Wonderland - tribute to Eileen, anything Christmas goes  
The Holly and Ivy - Anything Christmas Goes

Sunday 18 February 2018

Buzzzzzzzzz


I've used yellow and black snippets with the Dovecraft Bee Happy die set for this card, inlaying the yellow pieces into the black. I ran the whole thing through the Grand Calibur after adding all the die cuts, to give a more even finish and to help the Stick-It adhesive to stick firmly, as it can be a bit temperamental. It looked a bit bare at the top but I thought another bee would be overkill (plus I'd finished the last scrap of yellow), so I stencilled in a little patch of honeycomb instead.

I am sharing this with

CAS on Friday - Dies
Pixies Snippets Playground - Challenge 320
Sparkles Monthly Challenge - Clean and Simple
AAA Cards - die cuts only (hope that bit of stencilling's OK!)

The Tiger Who Came To Tea

 - a birthday tea, that is!


This cute little chap is stamped using a set that was a magazine freebie last year - the sentiment came from the same set and I think the embossing folder I used came with it too. First I embossed the paw prints across the bottom of the card, then embossed a scrap of orange card with the tiger pattern, sponging a little black ink over the raised areas.
 
Then I coloured and fussy cut the tiger and added him to the "tiger skin" panel.
 
I am sharing this with
 
Addicted to Stamps and More - CAS 
Addicted to CAS - CAT  
A Bit More Time To Craft - anything goes 
Less is More - dry embossing  

Up, Up and Away at CD Sundays

It's new challenge day again at CD Sundays and our theme this fortnight is Up, Up and Away.


I've used an image and paper from a fairly old Joanna Sheen CD called Victorian Birthdays and made it into a masculine card with die cuts and Candi. The sentiment and banner dies are both from Dovecraft  - and since I inlaid the stars, I now have enough bits and pieces left to make the banners again but with the colours reversed.

I am sharing this with Watercooler Wednesday - Occasions

Saturday 17 February 2018

A Brilliant Day of Baking

This week Mark and I went into London to the Bread Ahead Cookery School in Borough
Market  as I had won two places on the Complete Sourdough Workshop class which is held there.

Having stayed overnight in London the night before (and enjoyed a delicious Lebanese meal at one of Maroush's many restaurants on the Edgware Road) we reached the market area early and had a few minutes to wander round and whet our appetites by browsing around all the wonderful food stalls, then headed into the school to meet our instructor, Manuel and his assistant Fran, and our fellow students, who ranged from experienced bakers to absolute novices.

The day was well planned and thoroughly prepared for, so we accomplished lots and learned lots. The morning was spent learning about sourdough starters and starting to make our own, which we brought home to continue nurturing until it is ready to cook with, and then using some of the bakery's own starter to get our various bakes for the day started. We were taught lots about the background of the breads we made and the techniques we were  using and with the hands-on experience and expert tuition we learned far more than we could ever have done from books, television or You Tube.

Our first completed make was also our lunch - a pizza made with a sourdough base.


Probably the best pizza I've ever eaten - and the easiest I've ever made. We were even taught the shaping technique of slapping the dough from arm to arm.

The same basic dough was used for our next completed bake, a baguette.


This has the true baguette texture with a delicious crispy crust and lovely well risen crumb with large holes and a satisfying, slightly chewy texture. So much more like the baguettes we buy when we visit France than anything sold in local supermarkets!

Next we produced a very dark rye bread called Borodinsky, which contains caraway and coriander seeds and has an unusual cracked-flour effect crust.


As usual for a dark rye bread, this has a much denser texture and I can tell you, as I tried it today, is delicious with black cherry conserve for breakfast.

Next we made a Levain bread and were shown how to use a banneton to shape it and a razor blade to score the top - Mark and I made different designs.


And our final bake to be completed - although due to the number of steps in the making, it had been the first we started, was a No-Knead Fennel and Raisin bread, which again we shaped in a banneton and scored with a razor blade before cooking in its own steam in a dutch oven.


I think this is my favourite bread from the whole day. Apart from looking spectacular, the texture and flavour are wonderful. Fennel seeds and raisins aren't a combination I've ever thought of using but they are delicious together. We've just eaten some of this with cheese for lunch.

So we staggered back to the station under the weight of four delicious loaves each  - we've had to put some of it in the freezer as there is far too much for the two of us to eat before it goes stale - plus our recipe packs, our own sourdough starters, bags of rye flour and highly useful scraping tools.


As you can imagine, the smell of freshly baked bread filled the whole carriage on the train. We keep looking at our breads and thinking "Did we really make those?" - so much flavour and so much variety packed into six fascinating hours.

 If you would like to read about Mark's take on the day, and see his photos, you can read his own blog post here.

Tuesday 13 February 2018

L is For..... at Cardz 4 Guyz

Our new challenge is ready at Cardz 4 Guyz and this time we would like to see something beginning with the letter L on your card.


The paper and image I have used were printed out from a CD that was free with Making Cards magazine a while back - in fact Making Cards has really come up trumps for this as the sentiment is stamped with a stamp that came from there too.

I've kept it bold and bright, as befits a card for a boy, with the addition of nothing more than black spotty washi tape and black candi.

Sunday 11 February 2018

Hiding in the jungle

I'm sorry to be deluging you with posts today - I've had a busy few days of crafting and now I have a hectic week ahead and may not get chance to post at all. So I'm having a bit of a blitz today.


This is one of those cards that is just so much easier to make when you have a stamping platform!

First of all I put the CLOSED card in the Misti, using the Creative Corners to position the card, placed the animals ( a set that was a magazine freebie) where I wanted them to be peeping out, drew lightly around their heads to show where I wanted the apertures and closed the platform to pick the stamps up on the clear plate. Then I removed the card, leaving the corners in place to make sure I replaced it in exactly the same spot.

Next I stamped jungle leaves, from a couple of Uniko sets, all over the front of the card. Then I taped circle dies over the pencil markings, so that each head would appear to be peeping through a circle, and cut the apertures.

Now I returned the card to the Misti, positioning it inside the corners, but this time I opened out the card and turned the front panel to the back, so I was stamping on the inside. Then I inked the pre-positioned stamps and stamped the images. I coloured them in with watercolour markers rather than alcohol ones, so the ink wouldn't show on the back of the card, although I could have used the alcohol ones and covered the back panel with a spare piece of card - but I've only just thought of that. Although you can't see them on the photo, I stamped a few more bits inside - some grass for the giraffe  and tiger to stand on and a vine for the monkey to swing on,

Finally I turned the front panel back to the front and re-creased the fold.

Now, please don't point out to me that tigers and giraffes don't live on the same continent - I know that, and had intended using the lion and not the tiger, but he was facing the wrong way and looked all wrong!

I am sharing this with

Make My Monday - Going around in circles

Inkspirational - Aperture card


Yet more hearts

It's Valentine's week so I suppose I'd better make a few romantic  looking cards!


First of all, here are the cards I've made for the latest Twofer challenge.


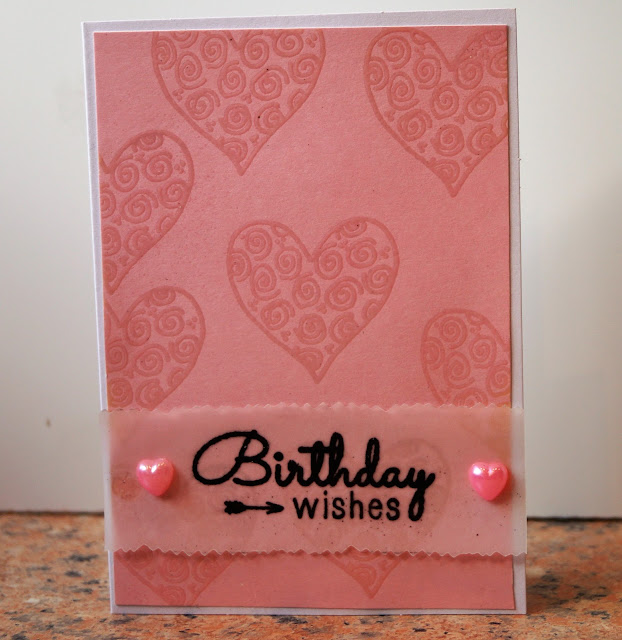
The stamp I've used is an unmounted one that came in a RAK many years ago.  It says "Third Coast" on the back so I presume that's the manufacturer. For the first card, I used Versamark ink and clear embossing powder to stamp it randomly over the pink card and heat emboss it, then added a sentiment stamped on vellum and held in place with glue dots behind the heart shaped pearls.

For the second I heat embossed in black on red then attached it to a panel of Bazzill embossed card. The finishing touches are some ribbon from an NBUS reel (odd how the stuff with hearts on tends not to get used in this house!) and a peel-off sentiment from La Pashe. 

Now a closer look at the cards on their own


I'm sharing this one with

Sweet Stampin - Girly 


And I'm sharing this with

Allsorts - Love is in the air

AAA - All you need is Love


RECIPE - Quick Pickled Onions

When I was a little girl, my grandma always had a bowl of these delicious pickled onions on the table, at every mealtime. Mum occasionally made  them too, but usually only if we were having chips or a salad. We all loved them so much we used to sneak into the kitchen and steal them from the bowl - every few minutes the metal plate she covered the bowl with could be heard rattling and by the time the meal was ready, there were hardly any left!


They were very popular in fish and chip shops and cafés around the Warrington area where I lived as a child, most places had a large bowl of them on the counter for customers to help themselves from, and although I never went in pubs then, they probably had them there too. Only a few years ago I went in a pub that still had them, although they were probably flouting all kinds of laws made up by the Department of Over-Protecting Us From Ourselves.
After all, they were in a large, uncovered bowl and customers could dip mucky utensils and even fingers in - but I'm sure the vinegar would do a lot to help prevent the spread of germs!

Anyway, since you probably won't find 'em in't pub or't chippy any more, here's how to make them.

For 1 large onion you will need 250ml of vinegar, 1 teaspoon of salt and 1 heaped tablespoon of sugar (I use a third of the quantity of Truvia). Whisk the salt and sugar into the vinegar until dissolved. Peel and halve the onion and slice very thinly, and place in a non metallic dish with a lid. Pour over the vinegar mixture and leave to stand for 3-4 hours, stirring occasionally.

This keeps well for several days at room temperature - given chance! When the onion is all used up you can slice another into the vinegar - I usually do this 2-3 times, after which the vinegar takes on a cloudy appearance which is unappetising.

Traditionally these are made with malt vinegar but I've made them with all kinds of vinegar, whatever seems to best match what we are eating. I'd stick to malt vinegar if they are going to be eaten with fish and chips though! My current batch, in the photo, was made with red wine vinegar - HOME MADE red wine vinegar, made using the vinegar maker my daughter gave me for my birthday last year.


She said I'd be able to make vinegar using left over wine - honestly, she's known me for thirty odd years, she's my daughter after all, and yet she somehow thinks I might ever have left over wine! So I have to buy wine for it - I treat it to a bottle now and then when there's a good special offer. The vinegar may not be cheap - but oh my word it's wonderful!

What a week!

It's been One Of Those weeks.

First the dishwasher packed up - luckily we managed to get that sorted out - with all the cooking we do, managing without it would be a real struggle.

Then the loo in our en suite got stuck on permanent flush. Fortunately we have a maintenance contract and it was sorted out the next day.

Then the gas boiler started to play up, switching itself off every few minutes and refusing to fire up when the heating first comes on in the morning. Because it's such a busy time of year, the engineer can't come out to it for a few more days so at the moment we have only intermittent heating and hot water.

Anyway by Friday morning all the repairs were either done or booked, so we got on and booked airport parking for our holiday in April, and a hotel for the previous week when we are going to look after my Mum while my brother, her main carer, goes on holiday. We were feeling pretty pleased with ourselves - until the post arrived, bringing with it a summons for me to do two weeks of jury service - for the period of my brother's and our holidays. Now jury service is a great privilege but in order to do it at the time not only would we have to cancel the holiday we have booked and paid for, but so would my brother and his family, and also my daughter and her family as we are holidaying with them. So I've applied to have it deferred to a later date - please all cross your fingers (or hold your thumbs, if that's what you do in your country) that the deferment is granted!

Anyway, I've made a card that sums up my feelings about this week:


The image is a Viva las Vegas stamp, the sentiment from So Suzy and the splodges are from the Gentleman Crafter set.

I am sharing this with

Rubber Dance - I've chosen the colour challenge of Orange, Turquoise and Lime Green

Chinese New Year card

When we lived in Hong Kong, our home was out in the (then) very rural New Territories,  and wherever we went our journeys would take us through miles of farmland. At this time of year, the fields were full of plum and cherry blossom because everyone wanted to have some in their homes for the New Year celebrations. Strings of bright lights over the fields helped to bring the blossom on at exactly the right speed so that it was all perfect just in time for the big shopping frenzy.

This week's photo inspiration at Just Add Ink  reminded me of driving through those fields, so I just HAD to make a Chinese New Year card.


The stamps are all from a set that was a covermount a few years ago - I think the magazine was Creative Stamping or its now-defunct sister publication, Get Stamping.

And here is the lovely photo from Just Add Ink that brought back such lovely memories for me