Wednesday 31 October 2018

A Sketch at Back to Basics

This fortnight's challenge at Back to Basics is to use this sketch, which was found on a Free Sketches board on Pinterest


If you are new to sketches, what you need to know is that you can rotate, flip or stretch the sketch and way you want, and interpret in any style you like, from clean and simple to full-on mixed media, just as long as we can see that your design was inspired by it.

I've gone for a shabby chic look with my version of it. a great excuse to use some of the beautiful papers and decoupage from the dovecraft Couture du Jour collection.


The heart shaped rosettes are ready made ones, also from the same collection.


Tuesday 30 October 2018

RECIPE: Chilli Stuffed Squash


For this dish, I used an Uchiki Kuri squash, grown by Mark. It weighed in at around 800g  and once it had been halved and de-seeded,  made two perfect "bowls" for individual servings, but you could use any squash or pumpkin depending on what is available and how many you want to feed. Butternut squash might not have a big enough cavity but you could scoop some out and set it aside for another dish.

For the filling I  made my "student chilli" that I've been making ever since I was ay University over 40 years ago. I'll share the recipe here but you could use any chilli recipe, whichever is your favourite, as long as you make it quite thick so you can pile it into the squash bowls.

As well as your squash, you will need your chosen chilli, a little oil and about 40g of grated cheese per person.

To make 4 servings of "student chilli" (I've only used two portions for this dish, the other two will be served with jacket potatoes tomorrow).

500g minced beef
1 large onion, finely chopped
2 cloves of garlic, crushed or chopped
1 teaspoon each of dried oregano, ground cumin and chilli powder
1 heaped tablespoon of plain flour
1 tin of chopped tomatoes
1 tin red kidney beans, rinsed and drained (other beans such as black beans or pinto beans would work well too)
1 teaspoon of Bovril or other stock concentrate
1 tablespoon of tomato purée
seasoning

Heat the oven to 150 C (130  fan), 300 F, gas mark 2.
Place the meat and onions in a casserole dish that can be heated on the hob. Heat slowly until the fat starts to run and then increase the heat and fry until the meat is browned and the onion softened, then stir in the garlic, oregano, cumin and chilli and cook for 1 minute. reduce the heat to very low and stir in the flour followed by the tinned tomatoes. Fill the tin with water and stir that in too. Blend the stock concentrate and tomato purée in, bring to the boil and then stir in the beans. Cover the dish.
Place in the oven and cook for 2 hours, stirring frequently. If it starts to catch, add a little more water, and if after 2 hours it still has a lot of liquid, remove the lid and cook on the hob until thickened.
Set aside and increase the oven temperature to 220 C (200 fan), 425 F, gas mark 7.

Now prepare the squash - cut it in half and remove the seeds.  Check to see whether the halves sit well on the plate - you may need to trim off a little from the base of each bowl to stabilise it. Brush all over, inside and out, with oil and place on a baking sheet and cook until your squash is tender  but not collapsing. My small squash took about 20 minutes but a big thick pumpkin could take 40 minutes.

Remove from the oven, fill each half with chilli, cover with cheese and return to the oven. Cook for a further 10 minutes until the cheese is bubbling and golden.

I love runner beans with chilli and as there are still a few in the garden, I served those with it, along with a few tortilla chips for added crunch. I also added a wedge of lime to squeeze over the chilli.


Sunday 28 October 2018

The night before Christmas

I have to confess that I STILL peep out of the window on Christmas Eve, half expecting to see Santa on his sleigh - and I don't mean NORAD Santa, I mean the Real Thing. Who of course posed for the stamp I've used here.


I masked off the card front using scrap paper and a die cut circle, then sponged several shades of blue ink over the exposed area. After removing the masks, I stamped the Santa silhouette and sentiment - both old magazine freebie stamps, and added a few starry dots using a silver glitter gel pen.

I am sharing this with
Addicted to CAS - one layer card

52 Christmas Card Throwdown - Masking

Fab'nFunky - Christmas

Christmas at CD Sundays

In crafting terms. Christmas really isn't far away now, so to give your card making a boost we've chosen Christmas for our latest theme at CD Sundays.

I've gone back to one of my all-time favourite CDs, The Best of la Pashe 2012,  and printed a decoupage sheet, including the fir tree background and sentiment, from the Pickles and Podge at Christmas section.


I've added a background paper from an old magazine, lots of layers and a flurry of die cut snowflakes.

Because it's been a hectic half term, giving us chance to spend quality time with both sets of grandchildren, I've not had much time to make cards so this is going to be my slightly belated Rudolph Day card this month.
I am also sharing it with Crafty Hazelnut's Christmas Challenge - for someone special

Tuesday 23 October 2018

Into the Woods at Cardz 4 Guyz

It's time for our latest challenge at Cardz 4 Guyz and this time our theme is Into the Woods.

I'm sharing a card I have made for my husband - since he retired he has found a passion for foraging for wild fungi. At first he was only interested in edible ones, but as he's learned more about them he has become fascinated by all of them and loves to go for a trip into the woods to search for them. When I go with him, I can feel myself being drawn in to the fascination too, but then I think "No, stop, I really haven't got time for another obsession!"

However I DO have time to make cards about them!


To make this card I've used papers, an insert and a topper sheet printed out from the Joanna Sheen CD "The Country Diary of an Edwardian Lady". I believe the CD is no longer available - I don't know whether the same images will be on the Crafters Companion CD based on the same book.

Monday 22 October 2018

Grumpy Cat Does Christmas


I do love this grumpy cat image, from the Katzelkraft "Les Chats Russes" set, and the Dylusions sentiment is perfect for him! He really doesn't look thrilled with the too-small Santa Hat perched over on ear and the luxurious bow (both brads) I've given him, does he?

I'm sharing this with
Crafty Hazelnut's Christmas Challenge -  sentiment as focal point or anything goes
Jingle Belles - While Shepherds Watched their Flocks
52 Christmas Card Throwdown - Pets

Two Turtle Doves

I made this card using some of the beautiful "12 Days of Christmas" stamps that came with a recent issue of Creative Stamping.


It is simply stamped, coloured and cut - I used Promarkers for the red and green, so had to cover the inside of the front flap to hide the bleed-through but it was worth it for the bold, bright, simple colour. The branches and beaks, which appear brown, are actually coloured with a gold gel pen - I think the areas involved are so tiny that the black outline is reflecting off the gold and making it look darker.

I am sharing this with
Allsorts - Traditional Christmas Colours
CAS Christmas - Birds 
 

Sunday 21 October 2018

Another Masterboard Make

If you read my Harvest Time post on Friday, you will have seen that I made this masterboard to use as a background for one of the cards.


I promised that I would be back with something made with the snippets left over, and here I am to keep my word. I die cut the left over card into lots of Autumn leaves, and added some leaves cut with snippets of medium and dark brown card. Then I scattered them over a card blank and stuck them down to form a background. (Excuse the poor lighting in this photo)


I was quite tempted just to add a sentiment and leave (groan!) it at that, but I'd already stamped, coloured and cut the sweet hedgehog image and as this is my entry for the current Snippets Playground and I know how fond Di is of hedgehogs, I really HAD to use it!


The image and sentiment stamps came in a recent issue of Creative Stamping. I wish I had some more of the masterboard left, because I reckon the same background with that square die cut  stamped sentiment positioned centrally on it would work a real treat.

Sunflowers

My older daughter loves sunflowers and every year I try to make her a different sunflower themed birthday card, which inevitably means I end up with a lot of sunflower themed stash that doesn't get used much for the rest of the year. This stamp is one I bought to make her card about 10 years ago, a lovely Linda Luckin stamp, that I've hardly used since.


For this card I have stamped it three times, coloured it with Promarkers and then fussy-cut it, removing the stem from one so I could use the head and leaf independently. The background card has a lightly printed script look, and I have slightly distressed the edges, then added some mesh strip and a sunflower-patterned ribbon. I'd been worried that the script on the background might mean a stamped sentiment wouldn't show up, but I was pleased with the way it turned out. If it hadn't worked, I'd have stamped it again on cream card and added it over the existing one!

I am sharing this with
Fab'nFunky - Embellished with ribbons or lace 
House of Cards - Autumn Flowers and/or Colours

Country View Challenge - Plant-tastic

Saturday 20 October 2018

Sisterhood of Snarky Stampers challenge #121 - Skulls

It's time for our latest challenge at the Sisterhood of Snarky Stampers, and with Halloween and the Day of the Dead just around the corner Edna has chosen Skulls as our theme.


I've chosen to go with the Mexican festival, using this beautiful sugar skull die from Dovecraft and a selection of card from a First Edition pad.


The ribbon and buttons are from my stash and the sentiment, which I love for its ridiculousness, from a Tim Holtz Idea-ology Small Talk pad.

Let's see what skull-y creations you can come up with - you might be crowned Queen or Princess of Snark!

Friday 19 October 2018

Harvest Time

The current challenge at Twofers is Harvest and I've dug out a very, very old stamp for my twosome.


It came from a firm called Dimension 4th, who had a monthly stamp-and-project club about 15-20 years ago, and this was part of one of the monthly stamp sets. I've hardly ever used it - the project sheet suggested heat embossing in gold then filling in the wheat seeds with glue and ultra fine copper glitter (glittering mandala designs was popular at the time) but, well, once you'd done it you'd done it, so the stamp got relegated to the "might use again some time" tin. I'm very glad this challenge reminded me about it!


And now for a closer look at the individual card. First the very CAS get well card.


Now the sun is lower in the sky, I'm really struggling with the white balance in my photos, so you are going to have to take my word that the card is white! I stamped the image with brown ink and used a waterbrush with green and orange inkpads to paint in the coloured areas, then die cut it and used very thin (1mm) foam pads to very slightly raise the image from the card surface, on which the sentiment is stamped in brown.

I am sharing this with CAS Watercolour - orange, green and brown 


And now for a complete change, a very different card made with the same stamp. For this I started off by making a masterboard using an A4 sheet of card.


I smooshed with orange and yellow inks then spritzed with gold and copper mica powders in water spray bottles. When it was completely dry, I used a caramel-brown ink to stamp the image all over.

Then I stamped the image on white card and heat embossed it in gold, and used that as a topper for my easel card.


And I'm not planning to waste the leftover scraps of my masterboard - look out for a snippets make coming soon!

I am sharing this with Cardz 4 Galz - fancy folds

Our blog badge 

Thursday 18 October 2018

RECIPE: Cheese scones with "jam and cream"

Recently Mark and I went to a chilli festival. There were lots of stalls selling hot spicy food, and lots selling drinks such as chilli beer and chilli vodka, but only one stall selling "ordinary" tea and coffee. And guess which stall had the longest queue? The stall in question had about a dozen different styles of coffee, and all the usual syrups and garnishes, but when it came to tea there was just one rather unenterprising option - a tea bag dunked in a cup of hot water.

And I do love my tea!

Earlier in the year we'd been to a different food festival where there had been a tea tent serving proper sit down tea, served in vintage china pots and with old fashioned tea room music playing, and as we drove home from the chilli festival we talked about how that idea could work with chilli themed food being served alongside the teas.

Just imagine a cake stand piled high with things like bridge rolls topped with avocado, egg and chipotle mayonnaise, mini Yorkshire puds filled with rare roast beef and chilli horseradish,  chocolate chilli cupcakes and lime, coconut and chilli layer cake. Doesn't that sound fun?

But what about that middle tier, the one where we expect to see the scones with jam and cream?


Well, what about cheese scones with chilli jam and sour cream with chives? Having come up with the idea, I just had to see if it worked - and oh boy does it! We've just tucked into some of these and they were delicious.  Note how I have presented one the Devon way and the other the Cornish way, just to prevent arguments!

To make 4 large scones you will need

150g self raising flour
generous pinch each of salt, pepper and dry mustard
25g butter
75g Cheddar cheese, the strongest you have, finely grated
1 large egg
50ml semi skimmed milk
chilli jam (I actually used some of our home made sweet chilli sauce that had come out a bit thicker than usual)
1 small carton sour cream
2-3 tablespoons chopped fresh chives.

Set the oven to 200C (180 fan, 400F, gas mark 6) and grease or line a baking sheet.
Beat the egg and milk together and set aside
Sift the flour, salt and mustard together then rub in the butter. Stir in the cheese, keeping aside a little to top the scones, then add about two thirds of the egg and milk mixture and knead lightly to make a soft dough. Add more of the mixture if needed but keep a little back for brushing the tops.

Roll or pat out to around 1.5 cm thick and cut into four equal scones. Place on the baking sheet, brush with the reserved liquid and sprinkle with the reserved cheese.
Bake for 15-18 minutes until risen and golden. Cool slightly on a wire rack.


While they are baking, mix together the sour cream and chives.
Serve the scones while still warm, accompanied by the sour cream and chilli jam.

Guest Designer at Swedish House Crafts

I'm absolutely delighted to have been invited to be today's Guest Designer at Swedish House Crafts Blog,  and I decided to go for something much more Clean And Simple  than the wonderful things that many of the regular designers create, to showcase what versatile products they sell.


My card is entirely made with Gummiapan dies - many of my all-time favourite dies are Gummiapan ones, including these gorgeous dragonflies which I'm sure you've seen featured on here dozens of times.

For the allium flowers, I took an A5 piece of watercolour paper, wet the top third and sprinkled purple brushos over it, dried it thoroughly, then wet the rest of the sheet and sprinkled with several shades of green brushos and dried it again. I let it dry under weights overnight  to make sure it was flat, then backed it with double sided adhesive sheet and used the dandelion heart die to cut four flowers, positioning the die so the flower heads were in the purple area.

The "land and sky" background is a stitched rectangle of green on top of a square of blue.

Wednesday 17 October 2018

RECIPE: Dirty Hot Dog Fry #KitchenClearout

What's this, two food posts in as many days? I've not done that for several years now. It must be the cooler weather making me hungry.


Our fridge is SO overcrowded at the moment with the lovely veg from the garden, so some decluttering of the odds and ends was in order. A fridge dive yielded


Four frankfurters, a few rashers of bacon, half a punnet of mushrooms and a cold leftover jacket potato.
I added two onions and a tablespoon of sunflower oil.

Slice the onions and mushrooms, chop the bacon and cut the franks and potato into bite sized chunks.

Heat the oil over moderate heat in a large frying pan and fry the onions for about 5 minutes until softened, then stir in the bacon and continue to cook until everything is starting to brown. Add the mushrooms and cook for a further 3-4 minutes until they start to soften. Mix in the potatoes and frankfurter pieces and carry on cooking over a low heat for 5-6 minutes until everything is heated through.


Those few ingredients suddenly look as if they are going to feed a whole army!

To complete the "Dirty Hot Dog" experience I slathered both ketchup and American style yellow mustard over my portion. It was delicious - and a lot less stodgy than a hot dog served in a traditional bread roll.


This is my recipe for the Kitchen Clearout linky at Madhouse Family Reviews - a great place to find and share fabulously frugal food that might otherwise have gone to waste.

Stencils or masks at Back to Basics

It's time for our latest challenge at Back to Basics and this time we would like you to use stencils and/or masks on your work.

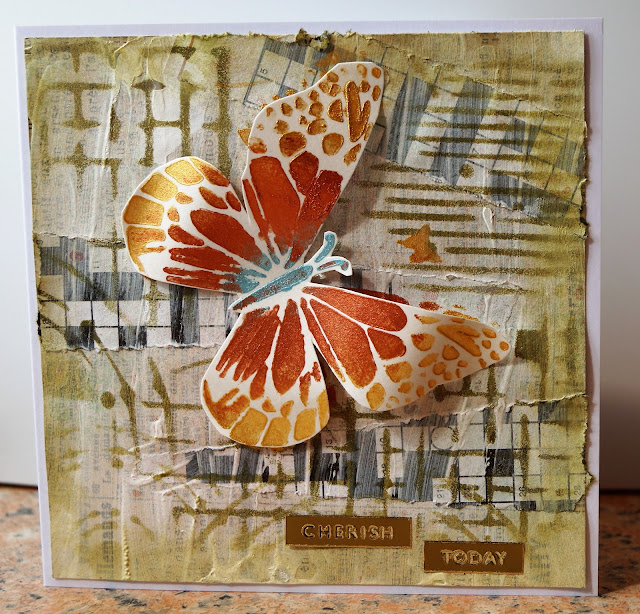
I've had a go at a mixed media style, something a long way out of my comfort zone!


I used some newsprint-style paper for the background, covered it thinly with gesso then added some torn up strips from a crossword. Then I used Moss Green distress ink to stencil some of the patterns from one of the beautiful new Imagination Crafts A4 stencils over the background, concentrating mostly on the broken squares design to link to the crossword pieces on the background.

I used Alchemy Waxes to lightly stencil the butterfly from the A4 sheet where I wanted to position it on the card, then stencilled it more boldly onto cream card, fussy cut and shaped it and added it with3D adhesive. The words I have finished it with are from a very, very old sheet of peel-offs.

I am sharing this with
A Bit More Time to Craft - Anything Goes 
Butterfly Challenge - spin the wheel - I've just used Burnt orange
More Mixed Media - Anything goes/orange

The Owl in the Moon

We often hear about the Man in the Moon, and the Cow who jumped over the Moon, but what about the Owl in the Moon?


 - well, here he is, courtesy of a very old set of Woodware stamps.

I am sharing this with
2 Crafty Critter Crazies - anything goes with a creature
Alphabet Challenge - O is for  Owls
Addicted to Stamps and More - CAS 
AAA Cards - Moonlight 


Tuesday 16 October 2018

Whoopsie!

The current challenge at The Male Room is "My bad/sorry"  so I really couldn't resist using this fab digi from Bugaboo - in fact I'm quite surprised it doesn't already feature in the gallery because I think it's a perfect image for a man's card. They do tend to have a rather, erm, lavatorial sense of humour. (Not that women don't - at least this woman!)


I decided that it shouldn't be just any old pile of poo, though - I wanted to make it look like the popular poo emoji. That's why some of you noticed a rather cryptic message from me on Facebook yesterday - I was trying to take a look at the emoji but my fingers were covered in mica powder from another project and I didn't want to mess my phone up too much!

Anyway, a snippet of paper for the mouth and a pair of googly eyes was all it took to transform it. I really don't know what it has to be so happy about!!!

RECIPE: "Nigel Slater" Chicken and Balsamic Tomatoes

This is a family favourite recipe that we've been enjoying for years - probably since we very first heard of Nigel Slater. The funny thing is it isn't one of his recipes! But it was inspired by his general cooking style and attitude to food - the first time I made it, one of us said "This could almost have been made by Nigel Slater" and the name stuck.


Sorry if the photo's a bit blurry - I was anxious to tuck in!

To serve two, you will need

2 plump chicken breasts with skin (and ideally on the bone, but they are hard to get unless you cut up a whole chicken)
about 80g sliced mushrooms
a knob of butter
2 tablespoons dry sherry
3 tablespoons double cream (longlife cream or Elmlea is less likely to split in cooking)

Melt the butter in a frying pan and place the chicken breasts in the pan skin side down. Fry until skin is golden-brown then turn them over and add the mushrooms to the pan, stirring them into the buttery juices. When they are soft, tip in the sherry (stand back!), mix it well then reduce the heat to very low and cook until the chicken breasts are cooked through, about 15 minutes depending on the size. Keep an eye on the liquid, adding a splash of stock or water if the pan gets too dry. It needs very little liquid but not none at all.

Stir in the cream and turn the portions over a couple of times in it until well coated, check seasoning and serve.

We sometimes ring the changes by replacing the sherry with wine or lemon juice, and sometimes add fresh herbs - thyme, chives or parsley- so it is a slightly different dish every time. I sometimes make Parmesan crisps for a tasty garnish.

I served it with rice (lovely for mopping up the juices), steamed broccoli, runner beans and Balsamic Tomatoes.

For the tomatoes, slice a small onion or shallot and place in the bottom of an ovenproof dish. Halve 3 medium tomatoes and place, cut side up, on top of the onions. Drizzle each with olive oil, balsamic vinegar (you will need about a tablespoon in total) and season with salt and pepper then bake in a moderate oven for about 20 minutes.

Monday 15 October 2018

An Autumn Thank-you

My Canadian  friends have just celebrated Thanksgiving, my American friends are planning for it. Meanwhile here in the UK we are looking forward to sitting a model of a man on top of a pile of wood and setting fire to him...

That's civilization for you! (And don't get me started on the history of corn dollies, now if you want gruesome there is some SERIOUSLY gruesome stuff going on there!)

Anyway, to much of the Northern Hemisphere, Autumn means Thanks in one way or another. So here is a very Autumnal thank you card.


I used an assortment of peg stamps from my old Rubberstamp Tapestry (now Card-Io) sets and a collection of inkpads in various autumn shades. After die cutting the oval for the sentiment I very faintly drew around it on the card then used that as a guide for the stamping, stamping the leaves with a sort of "organised randomness" that kept it natural looking and yet still CAS. Because we've had a very windy few days, I couldn't stop one or two of the smaller leaves blowing away towards on corner!

There are lots of Autumn and Thanks challenges around at the moment so I'm sharing this with
Little Red Wagon - Thankful for you!
Fab'n'Funky - Autumn Colours
CAS on Friday - Thank You card
Addicted to CAS - Foliage
Stamping Sensations - Shades of Autumn
Crafty Calendar - Autumn   

Sunday 14 October 2018

Ho! Ho! Ho!

I really seem to have got the Christmas bug at the moment! Here is yet another Christmas card.


I've made a very simple stamped Santa tag and finished it with a Ho Ho Ho sentiment. I ran a black inkpad around the edge of the card to match the stamped outline of the tag.

I am sharing this with
Less is More - Tags 
Addicted to Stamps and More - Holiday 
Christmas Crafts All Year Round - Santa, Elf or Fairy.

Pink Christmas #2

This is my second card for the annual Pink Christmas challenge at Jingle Belles - scroll down if you would like to see my first.


I've used the same Funkyhands backing paper and Uniko die set as in the previous card, and this time have added a Christmas tree made with a stamp and stitched die set. The star on the top of the tree is actually the centre waste from the snowflake I used on the first card.

I am also sharing this with Crafty Hazelnut's Christmas Challenge - stocking or anything goes

Pink Christmas #1

It's the annual Pink Christmas challenge at Jingle Belles, and for each card linked up to the challenge, Stephanie and Lauren will donate $2 each to Breast Cancer Research. The challenge is particularly significant to me this year as a few months ago I lost a good friend to this horrible disease, so the cards I've made this year are dedicated to Jan. I've made two - they will have to go into separate posts because of the linky not accepting the same URL twice.


I printed out a pink snowflake backing paper from the Funky Hands "Funky Little Christmas" set, and die cut a large circle from it. The HUGE pink snowflake is cut with a Uniko die, and I can't recall which brand of die the sentiment is - possibly Spellbinders?

I am also sharing this with Allsorts Challenge - Christmas.