Thursday 30 July 2020

Dog Days #3

Another ultra CAS one layer card made with the Card Hut pets stamps and Rubber Dance sentiments.


Once again I coloured it with pencils. I'm sure every dog is convinced, deep inside, that he's a ferocious guard dog. Well, as long as there's a good safe pane of glass between him and the cat/squirrel/postman he's defending you from!

This is my third card for the Sisterhood of Snarky Stampers D  is for Dog challenge.


Wednesday 29 July 2020

Dog Days #2

Another card made with stamps from The Craft Hut's Mark Bardsley collection.  This time I've gone for a very CAS one layer card.


The image is coloured with pencils and the sentiment stamped with a Rubber Dance stamp.

This is another card for the D is for Dogs challenge at the Sisterhood of Snarky Stampers.


Tuesday 28 July 2020

RECIPE - Kohlrabi vinaigrette

This year because of lockdown and the threat of food shortages, more people turned to grow-your-own or, with shopping difficult or impossible for some, subscribed to a veg box scheme.
Mark has, of course, been growing veg for many years but this year our kohlrabi have done particularly well. But what can you do with them, if  you've gron some or get one of these alien-loke veg in your veg box?


They can be purpley-red or pale green,  both taste the same. The peel is surprisingly thick, so I've not tried eating it. Sliced and boiled, they make a good accompaniment, especially when mixed with a more colourful vegetable like carrots. Or you can be really decadent and slice them, smother them in lots of cream and bake them into a sort of kohlrabi dauphinoise.
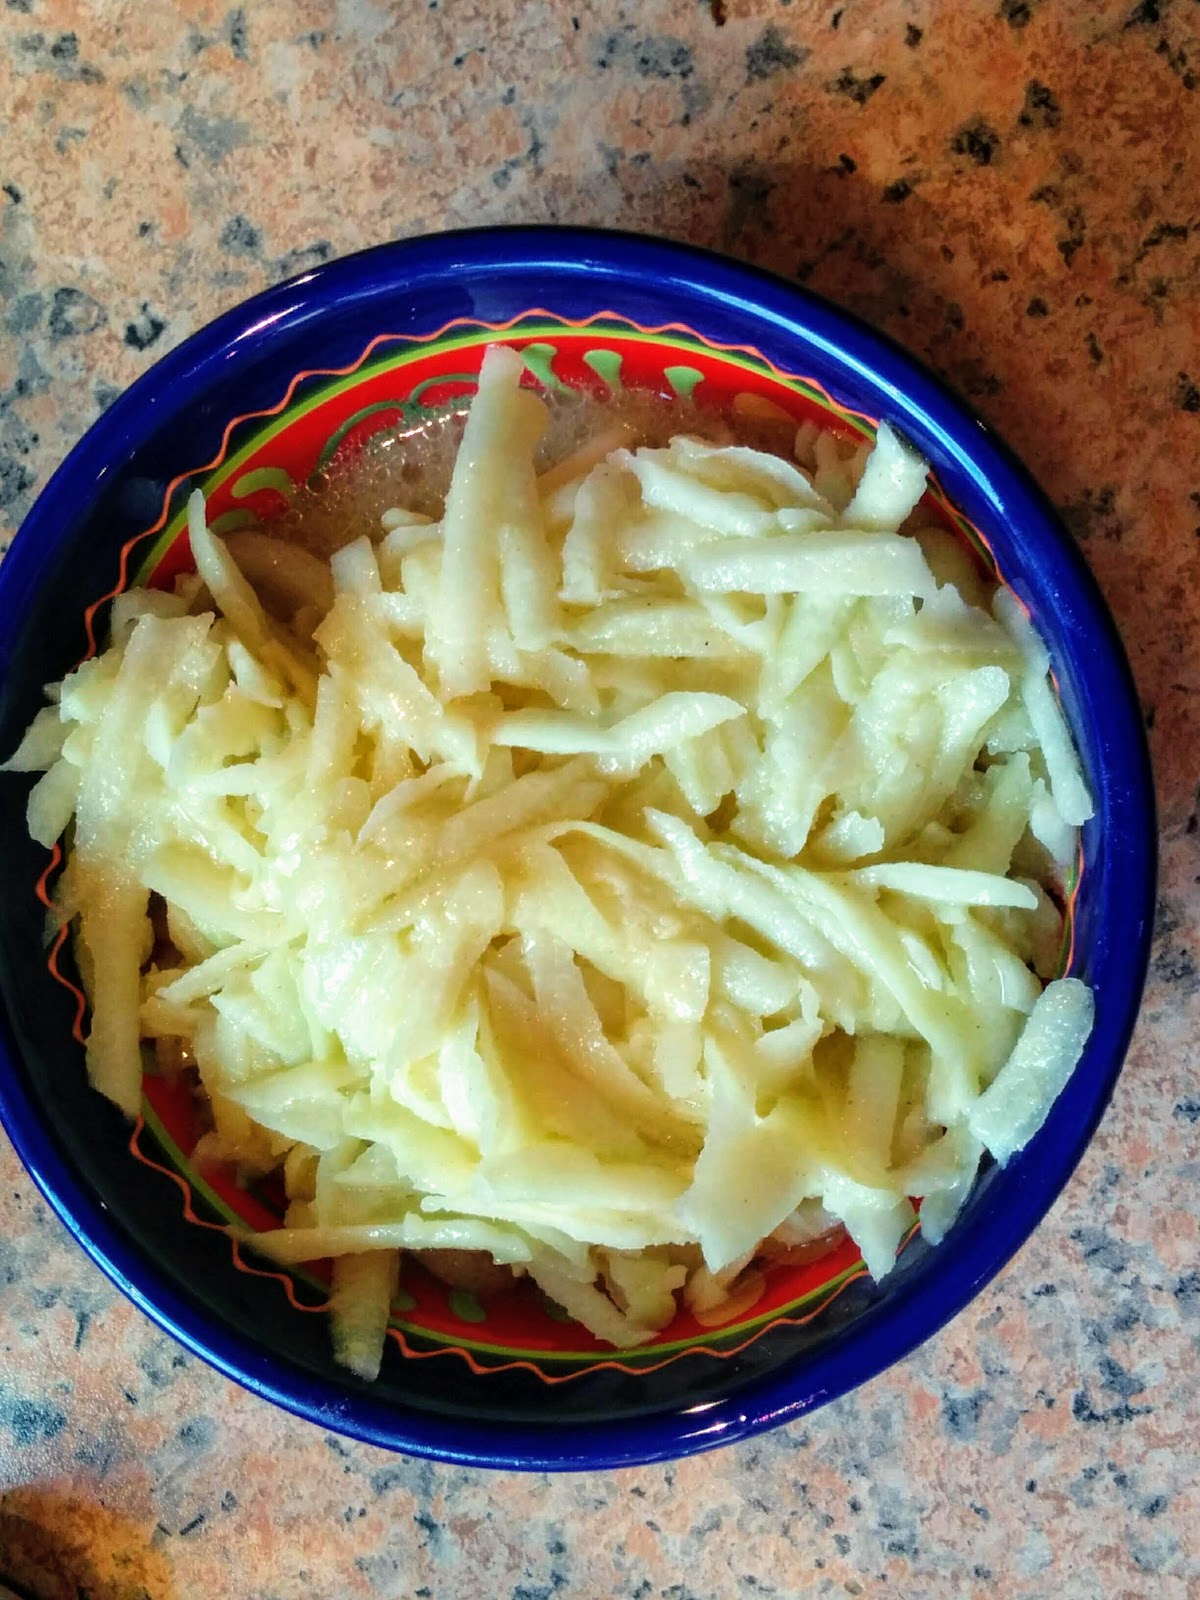
However they are so crisp and juicy raw that I wondered if they could be made  into a salad dish. So I had a go - and it was delicious.


For one kohlrabi you need 

3 tablespoons light olive oil 
1 tablespoon white  wine vinegar
1 rounded teaspoon Dijon mustard 
½ teaspoon salt

Whisk together the vinegar, mustard and salt then gradually whisk in the oil - it will emulsify into a creamy dressing. Grate the peeled kohlrabi and stir it into the bowl. Cover and leave for 1-2 hours before eating - the kohlrabi will soften slightly. Unlike many dressed salads, this will keep, covered, in the fridge for a day or two without going slimy. 


Dog Days #1

I'm really not a dog person and for many years only had one or two dog stamps. Then I fell in love with Mark Bardsley's pet stamp sets from The Craft Hut....


I love the wistful look on this Basset Hound's face - just as if somebody's trying to take away the doughnut he stole! The doughnut stamp came from Creative Stamping mag and the sentiment from Rubber Dance. All the colouring is done with Promarkers, and a pencil used for the chocolate sprinkles (you WILL make sure your doggy doesn't steal a doughnut if it has chocolate sprinkles on it, won't you?). The only slide mounts I have at the moment are rather garishly patterned ones, but covering them in paper soon sorts that out!

I am sharing this with

Alphabet Challenge - H for Hungry 

Sisterhood of Snarky Stampers - D for Dogs 


Monday 27 July 2020

Dragonflies

I don't go very long without making a dragonfly themed card! I love dragonflies and can't resist a dragonfly themed stamp (or garment or jewellery item for that matter)


This one is actually inspired by my favourite tea cup


... and tea is another thing I love! I also love stamping, especially heat embossing, and as you've probably noticed, my current passion is for embossing in white and pastel colours on back backgrounds, which is what I've done here using a very old Craft Stamper freebie stamp. I cut out the square images using deckle edged scissors and mounted them on the black background with foam pads for dimension although it doesn't really show in the photo. The background is stamped all over with the Hampton Art Stamps Dragonfly Background, a stamp I've probably had for 20 years or more.

I am sharing this with

Shopping Our Stash - Black and White

Country View Crafts - Do what makes you happy   (dragonflies, tea, stamping, heat embossing...)


Sunday 26 July 2020

Ink-Well

My crafting mojo is still at an all-time low, so for inspiration I am working my way through some of the designs in the book "Simply Beautiful Rubber Stamping"  by Kathie Seaverns, but using my own stamps and supplies.

brass clip is just to hold the card closed to show the image lined up behind the aperture.


This  one used stamps that came with Creative Stamping a year or two ago. I stamped the ink bottle in a dark blue distress ink on a scrap of white card, cut it out with a square die and matted it on very dark blue card then cut the edges with fancy scissors.

Next I  lightly brushed pale and medium blue inks over the lower right area of the card, and used the same square die to cut the aperture. Finally, I used the dark blue ink to stamp the pens and postmark.

I am sharing this with:

Cardz 4 Guyz - No Patterned Paper 

Fab'nFunky - use a real stamp (no digis) 

Pearly Sparkles - Three of a kind (pens)

Daring Cardmakers - Three Musketeers (pens)


Friday 24 July 2020

At the North Pole

For this card, I've used 6 images from Hunkydory's "Little Book of Father Christmas", cutting them into layers for the 3-D decoupage.


Each page is printed 6 times, so you can have up to 6 layers of decoupage. When I got to the top layer, I felt I could have done with two more layers, one for his left glove and cuff and the other for just the cuff. If I'd thought about it in advance, I could have cut those from the bottom two layers - subsequent layers over the top would have hidden the "holes" - but they were already firmly stuck in place by then. I'm a great believer in letting the glue completely dry between layers, you get more tea drunk that way. 

The moral of the story is, if you are planning your own 3-D decoupage rather than using purpose-printed layers, make sure you plan and cut all the layers first so you can see you have the right amount of everything! 

The starry paper, felt snowflake border and gems are all from my stash and I've finished the snow and the trims on Santa's outfit with Stickles. 

I'm sharing this with

52 Christmas Card Throwdown - Santa  

Watercooler Wednesday - All About Occasions  

Christmas Kickstart - Starry, Starry Night 


Wednesday 22 July 2020

Gold Poinsettia


A one layer card made using stamps from one of last year's issues of Creative Stamping.  I heat embossed the stamping in gold, then coloured the "petals" (I know, I know, they're not petals they are bracts) with gold glitter and the leaves with Wink of Stella, and gave the mistletoe some liquid pearls as berries.
It looks a little drab full face, but angle it towards the light and...


The gold gleams, the glitter glitters, the Wink winks  and the pearls pearlesce!

I am sharing this with

Crafty Hazelnut's Christmas Challenge - Anything goes

Less is More - One Layer Christmas in July 


Sweet Stampin - Clean and Simple

CAS  on Friday - Anything but white

AAA Cards - maxi white space/flowers 


Tuesday 21 July 2020

Finishing up the papers.

I've actually done it, I've finished up the very last scraps of a pack of papers! The papers in question were the lovely BoBunny Secret Garden 12 x 12 double sided papers, all of them beautiful and I've made  lots of cards with them.


I used some of the larger pieces to create layers, and stamped a sentiment onto the  square panel, then fussy cut flowers and birds from the remaining scraps  and attached them around the card,  using different amounts of 3D adhesive to create various depths to add dimension to the card. Here is an angled photo to give a better idea of the dimension.


I dotted a few butterflies around,  punched from the very last scrap of paper, and gave them a hint of glitter.

I am sharing this with

Pixie's Snippets Playground - challenge 382 

AAA Birthday - 3D 


Sunday 19 July 2020

She sells sea shells....

Yes, I did say I'd made a couple of cards, so  here is my second post for today.


This card is made with a digi called Shell Border from Eureka stamps.  Instead of using it as a border, I sized it to fill the front of a DL card and printed it three times.

I covered the first image in clear embossing powder and sprinkled WOW Embossing powder in Serene all over it, heat embossed it and then repeated the powder and heat to give good coverage while not completely obliterating the printing on the background - I wanted to be able to see the pebble effect and of course where to position the shells later on. The powder is a gorgeous mixture of colour, texture, shine and sparkle, very reminiscent of sunlight glinting on a rock pool.  I needed to flatten the finished piece under a weight for a while then attached it to the front of the card.

I coloured the shells and border of the other two images using Promarkers,  and cut everything out. The first layer of border and shells I attached to the background with red-backed double sided tape for extra strength on the textured background. (Don't you just hate the way the static in the red background means the waste sticks to everything?). For dimension, I used foam pads to attach the second layer of border and Pinflair glue to attach the shells.

I am sharing this with

CD Sunday Plus - anything goes using a CD, USB or download 

Cardz 4 Galz - Seashells 


Frida!

Goodness, is it really almost a week since I last posted anything? My crafting mojo is still pretty much AWOL, but it's been returning in fits and starts over the last few days and I've managed to complete a couple of cards.

This one is made with another of the stamps from the beautiful Santoro crafting bundle I won recently.  Looking at the coordinating papers that came with the stamps, it appears the images are intended to be coloured in pretty, delicate colours, but as soon as I saw this stamp I thought of Frida Kahlo's vibrant self-portraits and had to try creating something in her style.


I stamped the image and some small flowers for a background, then coloured the whole thing with Promarkers.  The eyebrows and lips were rather too dainty for Kahlo, so I enlarged them and added bold colour. I stamped  the sentiment on separate card, heat embossed it with a lemon pearl powder and cut it into a tab.

I am sharing this with

Allsorts Challenge - Flowers all over 

Inkspirational - Painting or Colouring 


Daring Cardmakers - Frida Kahlo 


Monday 13 July 2020

Those magnificent men in their flying machines

Along with many of my friends who belong to the same club, I've spent the last week tussling with a cryptic quiz on the theme of "Planes, Trains and Automobiles" and it seems to have crept over into my crafting!


I took a large 8" x 8" card and cut the front along the diagonal. Then, using papers and toppers from the Hunkydory "Planes, Trains and Automobiles" set, I covered the inside of the card with sky paper and the outside with collage paper. Then I arranged toppers along the diagonal and finished with a peel-off sentiment. 

I am sharing this with Fab 'n' Funky - For a man or boy 

Saturday 11 July 2020

Butterfly two ways

This month's Twofer Card Challenge theme is Butterflies - one of my favourite themes, almost up there with dragonflies!

I chose this butterfly stamp which was part of a magazine freebie set several years ago.


I am sharing the pair at Twofers 


and also at Allsorts where the theme is something beginning with B. Between the two I've got butterflies, birthdays and blue - lots of Bs!

Now a closer look at the individual cards.


I went pretty old-school on this  - matting and layering over a stamped background. I was going to use my Misti to line up the rows of stamping but it looked a bit odd with the sentiments lined up one above the other, so I stamped it by hand to make it easier to offset them. 

For the topper, I stamped a bark-effect stamp  over the square in light green, then inked the surface of my smallest square acrylic block with dark pink and pressed it over the  background, then finally stamped the butterfly in a darker green, added dark pink and green matting and finally ran the dark green inkpad around the edge of the card.

I am sharing this with Watercooler Wednesday - all about occasions


I often use butterflies on sympathy cards, so I decided my twofer should be a syampathy card. I went for a very CAS one layer card.


I simply masked the card to leave a band just narrower than the flower silhouette (from the same stamp set as the butterfly)  and used a brayer to lightly apply the ink from a Kaleidacolor pad.  Then I removed the masking and used Versafine ink for all the stamping. Job done! It only took a few minutes, something I think can be important with sympathy cards as unfortunately there are times when we need them at very short notice.

I am sharing this with AAA Cards - Made in Minutes


Friday 10 July 2020

The girl in the window

Usually when I make an NBUS (Never Before Used Schtuff, (c) Darnell)  card I use very old NBUS, but  over the last few days I've acquired some  lovely new toys to play with so today I'm using NEW NBUS.


The NBUS items are the Santoro Gorjuss girl stamp, part of a beautiful bundle of goodies I won on the docrafts Facebook page, and the pretty leaf stencil which I bought this week. 

I made a square card from single sided orange pearlescent card, and cut a slightly smaller piece of green for the topper. 

Next I stamped the girl on a scrap of white card, coloured her with Promarkers and chose a rectangular nesting die to cut her out. Look, look.... I coloured HAIR!!!! Go me! 

I measured the centre of the green card and used the next size up of die to cut a rectangle from it. Then I positioned the green card over the card front and positioned the die I'd cut the girl with inside it, equally framed all round,  removed the green and cut the aperture. 

I stuck the image onto the green "waste" die cut, then put adhesive on the back of the panel, lined it up exactly behind the aperture on the orange card and closed the card. This made sure the image was correctly aligned with the window. 

Now moving on to the green square, I taped the stencil over it, making use to leave an even border all the way round, and sponged Versamark ink through the stencil. Then I removed the stencil and brushed Blonde Moments Pearl Pigment Powder (do they still make that? It goes a long way, I must have had mine for about 10 years and I still have most of the pot) in gold over the leaves. I finished by buffing with a tissue to remove the excess powder  then stuck the green card to the front of the orange to form a wide border around the aperture. 

I am sharing this with

Passion for Promarkers - Use Orange 

NBUS - Challenge 16


Thursday 9 July 2020

Sunflower Twist Card

Happy birthday Emma! Today is my daughter's birthday and it's become something of a family tradition that I send her a sunflower themed card every year. After all, her birthday is at the height of sunflower season - we have some beautiful ones in the garden right now.


This year I decided to use  the twist card technique which I described in detail on my recent snowflake card. The sunflowers and leaves are stamped using a Creative Stamping from a year or so back and I've coloured them with pencils.

I am sharing this with

Crafty Calendar Challenge - add ribbon 

A Place to Start - Flowers 

The Flower Challenge - Summer/Winter 


Wednesday 8 July 2020

Feline Festive!

And while I had my Christmas stash scattered all over the table, I really had to make a second card. Once I'd remembered my pack of Santa Hat brads I simply had no choice.


The background is made  using a stars and stripes embossing folder on satin finished metallic card. The cat is stamped using a very, VERY old unmounted stamp that I got in a grab bag over 20 years ago. (I have no idea now where that bag came from, I ordered from a small ad in the back of Crafts Beautiful, but many of the stamps from it are among my all time favourites and are still in regular use). I thought it was the purr-fect size for the Santa hat brad!

Finished with a stamped sentiment, some die cut snowflakes and lots of bling  to brighten up this gloomy day.

I am sharing this with

Christmas Kickstart  - Hatty Christmas 


Show us your pussycats - Furrything goes 

Make my Monday - Stars and or stripes  

Jingle Belles - Stars and or stripes 

A winter walk

Today the weather is cold and wet - perfect Christmas card making weather!


I dug out a Hunkydory collection from a couple of years ago and used elements from it to make this card,  using the sketch from 52 CCT.

I am sharing this with

52 Christmas Card Throwdown - sketch 


Shopping Our Stash - Hannukah/Christmas in July 

Christmas Crafts All Year Round - Cool it! 

Fezziwig's Festive frolics - Anything festive

Crafty Hazelnut's Christmas Challenge - Anything goes


Tuesday 7 July 2020

An accordion card

I'm back with my second offering for the Butterfly challenge and this time I've included the accordion fold.


I used  the "A4 accordion" groove on the scoring board to fold my card into 4 equal panels then decorated the front and the inside panels with these papers which were a recent magazine freebie -  lots of lovely butterflies and bugs and the perfect colours for the challenge! I finished the front with an ancient and much-used Polkadoodles circular sentiment stamp. 

It's just dawned on me that each panel of this card is the perfect size for a bookmark - wouldn't it be nice to use the perforating wheel on a paper trimmer to score the lines so the recipient could use at least one panel of the card as a bookmark? I might give that idea a try. 

I am, of course, sharing this with the Butterfly Challenge where I'm claiming all elements - the fold, the two patterned papers and all three colours. 


Monday 6 July 2020

Back to the beaches!

From the horror stories we are seeing in the media, Brits are flocking back to the beaches in droves, and some of them are leaving  disgusting piles of litter behind them. But for one group of inhabitants, that is GOOD news - the seagulls! I've been noticing far more seagulls coming inland this year, probably because the scavenging opportunities along our seashores were so very much reduced because of the lack of tourists, and now they're back patrolling the seafronts looking to "help" people eat their chip shop lunches and ice creams.


First I masked off a band along the bottom of the topper for the sentiment to  go on, then used a Woodware stamp set for everything on this except the beach huts - the one in the Woodware set was a bit big for what I wanted  so I picked out this row of huts from a magazine freebie set. I stamped and masked  the gull before adding the huts and wooden post. I coloured everything with promarkers - I couldn't find a shade in my collection that was exactly right for the sand I wanted, so I coloured it with Vanilla first, then dotted it all over with tiny streaks of Sandstone, then blended another layer of Vanilla over in a circular movement until all of the Sandstone was blended in. I stamped the Marram grass over the top once all the ink was dry.

Then I removed the masking and stamped the sentiment - AND SMUDGED IT! But I rescued the card by stamping the sentiment again on a  scrap of card and matting it to match the main matting, and covering the smudged stamping with it.

I am sharing this with

Allsorts challenge -Summertime

Little Red Wagon - Summertime Fun   

Sweet Stampin - Holidays 

Stamping Sensations - All creatures great and small 

2 Crafty Critter Crazies - anything goes with a creature 

Passion for Promarkers - Make us smile 


Sunday 5 July 2020

The indoor gardener

I have a confession to make. With Mark being such an expert gardener you might have expected some of his skill and passion to rub off on me,  but I have totally "brown fingers" in that every plant I touch dies. I can no more tend a plant than he can wield an embossing folder, and back in our Army days when we lived in flats and all our plants were house plants, he used to arrange  for a neighbour to come in and water the house plants when he was away on exercise, even though i was still at home!!!

So, when I won a CraftsUPrint voucher in a recent Butterfly Challenge, I just HAD to choose this download - and just to make it an appropriate way to use my prize, I was pleased to see it included some butterflies to embellish the design.


The download had all the elements for several layers of decoupage for a large  8" square card plus enough to decorate the inside of the card and the envelope. And I love the contrast between the delicate, pretty background and the bold, snarky image and sentiment. As well as identifying with the sentiment, I reckon Stella (or the Stella look alike) has the same lockdown curly hair problems as me - I, too, have developed a tendency to look in the mirror and see Shock Headed Peter  looking back at me. Not sure I feel confident enough to visit the hairdresser yet, I'm going to wait a few weeks and see what effect the easing of lockdown has on the number of cases of Covid in our area.

I am sharing this with

The Butterfly Challenge where as luck would have it, aquamarine is one of the current colours to choose from, so I'm claiming just the one element plus butterflies.

CD Sunday Plus  -Anything goes using a CD, USB or download

And a second visit to The Sisterhood of Snarky Stampers - W is for Water