Thursday 31 January 2019

Remembering Jessi

Many of you on the craft circuit will have known, or at least known of, Jessi Fogan who blogged at One Crafty Mama and sadly passed away at Christmas time.

Jessi was on the design teams  of Shopping our Stash and the Sisterhood of Snarky Stampers, and it was on the latter that I got to know her and learn about the massive struggles with her health that she had to endure in the last couple of years of her life.

This week the team at SOS (many of whom are also on the SOSS team, the acronyms must get confusing!) have decided the challenge should be an Ode to Jessi  and have asked us to create a card inspired by some of her work.

Now, Jessi was already very ill when I got to know her, and her work at the time was very powerful, dark and artistic, reflecting the mental and physical pain she was suffering, so I was very surprised when I looked back over her blog and saw how bright and cheerful and most of all varied her work had been before her struggles began.

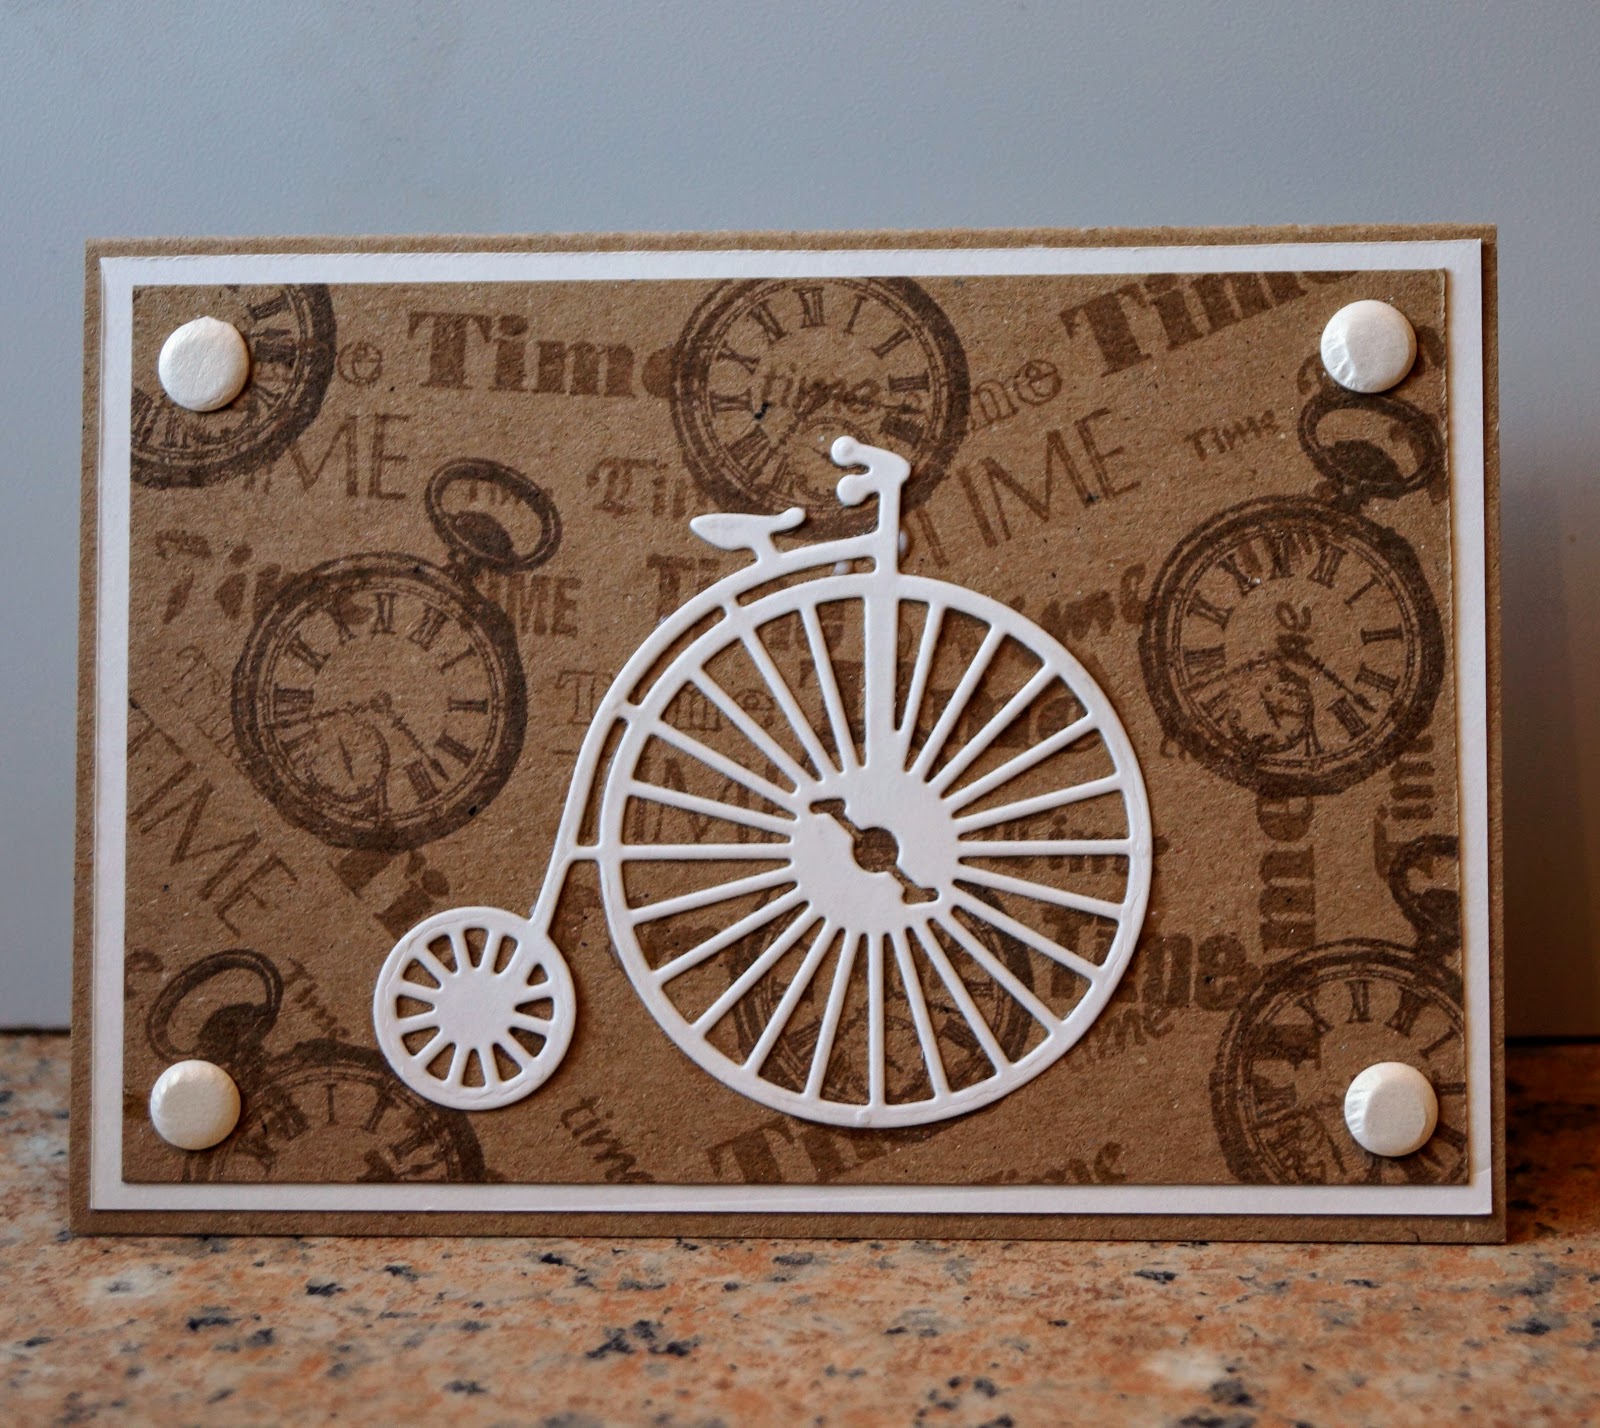
When I spotted this card I knew I had the perfect stash to do a complete, utter, total and unashamed CASE of it!

Here is my card - I kept the layout the same but because the patterns were smaller, I made the elements bigger IYSWIM. I think smallish elements teamed with big patterns look bold - with small patterns they can easily look mean.


and here is the card that inspired it


And why did I think this was so perfect for the challenge? Well, after all, Shopping our Stash is all about using up our stash, and I've used lots of snippets and offcuts from a couple of Craft Asylum Candy pads - a 12" one and a 6" one - that have been kicking around in my stash for years and years. And the pearls and gems are almost the last from a sheet I picked up at The Range about 5 years ago when I had a gift voucher and went crazy in the craft department.

I'm sharing this with Shopping Our Stash - Ode to Jessi

Wednesday 30 January 2019

A magic fairy door

A door so magical, in fact, that it's self-supporting and opens into a mysterious invisible fairyland portal..... Well, I forgot it would need a tree or something to open into, so that's my story. And since it is, of course, magic, it can work any way I want it to!


I used a selection of stamps - mostly magazine freebies - for this, masking the door and toadstools before stamping the wildflower border. The images are coloured with Promarkers  plus a white gel pen for the spots on the toadstools, or ammonita muscaria as my fungus fan of a husband would call them. You can't tell from the photo but the fairydust is highlighted with glitter - all you can see in the picture is that one or two of the sparkles are a bit paler where the glitter reflected the light.

I am sharing this with

Addicted to stamps and more - Anything Goes
Watercooler Wednesday - Anything Goes


Tuesday 29 January 2019

Something beginning with T at Cardz 4 Guyz

It's time for our new challenge at Cardz 4 Guyz and this time we would like to see something beginning with T on your card.

I think you can guess what my "T" is!


Texture, of course! Oh, and a tiger. The beautiful tiger image and backing paper are printed out from the Polyanna Pickering CD "A walk on the wild side"  and I've added kraft card, mesh and corrugated card from my stash.

Monday 28 January 2019

Scotland the Brave

Thanks to a year spent living on the North coast of Caithness when I was in my teens, I've always considered myself to be an honorary Scot, and with January being the month of Hogmanay (well, the hangover from it at least) and Burns Night, Scotland is never far from my mind at this time of year, so here's a Scottish themed card.


The thistle stamp came from a company called Artylicious which is sadly no longer trading. I stamped it by placing the stamp in my Misti and covering the flowers with torn sticky notes before inking the stamp with green, removing the masks and stamping, then without moving the stamp or paper, repeating the process with purple ink, masking the leaves and stems and inking just the flowers.

To make the thistle really stand out I kept the rest of the card very simple, with a plaid background printed out from the CD "The Best of La Pashe 2014" and a little matting and candi.

I am sharing this with
Sweet Stampin' - Burns Night
The Male Room - Nature

Sunday 27 January 2019

It's Paaaaaaaaaaaaaaaarty time in the Playground!

The Snippets Playground, where we are encouraged to make use of all those odds and ends of leftover card and paper, has been running for eight years now, and it is seven years since the lovely Di, of Pixie's Crafty Workshop, took over as headmistress, so Darnell has organised a blog-hop linky party - you can join in here - to thank Di (and Parsnip, of course) for all the hard work and generosity.

I wasn't there at the start of the Playground, in fact I hadn't even started this blog when the gates opened, but not long after I started blogging, I'd used a lot of scraps on a card and someone suggested to me that I should join in. I did - and was overwhelmed by the warm welcome from Di and from many of the regular players. It has to be the friendliest challenge in the Blogosphere. Since first dipping my toe into the water I think I have only missed playing along a couple of times - once when my Mum was in hospital and the other time when I was in hospital. I find hospitals don't take too kindly to having the wards cluttered up with paper, glue and glitter!

Di and I soon found out that we have a lot in common - we live not far apart, both of us have travelled the world as members of military families, and both of us have grandchildren living overseas. Meeting Di, Darnell and lots of other lovely bloggers in Southampton in 2016 was a real highlight of my blogging "career".

And what kind of a party would it be if it didn't involve gin? I've seen Parsnip disappearing behind the bike sheds with a green bottle and a couple of lemons clutched in his paws! So here's my card to celebrate.


The stamp I've used is a brand new one from Crafters Companion - I knew I had to have it as soon as the pre-release announcement came out and I stalked the postman every day until release day! The Gin O'clock ribbon was a gift from Linby of Crafty Linby who shares my love of all things gin related. All the pieces of coloured card are, of course, from my snippets box and the dewdrop gems are from a very, very old QVC kit that I bought about 20 years ago.

Saturday 26 January 2019

Sisterhood of Snarky Stampers challenge #126 - Valentine

Even Edna has her romantic moments, and with Valentine's day approaching, she's asked us to make Valentine cards for our challenge at the Sisterhood of Snarky Stampers. Naturally, we'll all be very happy if you can add a helping of snark, but I'm sure we'll understand if you decide to go all soppy and romantic on us!


I dug out a very, very old stamp - I think I got it from Crafty Individuals but I've had it so long I can't really remember.


The image is the whole film strip and heart, but I wanted to make the heart a different colour, so I stamped the complete image onto scrap paper. Then I put the card into my stamping platform and positioned the stamp, cut out the heart from the scrap paper and used it to mask the heart on the image while inking up the rest of the rubber with black Memento ink.
I removed the mask and stamped the black areas, then cut out the remaining parts of the image on the scrap paper and used them to mask  everything but the heart, which I then inked and stamped with red Versafine ink.
I used clear embossing powder to heat emboss the heart which made it come out a lovely deep reddish-coral, not the dayglo orange of the photo, then used a Dylusions stamp to stamp the sentiment on paper the same shade as the embossing.

Now, how about popping over to share your Valentine's Day creation with us, you could be our next Queen or Princess of Snark.

I am sharing this with the Uniko challenge where the twist this month is Love.

Friday 25 January 2019

Happy Bunny

Today I've been playing with an NBUS stamp that I must have had for at least 5 years. I knew it would come in handy some time!


It's one of the mini sets from Studio G. First I stamped the bunny on my card, then masked him (or her!) and masked off the card to leave a strip just a fraction wider than the bunny. Then I sponged in Distress Inks in shades of pink to create an ombré effect, and stamped the sentiment over the shaded area. After removing the masks I added enamel dots, which are also in several shades of pink to echo the ombré background.

I am sharing this with
Addicted to CAS - Friends 


CAS-ology - Smile 


AAA cards - up to one third & masking


Thursday 24 January 2019

Chinese New Year card

Chinese New Year falls quite early in the Western calendar this year, with New Year's Day falling on February 5th, although celebrations go on from January 28th to February 15th. Red and gold are very festive colours and can be seen everywhere, especially in the "lai see" packets that people gift good luck money in, so I've based my card around those colours, even though it was actually inspired by the latest Library Challenge, which is "The Girl With the Dragon Tattoo".


Both the dragon stamp and the sentiment are ones I have had for many years - neither carries a brand name. The coin is a genuine old Chinese coin and the gold thread is Goldfingering crochet yarn left over from my crocheting days - it must be around 50 years old. I just knew it would come in handy some time!

Here is the book cover for comparison - a book I really loved. I've enjoyed the sequels, too, even those written by a different author who has managed to capture Stieg Larsson's tone brilliantly.

2732977

I am also sharing this card with Watercooler Wednesday - Holidays around the World 

Wednesday 23 January 2019

Salt technique at Back to Basics

This fortnight at Back to Basics we would like you to use the salt technique. This involves sprinkling salt onto a wet watercolour background so the salt soaks up some of the colour to leave interesting patterns - there is a You Tube video here that might make it clearer if it is unfamiliar to you.

Here is the background I made


I was quite pleased with it for a first attempt, but I'm afraid it was downhill all the way from there! However hard I brushed and even sanded, I couldn't get rid of the very finest salt grains, and that meant when I tried to stamp on it, the image came out very - well - grainy!

So I stamped the image again, this time onto plain card. and used my salt background to make a large background for the smaller topper.


I stuck the topper on to cover the area where I had attempted to stamp the image.

Well, I've been brave enough to share my attempt and what went wrong, so now you have absolutely NO excuse not to give it a go and head over to Back to Basics and share the results with us!

Monday 21 January 2019

Oh I do like to be beside the seaside...

Here's a first outing for a new set of stamps I treated myself to from Woodware, one of my favourite brands.


My newest stamp - and my oldest papers. I had SUCH fun creating this! Way back in the 1990s when I started watching shopping TV, I had a craze for buying Hot Off The Press pads and kits. At first, I kept each pad separate, with any snippets tucked into it, but gradually over the years they've all been whittled down to the point where the few unused sheets and all the viable snippets from all the pads live in a single plastic foolscap wallet, and it's always fun to have a rummage through the snippets and reminisce about cards I have made with them.

This time I was looking for stripey snippets, and found lots of them, far more than I've used here. I also picked out a scrap of texture-effect brown paper which would be good for the stump. I'd been planning to add a piece of white for the seagull but then I spotted a scrap of mottled grey vellum which, with the help of a few strokes of Promarker, has the scruffy grey look of a young seagull that hasn't yet grown its adult plumage.

I am sharing this with
Pixie's Snippets Playground  challenge #344
Sweet Stampin - Bright and cheerful

Penny Farthing

Given that I've never even ridden a normal bicycle I'm always surprised by my fascination for penny-farthing bicycles. So as you can imagine, this die gets a lot of use!


For the background I used Versamark to stamp the "Time" word block stamp randomly over kraft card and left it to allow the watermark effect to develop - I think it works better on kraft  than on any other type of card. Then I stamped a pocket watch stamp randomly over it in dark brown ink. The browns of the background make the cream die cut penny-farthing really pop from the card, don't they?

I am sharing this with

Alphabet Challenge - V is for Vehicle 
Inkspirational - Use Kraft

Allsorts - Make it masculine
Little Red Wagon - Time Will Tell
Watercooler Wednesday - Masculine
  

Sunday 20 January 2019

Butterfly Blues

I was so excited to read that Kathy, from Purple Princess Diaries, had been used as the muse for the lovely sketch for the new challenge at Less is More, and couldn't wait to get started on my card.

Here's my card:


and this is the sketch


To make the triangles accurate,  I cut a sheet of scrap paper the size of the card front and measured and drew in the triangles, then cut them away and used the rest of the sheet as a mask. I sponged in Memento Summer Sky ink to fill the triangles then stamped butterflies from one of my newest acquisitions, a pretty Hot Off The Press stamp set, in Nuvo Laguna Bay and an old Marvy Matchables blue ink pad. I couldn't decide whether to stamp them with the mask in place or remove it and let them overlap the edges. Eventually I decided to go with keeping the mask in place but when I removed it, the butterflies looked "imprisoned" and we don't want imprisoned butterflies, do we? So I stamped a couple of happy little escapees to enjoy their freedom.

The sentiment is stamped and heat embossed in white on a scrap of blue vellum. I had to do this twice because the first time I didn't bother to swipe the vellum with my anti static pad and when a card is as CAS as this those white speckles and smudges really show up! I used part of my very precious last sheet of Invisidots to attach it to the card.

I am sharing this with
Less is More - Sketch 
Butterfly Challenge - The letter Y - I've used Yale Blue and You.
Addicted to stamps and More - Clean and Simple

#2 Anything Goes at CD Sundays

We have another Anything Goes challenge for you at CD Sundays this fortnight - but don't forget that you MUST include something from a craft CD on your work. You don't have to make the whole card from the CD, you might just use a paper, topper or embellishment, but for this card everything bar the die cuts has come from a CD, the gorgeous "Meadow's Edge - the Next Generation" from Design House.


 I chose the lovely Barn Owls design and printed the design sheet and matching backing papers then created an offset gatefold card sized to fit the stacker topper and coordinating border.

I am sharing this with Cardz 4 Galz where the current challenge is Dimensional Elements

Saturday 19 January 2019

Winter bunny

Shortly before Christmas I got a lovely set of stamps from Mama Makes but I'd already made nearly all my Christmas cards for the year so apart from the bunny and one of the sentiments, I'd not had a play with it. But I think over the next few weeks you'll be seeing a LOT of things made from the stamps.


It took me a while to work out what the cute creature was, but the tail is a giveaway isn't it? It's a lop-eared bunny wearing ear warmers!  I used heart and snowflake stamps for the background, stamped the sentiment into an area I'd masked off  and then stamped the bunny onto scrap card, coloured and fussy cut him or her and added with 3D adhesive.

As soon as I saw the theme at Christmas Kickstart  was Bundle Up I knew this bundled-up bunny had to appear somewhere on my card!

I am also sharing with
Jingle Belles - Look what Santa brought me. Actually the only craft goodies Santa brought me were totally unsuitable for festive cards, so I've used my most recent and mostly unused Christmas stamps.
Use Your Stuff - Furry Friends  although I fear Majo may faint with shock when she sees I haven't featured a cat! She knows me far, far too well....
Crafty Hazelnut's Christmas Challenge - Add a sentiment or anything goes

Thursday 17 January 2019

London skyline

I do love city skylines in crafting - stamps, dies, even ribbons, I can't resist them. I'm particularly fond of the Tim Holtz Cityscapes set which I got as soon as they came out - about 4 years ago? - and have used countless times since.


To make the background I swiped an embossing folder (also a Tim Holtz one, pure coincidence) with black Versafine ink and embossed it then immediately covered it in clear embossing powder and heated it, so the "inny" bits are nice and shiny. Not that you can see it on the photo, of course!

I am sharing this with

Retro Rubber - Black and White
RRCB 102

Countryview Challenges - Landscapes/Cityscapes

Watercooler Wednesday - Masculine Anything Goes
 

Wednesday 16 January 2019

Hearts all over

I've been playing around with a brand new stamp - it's an all-over heart pattern but I don't know the brand as it was sent to me by a magazine to test.  The sentiment and pearls are from my stash and as for that blue paper, my Mum bought it for me last time she came here  to visit and she's been housebound for the last 15 years so it's very, very old!


It would look good as either a background or the main feature on a card. I've got lots of ideas for this - white-on-white, stamped on parchment, used over an inky background and even cut up into border strips, but for its first outing I thought I'd make good use of those bold, clear shapes by colouring it in bold, bright colours. Incidentally, do you know it's Valentine's Day just four weeks today?

I am sharing this with
Shopping Our Stash - Hearts on Fire
Sparkles Monthly Challenge - New Year, New Stash

Tuesday 15 January 2019

Planes Trains and Automobiles at Cardz 4 Guyz

It's time for our first challenge of the year at Cardz 4 Guyz  - we didn't really want to start one on New Year's Day  so we had a break. Our first theme of the year for you is Planes, Trains and Automobiles. You could just pick one of the three, or two, or the whole lot as I have done.


I've used the toppers from the Hunkydory Planes, Trains and Automobiles topper deck  and a paper from the matching pad. I chose the toppers carefully so that a man who turns 90 during 2018 might well remember seeing, or at least reading about, the vehicles in his boyhood, and added the 3-d foam numerals to make a very quick and easy card for a 90th birthday.

I'm making a second visit to Allsorts - Milestones with Numbers with this card.

Sunday 13 January 2019

Happy 18th birthday

Here in the UK, the legal age for buying and consuming alcohol in a bar is 18, so boozy 18th birthday cards are very popular, despite the fact that most young people have either been sneaking into bars for a couple of years by their 18th birthday or, increasingly, not bothering to drink at all (they probably still drive their parents to drink though!).

So here's a birthday card for an 18 year old boy, made with stamps, dies and an embossing folder that came with a magazine last year. I'm not sure which but probably Papercraft Essentials.


I'm sharing this with
The Male Room - Anything Goes/optional beverages
Allsorts - Milestones with numbers

Owls and more owls

These lovely owl dies are supposed to be for Christmas, hence the Santa hats included in the set, but I think they are far too sweet to keep just for one purpose!

Here they are in their festive regalia:


The owls, branch and hats are all cut from snippets, of course, with a subtle snowy background and a Christmassy sentiment.

I am sharing this card with
Crafty Hazelnut's Christmas Challenge - Feature a creature
Addicted to Stamps and More - Holiday

Now, I don't know about you but I always smile when I see an image of birds standing on each other's heads. I don't know why, perhaps because it's so unlikely to happen in real life? Anyway, I really wanted to make my owls do that, and I also wanted to use up this very last snippet of a piece of 12 x 12 paper that I've eked out so frugally it's lasted me about 5 years!


I am sharing this with
Watercooler Wednesday - Occasions


And now here are the two cards together


Because I have used copious amounts of snippets, I am sharing with
Pixie's  Snippets Playground -  Challenge 343
and of course, the motivating force behind these cards,
Twofers - Birds

Saturday 12 January 2019

Sisterhood of Snarky Stampers challenge #126 - Books

Our new challenge at the Sisterhood of Snarky Stampers, picked as always by the gorgeous Edna, is Books


Edna's really living the dream - my dream anyway - comfy chair, mug of tea and a massive pile of books! And funnily enough I've combined tea and books in my card too.

I've used a Bugaboo image called Big Books Girl, an assortment of backing papers from my stash and  the books, tea and toadstools image printed out from the Polkadoodles CD "Winnie in Wonderland" and fussy cut.


The sentiment is computer generated and continues on the inside:


Now why not head on over and see what the other Sistahs have created and share your own bookish makes. You could be crowned Queen or Princess of Snark!

Friday 11 January 2019

Thank You, Thank you

I have been playing with this big bold flower stamp and my first thought was that it would look great as a white-on-kraft card.


However I wasn't very happy with the result - perhaps my kraft is rather too absorbent for heat embossing and slurped up too much of the ink. So this time I stamped and embossed it on white card using black Versafine ink and ultra detail powder.


Much better! I used water based markers to add some bold, bright colour.
And just to compare, where are the two together.


I am playing along with 

Little Red Wagon - Thank you very much 
CAS on Friday - Flowers

RECIPE: Alsatian Onion Tart

I don’t think there's anything genuinely Alsatian about this, it's my own version of a dish that originally appeared in The Pauper's Cookbook back in the 1970s and I've been cooking and tweaking it ever since, trying to keep the quicheyness (is that a word? If not it should be) while capturing some of the flavours of northern French dishes I've experienced over the years. I wouldn't call my version a pauper's dish - butter, cream and Emmenthal aren't cheap - but the bulk comes from onions which are still a bargain.


You will need a 23cm uncooked shortcrust pastry flan case, and if you are using bought pastry make sure it isn’t the sweetened kind. If you are making your own, 120g flour and 60g of your chosen fat should give you the right amount of pastry.

You will also need quite a lot of time. Not that you will be spending hours slaving over a hot stove, but there's some long, slow cooking with occasional stirring involved, so keep this to make on a wet afternoon when you don’t feel like going out. Pop a good film on the TV and remember to give it a stir in each commercial break.

For the filling you will need
1kg onions, peeled and roughly chopped
6 sprigs of thyme
100ml cold water
30g butter
3 large or extra large eggs
50ml double cream
50g Emmenthal cheese, roughly grated
Seasoning

Place the onions, water and leaves from the thyme in a heavy, lidded non stick pan. Bring to the boil then reduce the heat to very low and cook for about 2 hours, until the onions are extremely soft and just about melting, stirring frequently to make sure they don’t catch. Keep an eye on the liquid and add more if necessary.

When they are really soft, increase the heat to high and continue cooking, stirring very frequently, until all the water has been driven off. Stir in the butter and reduce the heat to medium. Continue cooking for 10 minutes until you have a rather unappetising looking brown mush like that in the photo below. During this 10 minutes, stir a few times but do allow a few places to catch slightly to give a hint of “fried onion” taste.

Set aside and allow to cool slightly. You can do this in advance and use it completely cold, but in any case it needs to cool enough for the eggs not to scramble when you add them.

Heat the oven to 220C, 200  fan, 450 F, gas mark 8.  While it is heating, beat together the eggs, cream, a little salt and a good grinding of black pepper. Stir this into the onion mixture along with about half the grated cheese, turn the whole lot into the flan case and level the top, then sprinkle over the remaining cheese.

Bake for 15 minutes then reduce the oven temperature to 180C, 160 fan, 350F, gas mark 4 and continue cooking for 45 minutes to an hour until set and browned. If it starts to look too brown before it is fully cooked, drape gently with a sheet of greaseproof paper.

Best allowed to stand for half an hour before eating, so it is tepid rather than hot.

Serve with green salad and a few new potatoes. Hazelnut mayonnaise ( use your favourite mayonnaise recipe replacing half the olive oil with hazelnut oil) makes a delicious salad dressing to serve with this.