Sunday 31 January 2021

The sound of leather on willow

Or in other words, cricket. A sport I love - you probably don't know this but throughout school and University I was a scorer (somebody who keeps the scores, not somebody who goes out on the field and actually hits balls) and occasionally an umpire. So I was very pleased to see there was a lovely silhouette cricketer among the stamps that came with the latest Creative Stamping magazine. 


I masked the card to leave a strip along the bottom and inked it with a green ink from a very old pad. The colour is called Grass Green but I reckon it's grass that hasn't had enough water for a week or two. Next I stamped the image and sentiment, then turned to the stamp set again to pick out a cricket ball stamp - and there wasn't one! There was a golf ball, a rugby ball, tennis, soccer and even a baseball, but no cricket ball. How odd, given there was a cricketer image. So I punched a large hole in a scrap of paper and stencilled red ink through it. I did think about trying to draw in the stitching lines, but you can't see them when the ball is flying through the air, especially if the bowler has used lots of spin, so decided it was safer not to. 

So there you have it - my second one-layer card in two days. I think I may need to go for a lie down. (Don't worry, this afternoon's planned project has lots and lots of layers!). 

Just in case you are unfamiliar with Cricket, I thought you might like to read this: 

  • You have two sides, one out in the field and one in.
  • Each man that’s in the side that’s in the field goes out and when he’s out comes in and the next man goes in until he’s out.
  • When a man goes out to go in, the men who are out try to get him out, and when he is out he goes in and the next man in goes out and goes in.
  • When they are all out, the side that’s out comes in and the side that’s been in goes out and tries to get those coming in out.
  • Sometimes there are men still in and not out.
  • There are men called umpires who stay out all the time, and they decide when the men who are in are out.
  • Depending on the weather and the light, the umpires can also send everybody in, no matter whether they’re in or out.
  • When both sides have been in and all the men are out (including those who are not out), then the game is finished.

– Attributed (tenuously) to the Marylebone Cricket Club.

Does that make it all clear? 

I am sharing this with 

Cardz 4 Guys - Sports 

AAA - One layer/Silhouettes


Saturday 30 January 2021

Cats on parade

 I was going to call this "Pussies on parade" but I thought it might attract the wrong kind of reader... 


I've used lots of stamps to make a very CAS card. These gorgeous kitties are stamps that were a freebie in Making Cards magazine a few years ago. They always remind me of Siamese cats so I've stamped them in brown and left them uncoloured, which adds to the overall CAS-ness of the card. It's one layer, too, which used to terrify me! 

I gave the cats some ground to sit on by drawing along a deckle edged ruler and finished with a stamped sentiment. 

I am sharing this with 

Allsorts Challenge - four legged friends 

CAS on Friday - Animals  

Less is More - in a row  


Friday 29 January 2021

Tea Time take 3 - the coffee edition!

 I've already shared two tea themed cards with my friends over at Shopping Our Stash and I thought since the theme is actually "I need a cup of coffee" I really ought to make a coffee one too! 


The background is paper from the Indigo Blu magazine kit,  stencilled with a coffee design which is actually meant to be one of those stencils you sprinkle cocoa on to your cappucino with. I added a stamped sentiment in a darker brown and edged the paper with the same brown.  With the same brown I stamped the coffee cup on white card and coloured it with alcohol markers. 


Thursday 28 January 2021

Prancing around the world

 This reindeer just has to be Prancer,  doesn't she, given she's prancing so gracefully? (All Santa's reindeer must be female, even Rudolph, as male reindeer shed their horns in winter). 


The image is a beautiful Gummiapan stamp and I really wish I'd bought the matching die while it was available! I stamped it in dark blue, stamping several times to make the script stand out clearly. The script is in Swedish so the polyglot background goes well with it. 

The background is a Crafters Companion embossing folder with a lovely selection of multi-lingual festive sentiments. I swiped the smooth surface with embossing ink then embossed navy card, sprinkled with white embossing powder and heat embossed. Sounds simple, doesn't it, but this is my third attempt; the first two went in the bin. 

My first attempt used hologram embossing powder AND I forgot to use my anti static pad on the card. It was impossible to see the embossed lettering. Because I knew it would use a lot of powder, I used an old, cheap white embossing powder for my second attempt and the result was patchy and messy - if I'd been going for a distressed look it might have been just about passable. So in the end I used about half a pot of lovely WOW Opaque Bright White and got just the look I was aiming for. 

Although this was made with Let's Squash it and Christmas Kickstart in mind, I  am sharing it with LOTS of challenges, because my Christmas mojo has gone AWOL so I need to make the most of any Christmas card I make! So here goes...

Crafty Hazelnut's Christmas Challenge - Anything Goes 

Fab 'n' Funky - Christmas 

Scrappymo's - Rudolph Day  

The Male Room - Animals 


Christmas Kickstart - such a deer! 


Fezziwig's Festive Frolics - Anything goes 


Let's Squash It - use an embossing folder and an animal 


Addicted to Stamps and More - Christmas  


Monday 25 January 2021

Butterfly and flowers

 Have you seen all the gorgeous gap cards that have been created for the current Butterfly Challenge? My attempt to make one just didn't come together, it wasn't the direction my mojo was heading this week, so instead I've gone with a couple of colours from the challenge wheel - geranium and granny Smith. 


The background paper is one of the papers from the Indigo Blu magazine kit. I stamped and heat embossed the floral stamp from the kit onto the paper and also onto white card, then coloured the flowers with a watercolour marker pen, fussy cut them and applied them over the ones on the background. The butterfly is die cut with a Spellbinders die and the sentiment is cut from another of the papers in the kit. 

I am sharing this with 

Allsorts Challenge - Beautiful Blooms  

Butterfly Challenge - G for Gap 


The Flower Challenge - Embossing, heat or dry  


Sunday 24 January 2021

Green Mandala

 Just before Christmas (after I'd packed away all my craft stuff to make room for the family get-together that never was!) I received a gift of a "Mandala colour blending kit" and I've only just found the time and mojo to play with it. 

The kit consists of a selection of pre-printed mandalas, 3 Spectrum Noir Tri-Blend markers and two different thicknesses of black fineliner. There is an instruction booklet showing you how to use the three colours of one pen to create the illusion of dimension on one of the mandalas, and this is my first attempt. The fineliners are to darken and thicken the printed lines in the more shaded areas. 


Once I'd completed the colouring, I cut out the mandala and stuck it to a card, then found a curved sentiment that had just the right curvature and stamped it above the mandala. 

I am sharing this with 

Passion for Markers  - Anything Goes 

Up up and away.

 Well, I stayed away from my beloved Indigo Blu magazine kit for a few weeks but it's lured me back in.... 


I love the vintage balloon stamp and it's perfect for making masculine cards. This time I stamped and coloured it and then cut it out leaving a narrow border and layered it with black. I used a blue distressed paper from the kit for the background, stamping some of the smaller images randomly over it, and again layered it with black. Then I cut the compass and sentiment from another of the papers and layered them too with black. I stuck the compass to the card then used foam pads to attach the balloon and sentiment. 

I am sharing this with

Watercooler Wednesday - Anything goes with a masculine twist 


Saturday 23 January 2021

Tea time take 2

 So, while I was making the card I shared earlier, my mind kept wandering to all the tea-related images included in the beautiful "Winnie in Wonderland" CD from Polkadoodles. I imagine they are inspired by the Mad Hatter's tea party. 


I printed a design sheet and a couple of background papers, then had a lovely time distressing, layering and fussy cutting to create this large 8" square card. 

I am sharing this with 

Shopping Our Stash - I need a cup of coffee  

CD Sunday Plus - anything goes 


Tea time take 1

 A few months ago, a friend passed on a pre-loved die to me - she'd not managed to come up with many ways to use it, and now I'm having the same problem. 


It's quite a big die - on a 6" square card it doesn't leave much room for anything else. To show it off here, I've simply cut it in white, then picked a piece of Hunkydory card which must be at least 15 years old, as it has the look of steam swirling from the teacup. 

Now, what else can I do with it? I could colour the die cut and use it on a plainer background, or perhaps on a lace doiley to give an afternoon tea look. I could snip the elements apart to remove the constraint I feel the shape and size of the image causes. 

I wonder if inking the raised surfaces of the die in brown and then cutting cream card would give the look of a faux woodcut? I think I'll try that next. 

Watch this space - and I'd love your ideas, or links  to things you've made or seen using it! 

I am sharing this with 

Little Red Wagin - Die-ing to get Crafty  

Shopping Our Stash - I need a Cup of Coffee (I know this is tea - blame Chris!) 


Monday 18 January 2021

OMG an ATC!

 It's years, absolutely YEARS since I made an ATC, they just don't really come into my skillset at all. But Edna has asked us to make ATCs, and what Edna asks for, Edna (usually) gets. 


How can something so tiny take so much time and patience? Not really knowing where to start, I drew inspiration from the amazing You Tube artist Shanouki  who is really inspiring me to try Mixed Media art. 

First I chose a selection of tiny vaguely co-ordinating snippets, tore the edges and stuck them to my ATC, then painted over it all with a thin layer of gesso. Then I punched a circle from a contrasting snippet, stuck it down and drew around the edge with a watercolour pencil, and pulled some of the colour out onto the background with a wet brush. Next I used the same pencil to doodle round the edge. I'd intended leaving it dry, as normal doodling, but I didn't like what I'd doodled so I used the wet brush to change it into a border. 

I added a sentiment - it's from one of Ranger's Tim Holtz snarky pads, snipped apart and outlined. Then I stamped and coloured the wine bottle and glass and added them to the circular spotlight. 

I am sharing this with 

Cardz 4 Galz - Coffee, wine or cocktails  

Sisterhood of Snarky Stampers - A is for ATC 


Sunday 17 January 2021

Pot of cacti

 Today I've been playing for the first time with a set of stamps I got for Christmas. It's a HunkyDory set called Prickly Plants and comes with a large mix-and-match selection of pots and succulents to play with.


I used lots of masking to stamp the plant-filled pot then coloured it with Promarkers. I added one of the sentiments from the stamp set and edged the topper panel with terracotta ink. 

My favourite colour combo is terracotta and green - our bedroom and en suite are decorated in those colours and if I had my way, the whole house would be! They are my favourite colours to wear too. So I know these stamps will see a lot of use. 

I am sharing this with

Allsorts Challenge - Something New  (the stamps) 

Passion for Markers - (only just noticed we can use any brand of marker now!) - Favourite Colour Combo 

Pearly Sparkles - Something beginning with P (plants, pot and prickles!) 


Saturday 16 January 2021

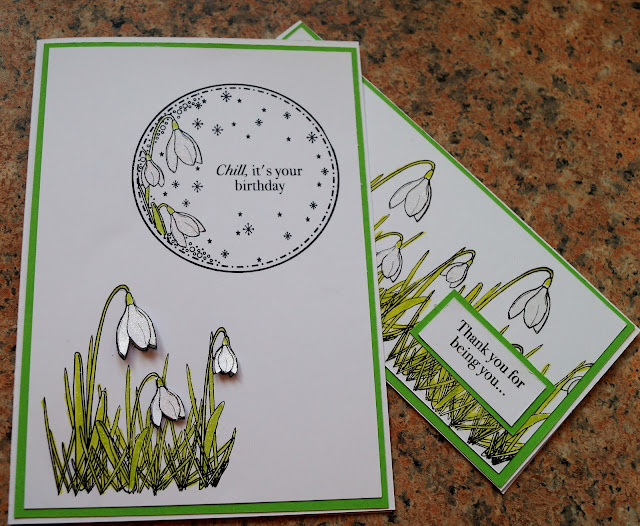
Snowdrops

 At this time of year I always look out for the first snowdrops, the first sign that spring is on the way, and that reminds me to lift out this Creative Expressions stamp set that I've had for a good few years. 


My first card is a skinny card, with the main snowdrop image stamped repeatedly across it. I coloured the snowdrops the same way on both cards - after all, I've never seen a snowdrop that wasn't white - using green and clear Wink of Stella pens. 


The stamp set helpfully provides a selection of sentiments, so I  chose one that would work well as either a thank you or a friendship card. 

I am sharing this with 

Sweet Stampin' - Thank you 

Little Red Wagon - Friendship 

Taylormade Cards 4 U  ( the first challenge!) - Anything goes/Friendship 

My second card uses the snowdrop stamp again, this time with the addition of a second layer of flower heads for dimension. The stamps for the extra heads are included in the set so you don't need to waste ink and card stamping the whole thing twice. 


I added the circle stamp from the set, which has a gap in the pattern perfectly sized to insert any of the sentiment stamps. This is SUCH a well thought out set of stamps, is it any wonder I return to it again and again, so perfect for winter birthdays which, of course, this is designed for. 

I am sharing this with 

Watercooler Wednesday - All about Occasions 


We Love Chocolate Baroque - Feminine 


And finally, well, I reckon you knew from the outset where i was heading with this post didn't you? Two cards with different layouts and made for two different occasions but featuring the same stamp - yes, of course this month's theme at the Twofer Card Challenge is FLOWERS.  And there's a positive plethora of them here! 


Wednesday 13 January 2021

Chemistry lesson

 This card uses another of my new Clearly Besotted stamp sets, this time the Creative Chemistry set. 


I made the background by stencilling in two colours than stamping the "atom"  randomly around the upper half of it, then stamping that fun sentiment below it. Then I stamped the steam, bench and cute creature (is it a bear or a short-eared rabbit?), coloured them with Promarkers and cut them out then attached with 3D adhesive. 

I am sharing this with

Addicted to Stamps and More - Make your mark  

Shopping Our Stash - what's new with you  

Just us girls - Use a Stencil 


Crafty Calendar - Make it Cute 


Tuesday 12 January 2021

If cats sent Valentines Day cards...

 ... they probably wouldn't bother. But if they did ever get round to it (they lead very busy lives, you know) this is what they would send. 

I really, REALLY fell in love with this month's Clearly Besotted new releases and treated myself to three of the sets, so they are brand new, having only been released on January 1st.  This card is made using a stamp and image from the Purrfect Valentine set. I made a background using a stencil, and stamped the sentiment over the stencilling. Then I stamped the cat onto a scrap of  card, coloured it and fussy cut, raising it off the card with 3D adhesive. 

I am sharing this with 

Use your stuff - all about the new  

Make My Monday - something new in your stash 

Show us your pussycats - Furrything Goes 


Monday 11 January 2021

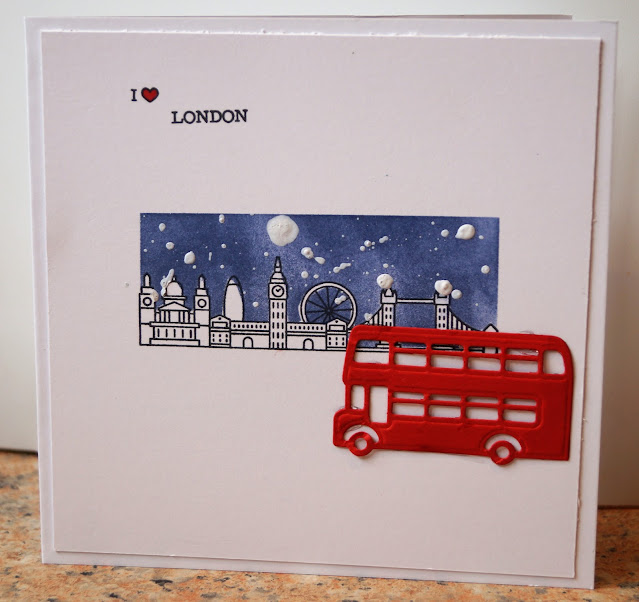
Night Bus

 London's night bus service is iconic, although I can't say I've had a lot of luck on the odd occasions I've tried to use it. Nevertheless, the idea of a moonlight bus ride past our iconic sights is quite romantic, isn't it? 


For this card I stamped the city skyline using a Clearly Besotted stamp, then stamped it again onto masking paper, cut it out and used it to mask the image. I also masked off the rest of the card, leaving a rectangle around the image, and sponged dark blue ink over the space. 

Then it all started to go a bit pear shaped. I wanted to make the night sky by spattering dilute white gesso, but it's only the second time I've done any spattering and I think I didn't dilute the gesso enough because I got lots of blobby bits. One of them was so big that I teased it outwards a bit with a paintbrush and made it into a moon. I think the rest are too big to be stars, so lets' pretend I'd intended it to be a heavy snowstorm. It looks as if the snow is really building up on the turrets of Tower Bridge! 

Before the spattering, I'd intended adding some shading to the buildings but now they are in a snowstorm, I think they are better left white - the glare from freshly fallen thick snow often gives buildings a flat, shadowless look, so I left them white. 

The London bus is cut with an X-Cut die from their London Build-a-Scene set. 

I am sharing this with

Time Out Challenges - Life in the City  (I've also used sponging) 


Alphabet Challenge - Traffic 


Inkspirational - Mask 

Craft Rocket Challenge - For the boys/men 


Sunday 10 January 2021

Making music with the Playground

 Last week, Di from Pixie's Crafty Workshop promised that there were going to be some surprises in the playground, and the first surprise is.... ME!!! 

The Snippets Playground is a fortnightly challenge where the theme is always anything goes, but your make MUST include some of your scraps and snippets - those leftover pieces of card (or fabric, or even ribbon) that were just too good to throw away and then hang around for ages looking accusingly at you whenever you open the box or basket where they live. My snippets basket is overflowing, even though I keep it right beside me and always check it first before snipping into a new sheet of card. 

Anyway, this fortnight I've donated a prize to the Snippets Playground of this stamp set: 


It's a Hunkydory set called Retro Mix Tape, and as I had a duplicate set, I'm giving away this unopened one as this fortnight's snippets prize and have used my other set to create the sample card. 


First of all I created a DL sized card. I used an A4 sheet of white card and my Universal scoring board, scoring at the one-third A4 line. I creased the card then cut off the part that stuck out, which of course was the same size as the card front, and trimmed off 1cm from one each of the long and short edges of this extra panel to use as the topper. 

Next I took a snippet of red, the same length as the trimmed piece of card, and stamped the "noise" pattern along it then trimmed it to the width of the stamped area, I stamped the cassette on a white snippet using Memento Tuxedo Black, coloured it with Promarkers and fussy cut. 

Then I put the white panel in the Misti and placed the red strip and cassette on it where I wanted them to go on the finished card, without sticking them down. I positioned the sentiment stamps while the strip and cassette were in place. This was a bit fiddly: the sentiment appears to be intended to be used to say "Rock classic" as the R has a capital but the C doesn't, but as I know so many people who say they love classic rock, I wanted to use them the other way round. I think the C is ornate enough to get away with it! Also, the word Classic is longer than the word Rock, so although I'd intended to centre the cassette, I had to move it slightly to the right for the stamping to fit. Before doing anything else, I grabbed my phone and took a snap to remind me of the exact positioning I had decided on. 

Before stamping the words with black Versafine ink, I removed the cassette and strip, knowing I could check the photo and reposition them later.  Next I took a snippet of black card, dusted it with my anti static pad and stamped and heat embossed the control buttons, using WOW! embossing pad and Opaque Bright White powder, then cut them out. 

I  stuck the red strip in place and matted the panel onto black card then onto the base card, then used foam pads to attach the cassette and control buttons. I have tried to position the control buttons to fool the eye into thinking the red strip each side of the cassette is the same length, to offset the fact I had to position the cassette slightly off-centre. 

I think this stamp set would be perfect for making masculine cards, especially for older generations.  And the cassette label is just crying out for personalisation - ideal for adding a name, age, sentiment or the title of a favourite piece of music. If you'd like a chance to add it to your stash, head over to the Playground - you have until noon on January 23rd to link up a snippets creation of your own. 


Friday 8 January 2021

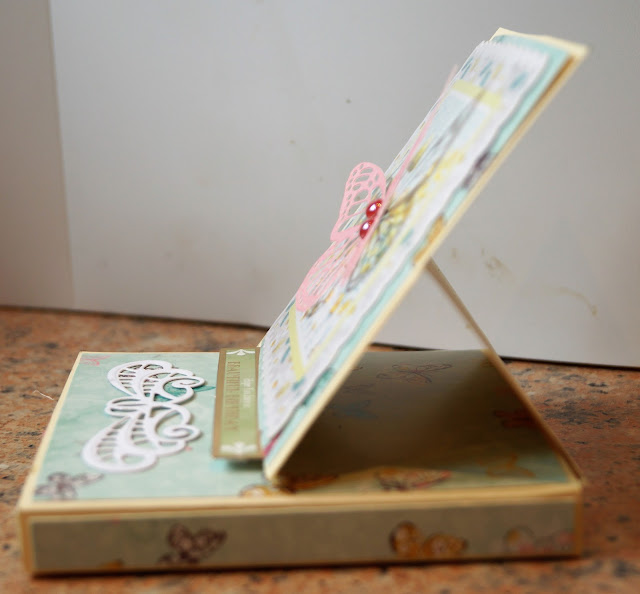
Butterfly Box

 When I set out to make this card/box, I wasn't sure how it would turn out as I actually dreamed the idea! 


It's made like a standard 12cm square "matchbox" box with an outer wrapper surrounding a sliding drawer, except that I extended the bottom panel to provide a back panel and a further 12x12 panel, plus of course tabs to connect the back to the sides.  I folded the "extra" panel over at the half way point and added another 12cm square for the upright part of the easel, then decorated all the panels with patterned papers and a coordinating square topper, die cuts, pearls, a flower brad and, for the easel stand, a sentiment raised on foam pads. 

I am sharing this with

Cardz 4 Galz - More than one fold 

Watercooler Wednesday - Anything goes with a feminine twist 


Wednesday 6 January 2021

Christmas Urn

 I know, I know, yet another creation with those Heartfelt Creations stamps and dies. I promise I'm going to move on to something else soon... 


This time I've combined some of the stamps from the set with lots of my old dies to make a Christmas card. I used the Urn stamp on vintage text paper and also cut a shaped card blank to match. I finished with lots of gold Stickles. Then I did all the stamping, cutting, embossing and glittering and finally had a lovely time arranging everything in the urn. 

I am sharing this with 

Fezziwig's Festive Frolics - Anything Goes 

Stamping Sensations - Favourite Stamps  (My favourites to tend to change but right now I have a total crush on this set, as you'll see if you look back over my last dozen or so posts) 

Jingle Belles - Something old and something new  (the stamps and matching dies are less than a month old; the other dies are all several years old, the pine cones and branch and the ivy must be about 15 years old) 

Allsorts Challenge - Anything Goes 

Crafty Hazelnut's Christmas Challenge - Anything Goes/Upcycle or use something old 

Tuesday 5 January 2021

Juke Box

 Are you old enough to remember "Juke Box Jury"? That's what I thought of when I saw this stamp set, part of a Christmas gift from a friend. 


There is a similar stamp set used to create a pop out card in the lovely book "Simply Beautiful Rubber Stamping" by Kathie Seaverns, and I decided to try to re-create it using this Hot Off The Press set.

First I made an A6 card from dark blue card, then cut a white strip for the front and a white piece just smaller than the  opened out inside for the liner and pop up mechanism. I used the checkerboard square stamp in red, yellow and blue to make a random pattern over both pieces of white,  then added musical notation in black over the larger piece. I attached the white card to the outside. I creased the larger piece, then cut two slits on the foldline where I wanted the juke box to sit, each about half the width of the juke box image. I creased the card again between the ends of the slits and reversed the centre fold so it pops out into the card, then attached it inside my outer card. 

I stamped the juke box and three records, coloured them with Promaerkers and cut them out, then attached them to the card as shown. 

Since there is no space to write a greeting inside the card, I added a white panel to the back. 

I am sharing this with

Sweet Stampin - New  

Country View Challenges - Squares 

NBUS - NBUS 


Monday 4 January 2021

Christmas stag

 Isn't this stag's head stamp gorgeous, with the winter scene embedded into it? 


It's from an NBUS set that came with last month's Creative Stamping magazine. I stamped it with brown ink, sponged a lighter brown around the edges and added just a hint of colour to the moon, door and windows, then fussy cut it. 

The sentiment I used was also from the NBUS set. For the background, I sponged blue ink  over the top half of the card then stamped the trees - also from a magazine set, but from several years ago, so they are my "something old" - repeatedly across the card. I finished everything with stickles to add some subtle sparkle. 

I am sharing this with 

Jingle Belles - Something old, Something New 

2 Crafty Critter Crazies - anything goes featuring a creature  

Creative Crafting Uncles - Christmas 


Saturday 2 January 2021

That floral urn yet again!

 I am really loving the Heartfelt Creations Floral Shoppe collection. Here is my latest make using it. 


I used one of the floral background papers, with the edges lightly distressed and inked with a deep wine-red.  I cut the urn from a blue patterned paper from the pack stamped with the same wine red (which of course looks a lot more purple when stamped on blue) and reinforced with white card. I added a doiley from my stash and a label from the pad, stamped with a sentiment from an old Uniko set,  then stamped and die cut lots of the flowers, berries and foliage, inking some and colouring others with pencils. 

I trimmed one side off the Urn and used foam pads to attach it to the card, then had lots of fun arranging the elements in it - I used to be a keen flower arranger and it's all coming back to me! 

I am sharing this with 

Allsorts Challenge - Anything Goes  

A Bit More Time To Craft Extra - Anything Goes 

Crafty Hazelnut's Patterned Paper Challenge - anything goes using patterned paper


Friday 1 January 2021

Happy New Year

Well, that's the year when all the dystopian fiction I've read actually came true over and done with - let's hope with vaccination programmes being rolled out all over the world that this year brings us some kind of normality again. Happy 2021! 

It's cold and gloomy here so I'm looking ahead to spring and have used a fresh spring green palette for this card. 


The foliage stamps are all from the Heartfelt Creations "Floral Shoppe" collection. I stamped the ones on the background using Versamark ink and then brushed green mica pearl powder over the stamping. On the white panel I stamped the leaves in a mid-green ink and then lightly daubed the same ink over them with a sponge dauber. The final set of leaves I stamped in dark green, sponged with mid-green then die cut. I stamped a sentiment and edged that and the white leaf panel in the dark green ink. 

I am sharing this with Sunday Stamps - Nature's Green. I've been following their blog for many years and I don't think I've ever entered the challenge before, but when I saw the colours for the current challenge I had to get stamping right away!