Thursday 28 January 2016

A Bright Christmas

Every year I like to buy some new Christmas crafting stash and NOT use it, so that I'll have something new to use before the next year's Christmas goodies appear on the shelves. And my December 2015 purchase was a pack of papers and die cuts from the Papermania "Folk Art Christmas" range.

The colours used in this range are pretty unconventional as Christmas colours go, and fit in really well with this week's colour inspiration at Christmas Card Challenges.

I've used a selection of the papers, simply matted and layered, and one of the die cut decoupage sheets. I seldom use die cut decoupage but I was very impressed with this - it is quite detailed and comes away cleanly from the retaining sheet without tearing or leaving white tags.

By the way, don't panic if you don't see any posts from me for a few days and I don't comment on your blogs  - I have a lovely few days coming up with all sorts of exciting things planned, so I'll not be around Blogland much until early next week!


I am sharing this with

Christmas Card Challenges - Anything Goes or Colour Inspiration


Fab  n Funky - Christmas 

Addicted to Stamps and More - Holiday

Winter Wonderland - Something new (the materials I used)

Wednesday 27 January 2016

A stuck stamp

A question for you stampers - I've got a few clear stamps that I've not used for a long time that have got so firmly stuck to their acetate backing sheets that they seem impossible to peel off. I've actually damaged a few of them and I don't want to destroy any more. Do any of you have any tips for helping to release them?

This stamp, for instance, only ever gets used in the run up to Valentine's Day and then is set aside for the next 11 months. It was totally welded to the acetate backing - in the end the only way I could use it was to glue the whole thing, backing and all, to my acrylic block and then wash the glue off after I'd done my stamping. And no, the washing off didn't release the stamp, something I'd hoped might happen!

Anyway, here is the stamped image, combined with a little heart-y ribbon from my stash and three red heart shaped mirror stickers. Those mirror stickers are acrylic ones, and there  isn't a line of glue seeping out of the bottom, that's a shadow because they are so thick! They are bright red in real life, but so very reflective they've come up looking black. I've had them absolutely ages, well, not just the hearts, actually three packs of assorted mirror embellishments, and it's the first time I've used any of them, so hopefully as time passes I will work out a way of showing them more effectively.


I'm sharing this with

Allsorts Challenge Blog - Valentines Day
Addicted to CAS - Red
Clear It Out - Loving you with red/white twine or ribbon  

Broken Crayons

This week the challenge at Make My Mondays is to use your newest or most favourite stamp. Now I have so many stamps I couldn't possibly pick a favourite, but which is my newest? I really couldn't remember, but I was saved by the bell - literally! The DOOR bell, as just then the postman arrived bearing the latest set of Dylusions stamps that I'd ordered a few days ago. I love these sets, when I use them I feel like Anne Taintor, and this latest set, called "How about never" made me want to start crafting straight away.

I immediately had an idea for using one of the sentiments - and it would use up lots of snippets too, so I'm popping back into the Snippets Playground with this too. And I'm hoping to see rather fewer hangovers than I did on my last visit!

I simply stamped the sentiment then cut some crayon-sized pieces of brightly coloured card, "breaking" each one with deckle edged scissors and then scattering them over the card. I think this would be a great card to send to somebody who was feeling a bit down in the dumps.

Tuesday 26 January 2016

Spots and/or Stripes at Cardz 4 Guyz

Time for our newest challenge at Cardz 4 Guyz and this time we would like to see SPOTS and/or STRIPES on your card.

I've chosen to use both and in fact even some of the stripes on my stripey paper are made up of spots! The two papers are left over from a very old Hot Off The Press Christmas kit, but I think they are well suited to any time of the year. The stamp is a Little Claire one and I have used Promarkers to colour it, picking "doggy" colours that go well with the browns and beiges in the paper.  And to keep to the spotty, stripey theme, there's even a spotty dog on there! All the layering pieces came from my snippets box, I was very pleased to find such good matches.


Why not pop over to Cardz 4 Guyz and show us your spotty and stripey creations?

Meanwhile I'll share mine with several challenges:

Ruby's Rainbow - Animal Magic
Crafty Hazelnut's Patterned Paper Challenge - January
Creative Card Crew - Anything Goes (and ooh, look who made top 3 last time!)
Craft Your Passion - Anything Goes
Fab 'n' Funky - Buttons, Bows or both (I hope the one button is enough - although one of the doggies is wearing a bow!)
and I'm tiptoeing in to the Snippets Playground to share my card and administer tea and paracetamol to all those hooch-induced hangovers!

Monday 25 January 2016

It's Rudolph Day

It's the 25th of the month - which means it's time to celebrate Rudolph Day by sharing a Christmas card over at Scrappymo's. And today it's an extra special Rudolph Day for me, as it's my first as a member of the new Design Team.

Here is my card - I used a piece of backing paper from my snippets box. I absolutely no idea where it came from! It looks as if it's one I printed from a CD or download, but I have nothing in my collection of either that looks as if it came from there. So it's Mystery Paper.

For the topper, two of the cute Woodware robins from the stamp set I won in the Snippets Playground looked to me as if they were in that bloated, post-Christmas-dinner food coma that seems to affect so many of us, so I stamped them lying back to back either side of that Christmas Pud they couldn't quite manage. The pud stamp itself is one I bought at the Make It Show in Farnborough a few years ago, there's no brand name on the backing sheet. I used a deep pink Wink of Stella for the robins' breasts, and pink gems for the holly berries on the pud, to link to the pink backing paper. The sentiment is printed out from a download, and I used deep grey for the matting because when I tried black it looked too harsh.


Do please flutter over to Scrappymo's  and share a Christmas card with us by the end of the month!

Sunday 24 January 2016

RUBBER stamping

.. and I don't mean using rubberstamps (and I don't mean stamping with those either - will whoever it was gave that smutty titter please go and stand in the corridor?). I mean stamping with the rubber eraser on the end of a pencil. That's what I've used to create the spotty pattern on this card. It is best done with a brand new pencil, as the edges of the rubber will still be nice and sharply defined. I simply dabbed it onto the separate colours of a Kaleidacolor pad and then stamped at random all over the paper, to give an effect similar to printing with bubble wrap only much more random.

For this card, I used a die cut circle to mask off an area in the centre, then used my rubber to stamp shades of green around it, some overlapping the edge of the circle. I stamped 2 or 3 times for each inking, to give varying intensity of colour. Then I removed the mask and stamped the open space with a silhouette flower stamp, an old UM that's been in my collection since time immemorial. I finished the edges with a little hand doodling.


I am sharing this with

Less is More - Silhouette
Crafty Gals Corner - New for YOU (the stamping with a rubber technique is new to me)
Craft Rocket Challenges - CAS
Sisterhood of Snarky Stampers - Technique (no snark today, just technique - so I'll be back later in the fortnight when I've got my snarky hat on)

And while I've got your attention, why not pop over to visit my friend and Twofers teamie, Christi from Art Without Anxiety  - she's got a surprise candy giveaway going on and whatever it is, I know it will be wonderful!

Seasons at CD Sundays

Today it's time for my next GDT post for CD Sundays, and this time our theme is SEASONS - either one season of your choice or all of them.

I was spoiled for choice when I loaded up my Crafting World CD "Through the year with Seraphina" as there are lots of images and backgrounds for each of the four seasons of the year, but with Spring not TOO far away now, I decided to  use this lovely image of kite flying on a blustery spring day. I love the little touches like the spring flowers in the corner and the pretty backing papers, and I was really intrigued by this topper set that has one fully coloured image printed like a completed jigsaw, one without the jigsaw lines but in a fainter print and one separate set of jigsaw pieces.

I decided to use the bold jigsaw image on the card front: 


The paler image on the right hand flap:


And add the jigsaw pieces, all cut out, in an envelope in the inside centre panel:


So the recipient can take them out of the envelope and assemble the jigsaw themselves on the paler image.


I would like to share this with:
Alphabet Challenge - X for Xtra Fold
Ooh La la Creations - In the Country
Fan-tastic Tuesday - Make it Girly  

Saturday 23 January 2016

Frosty the snowman

OK, OK, I know in the song Frosty had "A corncob pipe and a button nose" but I'm sure that was artistic license and in REAL life he had a carrot nose. They do, don't they? It's some sort of Snowman law.

Anyway, this 'ere snowman was made out of die cut circles and ovals - the crown of the hat is a circle with sectors cut off each side - and definitely has a carrot nose. The background is made by swooshing a couple of different shades of blue ink over the flat side of a folder before embossing, I used my Grand Calibur and Nestabilities circles and ovals dies, the ef was a magazine freebie. And all the cardstock was from my snippets box. In fact even the sentiment was, as it was the very last one from a sheet of Craftwork Cards ones.


I'm hoping to just slip into the Snippets Playground before the gates clang closed for this week and also to share with
Crafty Hazelnut's Christmas Challenge - Use a sentiment
Cuttlebugmania - Snowmen
 

Friday 22 January 2016

Teeny tiny stamps

The stamps I've used for this card are little teeny tiny ones that, when I bought them, came on long wooden pegs. I think nowadays they are sold on acrylic ones and as unmounted stamps. Back when I bought them, the brans was called Rubberstamp Tapestry but now they are called, at least in the UK, Card-io and I think other brands now make similar things.

The idea behind them when I got them was to build up complex multi-coloured designs with them,  but last year when I visited the Make It show, there was a stall demonstrating the stamps, all stamped in black onto inked backgrounds, and they looked soooooooo effective!

I'm still digging out old stash and either setting it aside for storage or disposal or bringing it back into use, and these stamps definitely come into the "back into use" category! Instead of harsh black, I decided to soften the effect by using a brown ink - this also means I can join in the current colour challenge at Stampin' Royalty, although not being a very girly type I have very little in the way of pink supplies and this was the closest I could muster!


Thursday 21 January 2016

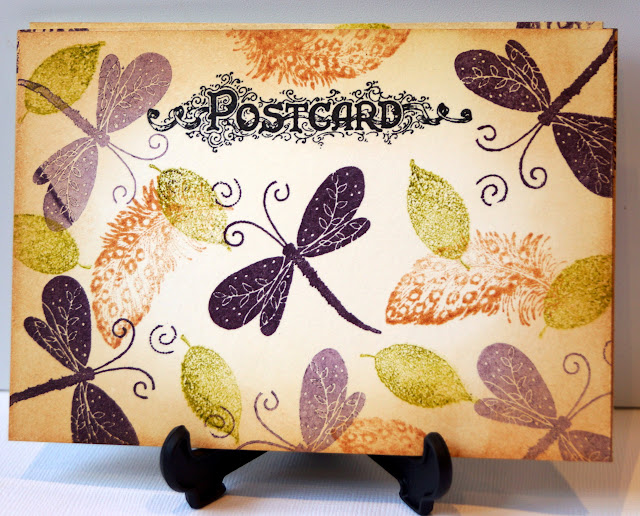
Postcards

As many of you know, when I'm not cooking and crafting I love to enter competitions, and sometimes for postal ones I like to use a hand made postcard. This week I've made a few to top up my stocks with.

All are based on a standard sized postcard, ie an A6 piece of cream card. The Postcard stamp is a very old Stampendous one, the feather is by PSX, the leaf and butterfly from an Indigo Blu set that was a magazine freebie and the dandelion clocks are ones I ordered by mail from an American company - I *think* it was called Just For Fun.

I  used distress ink in Antique Linen and Tea Dye around the edges of the cards before stamping, to give the cards a slightly aged effect.


I am sharing these (well the first and third of them!) with

Butterfly challenge - I for Inking
Sweet Stampin' - Things with wings

Everything's Hunkydory

.. .so Hunkydory, in fact, that it only took me a few minutes to whip up my second Christmas card of the week, and at the same time make an inroad into the Very Old Stuff that I'm trying to use up. I can't remember how many years it is since I bought a huge collection of Hunkydory Christmas themed card and toppers, but it was so long ago that I bought a big pack of coordinating embossed card, which must mean it was before I got my first ever Cuttlebug.  There isn't much left in the box I keep it all in now, but still enough to pull together a few quick cards. I really MUST try to finish it all before next Christmas!


I'm sharing this with

Winter Wonderland - Glitter and Shine
Jingle Belles - Oh Christmas Tree

Wednesday 20 January 2016

WOYWW #364

I'm having a busy day of crafting today - well, it's far too cold and icy to go anywhere! And my first project of the day is a set of postcards - as you probably know, one of my other hobbies is entering competitions, and it's always nice to have a stack of pretty postcards to hand for postal entries.

So the morning started with my desk looking like this:


and now it looks like this


with the postcards all finished and ready to be photographed properly for a later post.

Now I'm heading over to Julia's Stamping Ground to see what everyone else is making this week.

Tuesday 19 January 2016

Blue is The Colour at Cardz 4 Guyz

This week our challenge at Cardz 4 Guyz is "Blue is the colour".

For my card, I used a set of Kanban stamps, and stamped them in Broken China DI then fussy cut them. I used a water brush to add a little more ink from the pad to the sky, sea and lighthouse stripes, then assembled then on layers of  pearlescent blue paper and a blue patterned paper from an old Anna Griffin stack. 

Here is my card for the challenge:


However, I felt that the lighthouse looked a little lost in the main image, so I stamped it again in lack and coloured it with Promarkers, adding Glossy Accents to the light at the top, then added it over the top of the original. It's taken me a few steps away from the all-blue card I made for the challenge but I think it's given my card a stronger focal point.


I am sharing this with:

Sparkles Monthly Challenge - January Blues
Glitter and Sparkle - Monochrome
Just Us Girls - White, Dark Blue, Light Blue

Monday 18 January 2016

This week's first Christmas card

I have a feeling that by now some of you are waiting to catch me out, and spot a week when I don't post two Christmas cards. Well, I'm sure I'll slip up, but not yet!

This cute card has been made out of the last few snippets from a booklet of Holly Hobbie papers, a magazine freebie from a few years ago. I just have one piece left now, slightly smaller than half an A4 sheet, then I will have used up the whole booklet. There wasn't enough of any one paper to cover the whole card front so I had to make up a layout that looked as if it had been planned that way.

I've added a snow scene made on a Speelbinders die cut scalloped square - the die cut trees, stamped and die cut snow bunnies and robin and the stamped greeting were all sent to me in a swap with a friend. I think the stamps were Lawn Fawn ones but I wouldn't stake my life on it.


I'm sharing this with Pixie's Snippets Playground where the sharp eyed among you might spot some snippets of the papers I've used for the banners on my circles card from last week
and at Crafty Hazelnut's Christmas Challenge where this week it is Cute, or anything goes
Use Your Stuff - 3 or more patterned papers - I used 4

Sunday 17 January 2016

Clearing out the marinades and sauces

Do you find your cupboards and fridge get cluttered up with part-used bottles of marinades and sauces? I do - there are often bottles in gift packs and goody bags, and everything else gets used but the marinades and endless barbecue sauces linger on. To be honest, I prefer to make my own marinades, not only do I know exactly what's gone into them, they also tend to have more flavour, and I can ring the changes each time I make them. And when it comes to sauces, tomato ketchup, classic brown sauce and sweet chilli can't be beaten!

However I had half-jars of two marinades in the fridge. They were actually ones I'd been sent to review, but I was so unimpressed with them that I agreed with the PR that it was better not to post my review. However as I hate waste, I wanted to find ways to use up the remains of the jars, so here are two meals I produced using them - you could use any kind of spicy barbecues sauce or marinade for either of the meals.

For the first dish, I used an Asian style barbecue sauce. I marinated some thinly sliced frying steak in a few spoonfuls of the sauce for a couple of hours, and then stir fried it with some spring onions, adding a tin of mixed bamboo shoots and water chestnuts and a generous splash of soy sauce.


I served this with rice and the Asian style semi pickled salad which I blogged about the other day.

The second marinade was a Jerk seasoning. I marinated two on-the-bone chicken breasts overnight in it.  I took two sweet potatoes and cut them into wedges, then tossed them with 1tbs sunflower oil and 2 tsp Cajun seasoning (also left over from a gift box!) then roasted them with the chicken in a hot oven for 40 minutes.


I served these with corn on the cob with chilli-lime butter (soften a knob of butter and beat in chilli flakes, grated lime zest and a little lime juice) and a salad of red onion, red chicory, little gem lettuce and mustard and cress.


I'm sharing this with Kitchen Clearout at Madhouse Family Reviews.

A gatefold card

Today's make really ought to have been a Christmas card, seeing as we're experiencing our first snow of the year here in Hampshire, but I've gone to completely the other extreme and made a very summery card.

I know it's conventional to have the panel on the left hand flap of a gatefold card, but I had a layout in mind and really wanted it to open the other way so that my butterfly wouldn't be flopping around in space when the card was open, so here you have it, an unconventional gatefold card

 
The butterfly image is a Linda Luckin one, which I stamped all over the base cars in Versamark ink and then brushed with a green metallic pigment powder. It doesn't really show very well on the main photo, so here is a close up.

 
For the panel, I stamped the fern (an old Graphicus stamp) several times using Crushed Olive DI, then inked the edges with the same ink and matted it onto olive green card. I lined the centre of the card with a panel like it but without the stamping. The butterfly image was stamped with Memento ink and coloured with Promarkers.

 
I am sharing this with
 
Butterfly challenge - Inking
Sweet Stampin' - Things with wings 
MFP Stamps - Gatefold Cards
Inkspirational - Colour Challenge Blast from the Past (I chose #55, green and pink)


Saturday 16 January 2016

Metal, heavy or not at Twofers

It's the third Saturday of the month, and that means it's time for a new challenge at Twofers. It's Zoe's turn to choose the theme, and she has picked "Metal, heavy or not". You can interpret that however you like as long as you include some stamping and no digis. Do please pop over to say hello, see the team's inspiration and join in. We still only get a small handful of entries, so you'll stand a very good chance of wining our fortnightly prize of a $20 voucher for Alleystamps.

For my card, I chose a heavy metal key charm (not the head-banging type of heavy metal!) and dug out a NBUS set of stamps from the Stamp Bug. This was one of their club sets and I can see from the card inserts that it was produced in 2008 - and the red rubber was still uncut. Naughty me!

I made the background for both  the card and topper by swooshing a bundled Sage Distress Stain over white card, and for the main card I then splodged the stain on randomly to give some splashy circles (swooshed, splodged and splashy are, of course, technical terms). I also unearthed a piece of Stampboard that's been lurking at the bottom of a drawer for many years, and gave that a quick swoosh too. And as I had no matching ribbon, while I was swooshing, I swooshed a piece of white organza ribbon to match. There was a whole lot of swooshing going on!

Then I stamped the main keyhole-and-script image on the topper card, keeping it over to the right to leave space for the key, and the word "Mystical" and some random bits of keys on the Stampboard. When all the inks were dry, I used foils and a Tonertex pen to edge and highlight some small areas of the image, word and edges of the topper and Stampboard. I got the two-tone effect by starting with a dark brown metallic foil and then reapplying Tonertex to the edges and foiling again with a copper-gold foil. Apparently foiling is going to be one of this year's Big Things, and you can get hold of everything you need from Foilplay  if you are in the UK.

I reckon the colour scheme and metal give this a very masculine look - I wouldn't normally have used organza ribbon on a male card, but actually if you see it in real life, the distressed effect on the ribbon tones down the "girliness" of it - the photo doesn't do justice to that.

 
I am sharing this with
 
Addicted to stamps and more - Anything Goes
The Male Room - Anything Goes  
The Crafters Café - Male Card
Fantasy Stampers - All About the Boy

Thursday 14 January 2016

My second Christmas card of the week

I seem to be churning out the posts today - only because I have time to write about things I've been making over the last few days. But this card is one I have literally only just finished, I reckon the glue and ink aren't completely dry yet!

It was inspired by something I saw on Pinterest. a card with a band on it made from punched circles, and I decided to try to recreate the idea using Christmas papers - almost like a dense garland of baubles. A very handy way of using up lots of the snippets of patterned paper in my Christmas box!

First I punched loads and loads of circles, lightly inking the edge of each. then I cut a band of lightweight card, slightly longer and wider than I wanted the finished band to be, stuck all the circles down in overlapping layers, trimmed and inked the edges and attached it to the card front along with a stamped sentiment.

A very quick and easy card, and a warm fuzzy glow from using up all those snippets!


I'm sharing this with

Crafty Hazelnut's Christmas Challenge - red 
Christmas Card Challenges - Anything Goes
Pixie's Snippets Playground  - week 211 (have I earned the record for the number of different snippets used on one card?)
Crafty Hazelnut's Patterned Paper Challenge - January
Crafting by Designs - Seeing Red   

Sparkling snowflake

Ha! I bet you thought that I'd already broken my resolution to make two Christmas cards a week! Well, you'd be wrong, it's only the no-shopping one I've broken, the rest are still going strong. And here is the first of my cards for this week.

Just before Christmas, I won a competition that Cricut ran on Twitter - my prize was £100 worth of products, including several rolls of vinyl. The idea is that you cut it in the Cricut to make iron on motifs to use on fabrics, but as I have no Cricut I tried die cutting it in the Grand Calibur - with great success. There is a clear vinyl covering that holds it all together and means the glitter doesn't shed while die cutting, as it tends to when cutting glitter card.

I've been fiddling around with bits of it, and found that if I simply place a die cut shape in the position I want it on a finished card and then heat quite briefly with my heat gun, the motif sticks firmly in place - no faffing about trying to apply glue to the back or using double sided adhesive sheet. And the clear plastic "cover" comes off easily after heating too - it is still quite sticky, so next time I use some of the vinyl I think I will try foiling, flocking or glittering the "waste" and see if I get extra mileage from it that way.

To set off the glittery snowflake, I kept the rest of the card very CAS, with a scattering of tiny gems and a sentiment stamped with a stamp that appeared during my clear out earlier this week - I must have had it for many years but the rubber was still uncut.


I'm sharing this with

Crafty Hazelnut's Christmas Challenge - Red
Clear it out Challenge - Winter/Snowflake (the old item is the stamp)
Shopping Our Stash - Something new (the vinyl)
Christmas Card Challenges - Anything Goes

Using up the Stuff

After my clearout, I now have loads of "new" stuff - new in the sense that I'd more or less forgotten I had it, so I am discovering it all over again. And my discoveries include a tin of huge fabric flowers that I've had since around the time the wheel was invented, and a few sheets of very heavily patterned glittered acetate, that seemed like ever such a good idea at the time - and have never been used.

I decided to make a card with an acetate front panel, using purple backing card to match the fabric flower, and lining the card with white to show through the acetate. I was planning to use up some die cut silver lace effect borders, but they were too short, so I punched borders with an Anna Griffin (or is it Martha Stewart, I always mix those two up!) punch.

Now I know why I'd not used that bloomin' acetate - it is a total PIG to stick to anything. I had to sand off the glitter where I wanted it to stick and then use extra strong you-could-lift-a-horse-with-this double sided tape.


Anyway, it's a sort-of stretched out version of the sketch at Make My Monday so I'm heading over there to link up, and then I'm going to stick the rest of the acetate back in the box and swear at it.

One layer cards

I used to find any challenge that involved a one layer card, well, rather scary. There's nowhere to hide, everything has to be right first time. You can't stick an embellishment or extra layer on to cover up a blooper. And you need to be careful about what you do any colouring with - anything alcohol based will show through on the inside.

Anyhow, I have got used to them now, but I do tend to make very similar styles over and over again, so I was very pleased when my decluttering earlier this week brought up a copy of a magazine that had an article about one layer cards, with some suggestions of ways to make them.

For the first card, the idea was simply to use masking tape to create a frame before starting to stamp. Now why had I never thought of that? It makes it look as if the stamped area has been matted on to the base card, and yet it is still all one layer. I wish I had a classier looking sunshine stamp though!


I'm sharing this card with One Layer Simplicity - the Sky's The Limit

For my second card, I moved away from the traditional CAS aspect of a one layer card, to one with lots of colourful inking and stamping. It is more or less a CASE of one of the samples in the magazine, but using different inks, and different stamps, and adding a dragonfly...... oh, OK then, it's a whole new card!

To mask off the band at the bottom, I used LINED sticky notes. Lined ones mean you can be sure of getting a straight border, simply by cutting your sticky note along one of the lines and then lining up the cut line with the bottom of the card. Then I stamped the text, sponged over inks in shades of orange and mustard Then I stamped the flower silhouettes, first in one of the orange shades then in black.

After removing the sticky notes, I added a dragonfly and a greeting, and finished the dragonfly with Crystal Stickles.


I am sharing this with

Addicted to Stamps and More - Anything Goes
Butterfly (well, in my case dragonfly!) Challenge - I for Inks
Stampin Royalty  SR#132 - One Layer Card 

Wednesday 13 January 2016

A stamped and foiled flower

If you look over at my badges, you'll see one for the Foil Play design team. Well, that's not strictly accurate, as the DT was a temporary thing, but Gill, who runs the business, is an old friend, and I love her products, so I am more than happy to give Foil Play a plug every time I use them.

Magazines, websites and TV shows all tell us that foiling is going to be BIG NEWS this year, and foiling machines are popping up all over the place, but with the foils from Foil Play, you don't need any special gadgets, just the foils, something sticky and your fingers. Which means they aren't just a lot cheaper, but they are very safe to use - my granddaughter's been using them confidently since just after her 4th birthday.

The "Something sticky" can be all kinds of things - glue pen, Tonertex pen, double sided tape, double sided peel off stickers, die cut sheets of a double sided adhesive such as Stick-It, sticky embossing powder..... so far the only thing I've not had much success with is an adhesive "ink" pad. But today I decided to see if it would work with conventional heat embossing.

I stamped and embossed a flower and sentiment on a snippet of black card using Uniko's Flower Power set, with gold ink and gold embossing powder. Then I IMMEDIATELY pressed the gold foil over the embossing and rubbed it (using a couple of tissues to protect my fingers as it was very hot).

Because the embossing cools quite quickly and the foil would only stick while it was hot, the foil only partly covered the original image - which is why I'd used gold ink and powder - giving gorgeous gleaming highlights to the image, sadly not really visible in the photo despite me having tried shots at every angle imaginable. It looks particularly good on the words, in real life.

I mounted the finished piece on a snippet of gold mirri and added it to my card, with a couple of peel off borders to set it off.


I'm popping in to the Snippets Playground with this, and  also sharing at Sweet Stamping - Flowers   and Just Us Girls - Metal/Metallics

RECIPE: Asian style semi-pickled salad

This salad doesn't pretend to be any kind of authentic dish,  but it DOES make a very tasty accompaniment to hot, spicy Asian food. Here's how it came about:

Yesterday I was cooking a Korean style beef dish for a product review, which you may see later in the week. I was trying to decide what to serve with it, and thought about all the side dishes we've been served in Korean restaurants (not that I've ever visited Korea, or even eaten in one in the UK, but I've been to several in Hong Kong and in the USA, and they always bring a huge selection of sides). The main attraction is a fermented, pickled cabbage called Kimchee or Kimchi, and in fact a lot of people refer to ALL the side dishes as such, because the cabbage is such an important feature.

However we're not big fans of it, or of sauerkraut. In fact Mark won't even eat good old pickled red cabbage. So I thought I'd try to create a side salad that made use of some of the other vegetable sides - radish, carrot and cucumber -  we've been served in the past, but lightly "pickled" in lime juice.


To make this, you WILL need to use a food processor. Finely grating all that veg will destroy your soul, and your knuckles, and who wants drops of blood in their salad?

Ingredients, to serve two

100g each of radishes, carrots and cucumber
juice of 1 large lime
1 baby gem lettuce
1 tsp sesame seeds
1 tbs salted peanuts
2 spring onions, sliced.

Toast the sesame seeds in a dry non-stick frying pan and set aside to cool

Top and tail the carrots and radishes, if necessary. Use the fine grater on a food processor to grate the carrots, radishes and cucumber. Mix together, stir in the lime juice and leave for 10 minutes.

To serve, shred the lettuce and scatter over a serving plate. Spoon the pickled mixture over this and sprinkle the sesame seeds, spring onions and peanuts over the top.

Serve as a cooling side dish to almost anything hot and spicy.


It's very easy to eat lots and lots of veg when it's so finely grated, which makes it a great way of boosting your 5 a day, so I'm sharing this with Extra Veg at Fuss Free Flavours and Utterly Scrummy.
Extra Veg Blogging challenge badge

And also with Tasty Tuesdays at Honest Mum