This week's challenge at CD Sundays is "Quite Simply - Hats"
Well, I didn't have anything with JUST hats on it, but I have a CD called "Victorian Ladies" - which I won in a blog challenge, I think it was on the CD Sundays blog - where hats are a major feature of the outfits in several of the images. The CD doesn't have a brand name, but the copyright belongs to a company called JVA which I'm not familiar with. The combination of images and backgrounds is rather "Joanna Sheen-ish" so I decided to do something "rather Joanna Sheen-ish" with the image. But instead of using the whole design for decoupage, I used just the hat, inorder to emphasise it.
Incidentally that's my first-ever coiled paper rose, and it will probably be my last! I half-cheated and used a sheet of die cuts I bought in a sale, and had to turn the house upside down looking for my quilling tool, which I'd last seen when I lent it to my daughter almost 20 years ago. Luckily half her craft stuff is still here waiting for her to make space for it, but it's so long since I used it I was all fingers and thumbs, and as you can see I got glue everywhere. It's the kind that dries clear, but I was too impatient to take the photo so the rose has a big white blob in it!
Thursday, 11 July 2013
Shades of Grey
Sorry to disappoint you, but this is nothing to do with *that* book (have you read it by the way? I've not, but I did try to read one in the same genre and got bored after a few pages. I wonder what the ladies at the charity shop thought of it when it went there?). I do have some rubberstamps that would fit that kind of theme, thanks to the X-rated section of Viva Las Vegas stamps, but I don't think anything made with them will ever appear on here!
Anyway, things have been rather quiet on Onions and Paper for several weeks now due to my travels, which are set to continue on and off until the middle of September, so I'm not able to join in many challenges for the time being. But I've managed to squeeze in a little precious crafting time this week so here is my card for the Less is More challenge 127- Shades of Grey
The text and the flowers I overstamped it with are in Stampin' Up Basic Grey - it's my lousy photography that makes them look black! And the image is layered on to a piece of mottled grey metallic card that was part of the first kit I ever bought, about 15 years ago, and has been lying untouched ever since! I used Promarkers to colour the gems.
Anyway, things have been rather quiet on Onions and Paper for several weeks now due to my travels, which are set to continue on and off until the middle of September, so I'm not able to join in many challenges for the time being. But I've managed to squeeze in a little precious crafting time this week so here is my card for the Less is More challenge 127- Shades of Grey
Friday, 5 July 2013
It's only asparagus with a poached egg on top......
... or is it?
This month for Random Recipes over at Belleau Kitchen Dom challenged us to count 30 books along our shelves and cook from the 30th book, opening it either at a random page or page 30.
The 30th book along my top shelf turned out to be "maze - the cookbook" by Jason Atherton and I opened it at page 30 to see a photo of..... a load of empty eggshells. But the photo next to it looked reasonable enough - just asparagus with a poached egg on top.
So I turned to the recipe - asparagus with quail's eggs and pink grapefruit hollandaise. Which is how I ended up starting to cook at 7am for an 8pm meal.
Maybe in Maze they keep barrel-loads of clarified butter, pink grapefruit reduction, candied grapefruit peel and hollandaise reduction to hand, but I happened to be right out of all of those and had to make them all from scratch. Careless of me to run out, I know, but it's been a busy few weeks.
Anyway, several hours and two dishwasher loads later, I had everything ready for the main event - making the hollandaise and cooking the asparagus and poached eggs. I'd never poached quails' eggs before and hadn't realised that just a few seconds makes the difference between cooked and overcooked, so the eggs were rather overdone for Mark, but I can't cope with a yolk that's even slightly runny, so they were perfect for me. The finished dish did look gorgeous though!
I'll stop the photos here, with the sauce in the jug on the side, because when spooned on to the plate the pink lumps of grapefruit in it made it look rather like vomit - it tasted good though, although the vinegar reduction was rather strong when combined with the acid from the grapefruit. But that could have been my fault for not adding the optional sugar to the sauce.
Our overall verdict - it was delicious, and I'll make it again, but next time a much simpler version. Just asparagus with a poached egg on top and some chopped grapefruit stirred through a little bought hollandaise. The whole meal would be ready in 10 minutes.
Tuesday, 25 June 2013
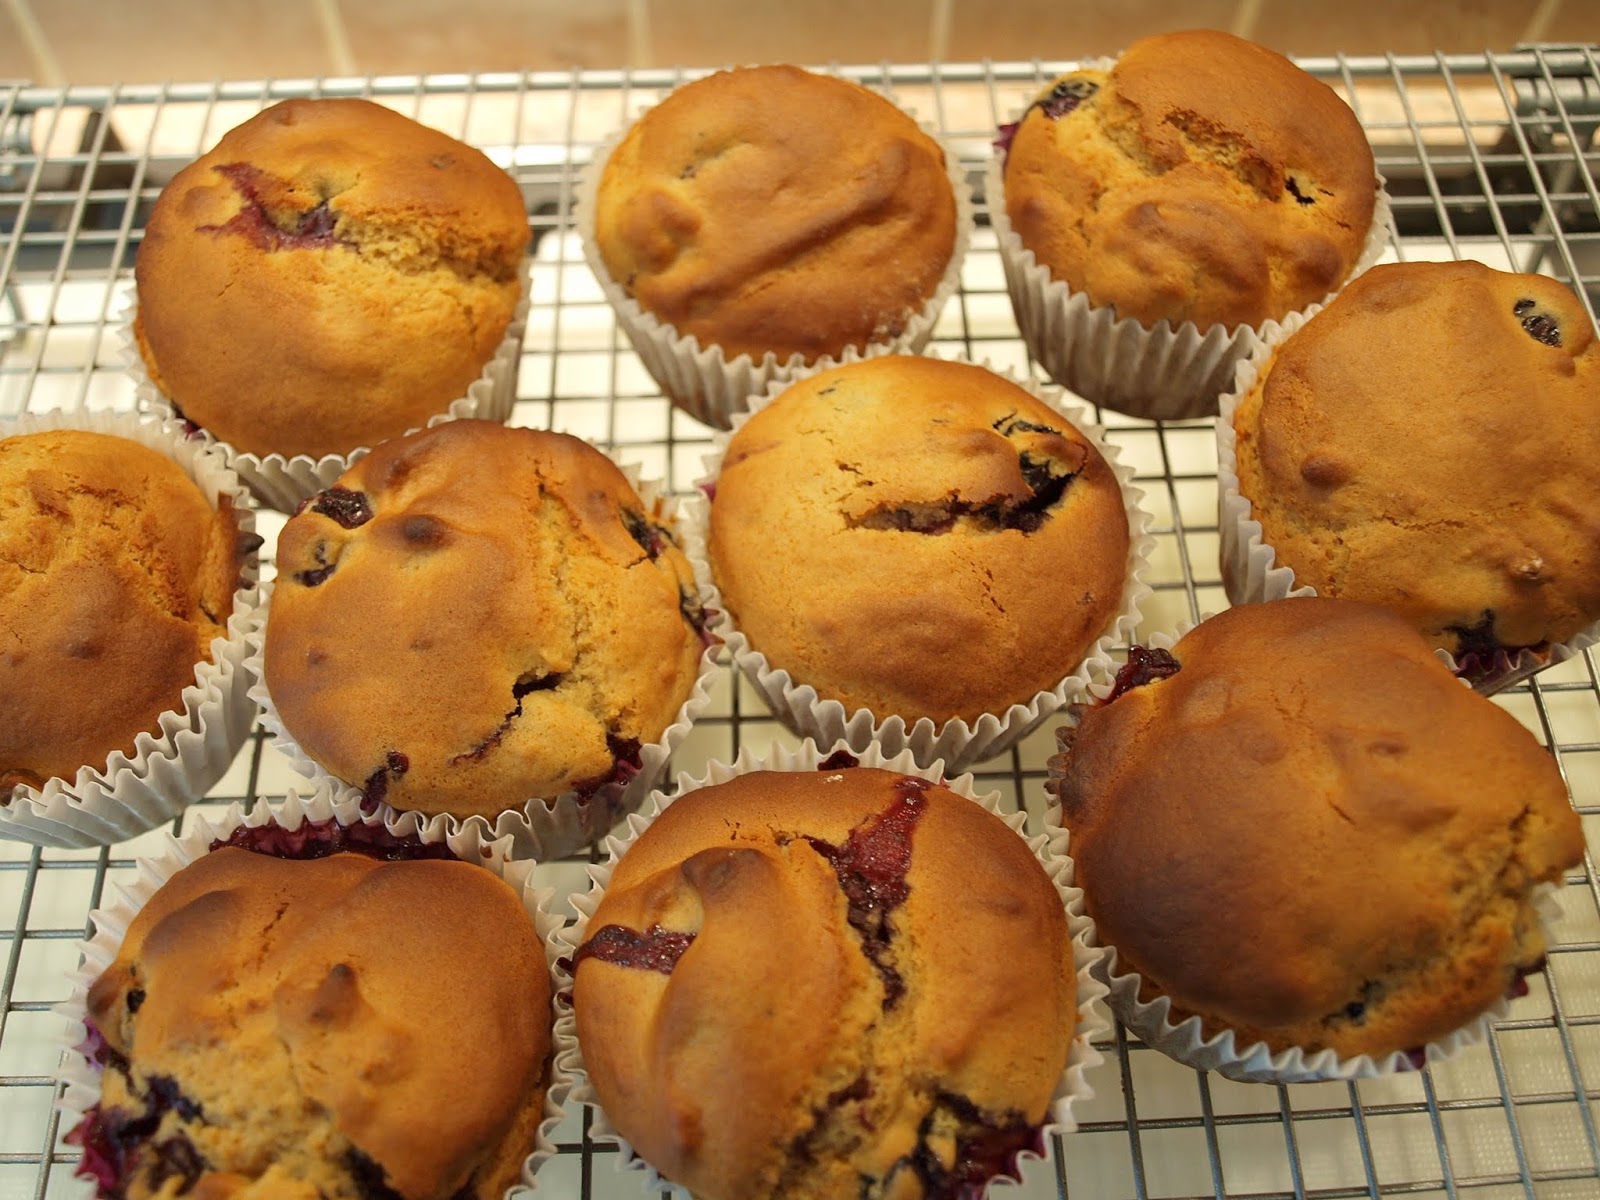
Sweet Freedom Blueberry Muffins
As you probably already know, I am diabetic so very seldom eat sweet treats. But when I DO, I usually make them with Sweet Freedom instead of sugar. Widely available in most supermarkets, it is a sweetener made from 100% fruit, with 25% fewer calories than sugar and a low GI rating which makes it much more diabetes-friendly than sugar. It comes in two varieties, dark which is intended for cooking and light which is intended for sweetening drinks and porridge, but I like to use both kinds both ways. There are lots of recipes for using it on the Sweet Freedom website.
I was sent a bottle to test - not really necessary as I'm already a big fan! - and decided to see if it would work in Blueberry Muffins. I was worried that the syrupy consistency in place of normal sugar might mean the mixture would be too sloppy and not cook through properly, but as you can see, this didn't turn out to be the case.
so, here is the recipe
250g plain flour
2 tsp baking powder
a pinch of salt
1 egg
125 ml skimmed milk
125 ml Sweet Freedom syrup
60 ml sunflower or rapeseed oil
125g fresh blueberries
This quantity should make 12, but I made 10 from it because I like having big muffins (fnarr fnarr.....).
Prepare your muffin tin by greasing it or spraying with non-stick spray (in case of spillages) and putting paper muffin cases in the holes, and pre-heat the oven to 190 degrees C.
Sieve together the flour, baking powder and salt into a large bowl. In another bowl, beat the egg then blend in the milk, Sweet Freedom and oil.
Make a well in the centre of the dry ingredients, then working quickly but gently, tip the liquid mixture into the well and fold together until just blended, then gently stir in the blueberries. Spoon into the paper cases and bake in the pre-heated oven for about 17 minutes, until risen and golden.
Try to wait for them to cool down a bit before you eat them or you'll burn your mouth on a burst blueberry (don't ask me how I know that).
I was sent a bottle to test - not really necessary as I'm already a big fan! - and decided to see if it would work in Blueberry Muffins. I was worried that the syrupy consistency in place of normal sugar might mean the mixture would be too sloppy and not cook through properly, but as you can see, this didn't turn out to be the case.
so, here is the recipe
SWEET FREEDOM BLUEBERRY MUFFINS
250g plain flour
2 tsp baking powder
a pinch of salt
1 egg
125 ml skimmed milk
125 ml Sweet Freedom syrup
60 ml sunflower or rapeseed oil
125g fresh blueberries
This quantity should make 12, but I made 10 from it because I like having big muffins (fnarr fnarr.....).
Prepare your muffin tin by greasing it or spraying with non-stick spray (in case of spillages) and putting paper muffin cases in the holes, and pre-heat the oven to 190 degrees C.
Sieve together the flour, baking powder and salt into a large bowl. In another bowl, beat the egg then blend in the milk, Sweet Freedom and oil.
Make a well in the centre of the dry ingredients, then working quickly but gently, tip the liquid mixture into the well and fold together until just blended, then gently stir in the blueberries. Spoon into the paper cases and bake in the pre-heated oven for about 17 minutes, until risen and golden.
Try to wait for them to cool down a bit before you eat them or you'll burn your mouth on a burst blueberry (don't ask me how I know that).
Thursday, 20 June 2013
Back from holiday
I've not posted for a while as I've been away on holiday, on what should have been a dream cruise along the Danube. Unfortunately the Danube experienced severe flooding a few days before our trip, yet the tour company told us the holiday would go ahead with only minor changes. This turned out to be totally incorrect - the river was impassable and after several days spent moored in Budapest while the various people in charge argued about what to do, we were sent home five days early, having not really had any holiday at all.
I'll be writing more about the trip later, once I've caught up with all the phone calls and emails that I now need to send to the company!
Jane
I'll be writing more about the trip later, once I've caught up with all the phone calls and emails that I now need to send to the company!
Jane
Wednesday, 29 May 2013
Using up the scraps
My plan to reduce the Mountain of Stash has taken a bit of a blow the last few months as my craft-shopping habit has kicked in again, but this week I've been going through my scraps box to see what I could use up. There's a lot of stuff in there - bits left over from projects and kits, odd and ends that are just "too good to thrown away", interesting bits of packaging and advertising material that looked as if they might come in useful - I'd forgotten about half of it until I tipped it all out on to the table.
I selected a handful of co-ordinating pieces, using the colours in the patterned card as a guide
And put them together to create this
But really that hadn't started to make even a dent in the pile of scraps. Then I remembered the "Serendipity" designs that were popular about 15 years ago, and thought I'd see if I can remember how they were done. First I tore up a few toning papers into rough pieces
Then I stuck them down on to a piece of card - I chose a matching colour in case any showed through. I used a wet adhesive and left it to dry before trimming the edges.
Next I stamped random swirls over with a silver pad and embossed with silver powder. The surface is very uneven at this stage, so you really need to use some kind of abstract design. Letters or a picture won't work as the patchy result would make it unclear. After embossing, I added further streaks and splodges with tow shades of glitter glue. When everything was dry, I left it to flatten overnight, under a pile of heavy books.
Finally I cut it into squares. I find the best way to do this is to mark the squares on the back and cut with heavy scissors or a guillotine. The layers of paper, card and glue make it too thick for a craft knife and a rotary trimmer could drag the torn, uneven paper edges.
I chose to make the squares about 1" (2.5cm) each, but other sizes or even shapes would produce interesting effects. Once you have your shapes, let your imagination run free! Here are two cards made with mine
Having used up so many scraps, I just had to play along with The Craft Room Challenge, because the current one is "Use Your Scraps"
And since everything I've used is old - even the technique - I'm also joining in with "Anything goes" at Use It Tuesday.
Monday, 27 May 2013
Serendipity
A few days ago, I ordered myself a new craft CD - planning ahead, I chose a double CD of Christmas designs. However the wrong one turned up - the one I received was "The Wine Buffs" by Katy Sue Designs. As soon as I saw the summary of contents on the back, I knew I had to have it, so I sorted out the payment details with the sender and dived straight in with it.
I've already blogged a couple of things I have made with it, here and here and this time I have used a cartoon and sentiment that were intended as labels for a bottle shaped card, trimming away the shaped outline to leave just the design. Many of the designs on the CD are perfect for men's cards - cards that are usually so hard to think up - so this CD is going to get a lot of use.
I'm playing along with:
Creative Craft Challenge #10 - Just Checking
CAS on Sunday #9 - Make it Masculine
Subscribe to:
Posts (Atom)
.jpg)
.jpg)

.jpg)
.jpg)
.jpg)